Page is loading ...

www.TrailFX.com
Page 1 of 5 Rev 091818
TO AVOID BEING SCRATCHED, PLEASE PROTECT THE SURFACE OF
THE FENDER FLARE CAREFULLY.
REMOVE CONTENTS FROM BOX. VERIFY ALL PARTS ARE PRESENT.
READ INSTRUCTIONS CAREFULLY BEFORE STARTING INSTALLATION.
60-180 min
support@trailfx.com
1 866 638 4870
Limited Lifetime Warranty
Cutting
Required
PLEASE USE SAFETY GLASSES & ENSURE TO BLOCK VEHICLE
MOVEMENT DURING INSTALLATION PROCESS
IMPORTANT: DO NOT OVER-TIGHTEN THE MOUNTING SCREWS.
OVER-TIGHTENING THE SCREWS WILL RESULT IN STRESS FRACTURES.
KIT INCLUDES
Qty
Part Description
Qty
Part Description
2ea.
Front Flares
2ea.
Rear Flares
2ea.
LED Marker Lights
4ea.
Wire nuts
HARDWARE KIT INCLUDES
Qty
Part Description
Qty
Part Description
28ea.
M5 x 32 machine screw
30ea.
M5 x 22 Black Phillips head machine screw
28ea.
M5 Flange nuts
30ea.
M5 flange nuts
28ea.
Screw cover & base
28ea.
Fender Washers
1 ea.
Rubber Edge Trim (20 ft.)
REQUIRED TOOLS
8mm Wrench
Pliers or Pry bar
8mm Socket Drive
Electric Drill
1mm Philips Screwdriver
Drill and 1/16 drill bit
PRIOR TO INSTALLATION
Pre-fit all panels as you proceed with the installation
Make sure kit is complete before beginning installation
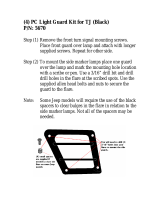
Fender Flare
PFFJ3003T / PFFJ3003S
1997 - 2006: Jeep Wrangler
Drilling
Required

www.TrailFX.com
Page 2 of 5 Rev 091818
STEP 1
REMOVE THE FRONT AND REAR FACTORY FENDER FLARES
1. Start with the rear fender flare. Remove the rear wheel well liner by prying back the Christmas tree fasteners with a pry tool
or pliers. Set liner and fasteners aside for re-installation.
2. Locate and remove the 8 factory bolts holding the factory fender flare.
3. Proceed to the front flares and disconnect the marker lights by twisting the bulb housing counter clockwise.
4. Locate and remove the 10 factory bolts holding the factory fender flare. Discard flares and hardware.
5. Remove 3 screws holding the rocker guard. Set the guard and hardware aside in a safe location as it will be reused.
6. Repeat steps 1-5 for the other side.
STEP 2
INSTALLING SUPPLIED MARKER LIGHTS IN FRONT FENDER FLARES
1. Place the marker light into the front flare light pocket. Using a drill and 1/16 drill bit two pilot holes in the flare. Fig A
2. Using 1mm Phillips head screw driver screw the marker lights to the flare with the supplied screws. Repeat for the other
front flare.
TIP: Using a piece of masking tape (not supplied) tape the leads of the LED light against the back of the flare so it
will not interrupt your installation.
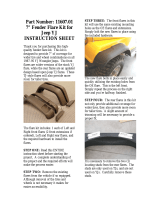
STEP 3
INSTALLING RUBBER TRIM ON NEW FENDER FLARES
1. Locate the supplied “U” shaped rubber trim. Peel back 1 “of the red lining. Starting at one end of the flare, push the trim onto
the edge of flare. NOTE: Make sure the red lining is on the inside of the flare. FIG 1 and 2
2. Continue pressing the rubber trim on to the flare in 6” increments. FIG 3
3. Peel back 6 inches of the red liner and press the trim to bond to the flare. FIG 4 Continue in this manner until you reach the
other end of the flare. When you reach the end cut the trim to length. Repeat this process for the remaining flares.
Fig A
Drill pilot holes using drill and 1/16 drill bit
Fig 1
Fig 2
Fig 3
Fig 4

www.TrailFX.com
Page 3 of 5 Rev 091818
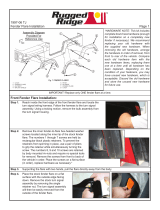
STEP 4
INSTALLING NEW TAG TRAILDRIVER FLAT FENDER FLARES
Start with the front Flares. Once both are completed proceed to the rears.
1. Hold your New TAG Flat flare against the Jeep fender. Line up the holes in the fender with the holes in the Flare. Starting at
the bottom front of the flare push an M5 x 22 screw through the hole in the flare and start a flange nut on the inside of the
fender. NOTE: Do not use a Washer on this mounting hole. Fig 1 and Fig 1b
IMPORTANT: Do not tighten any screws at this time.
2. Proceeding towards the rear of the flare Install one Flat Fender Washer and one M5 screws through the mounting hole in
the flare onto the screw from the back side of the flare. Push the screw through the hole in the fender and start a flange nut.
Fig 3
NOTE: Use the screws without the nuts in places that have a threaded insert in the Jeep body
3. Once the screws are all installed reposition the flare onto the fender for best fit. Fix any areas where the trim may be
bunched or pinched. When satisfied with the position of the flare proceed to tighten the nuts.
CAUTION: To Prevent Stress cracks in the Plastic Do Not Over Tighten Screws
4. Re-install the Wheel liner by using the factory Christmas tree fasteners removed in Step 1.1 on other side of page.
5. Repeat steps 1-4 to install the other side.
INSTALLING REAR FENDER FLARES
INSTALLING REAR FENDER FLARES by Repeating steps 1 through 5 above.
NOTE: Install the Flare marked with an L on the Driver’s side and the flare marked with an R on the Passenger side.
FINISHING THE INSTALLATION
1. Optional-Re-Attach Factory Rocker Guards to the Jeep using factory hardware previously removed in Step 1.5 on other side
of page.
NOTE: You will need to drill new mounting holes in the guards to get them to sit snugly against the new Flares. To
do so place the guard snugly against the new Flat flare and mark the guard with a white china marker where the
hole in the Jeep fender appears.

www.TrailFX.com
Page 4 of 5 Rev 091818
STEP 5
CONNECT MARKER LIGHTS
Once the flares are installed complete the installation by connecting the Turn signal wiring
1. Cut the two wires at the base of the factory turn signal light housing. Fig 1
2. Strip back the insulation and twist the factory wiring onto the wiring in the supplied marker light. Fig 2
3. Turn on the light to test if it is correctly wired. If it does not turn on reverse the wires.
4. Once the light is tested and working crimp a supplied wire connector onto each lead. Fig 3
5. Seal the connection with a small piece of heat shrink tube (not supplied).
6. NOTE: If you don’t have a heat gun, shrink the tube using a hair dryer. Fig 4
7. Repeat steps 1-5 for the other side.
Fig 2
Fig 4
Fig 1
Fig 3

www.TrailFX.com
Page 5 of 5 Rev 091818
PRODUCT CARE
1. Periodically check the product to ensure all fasteners are tight and components are intact.
2. Regular waxing is recommended to protect the finish of the product.
Check out these other TrailFX Products!! www.TrailFX.com
FAQ’s
1. Fender flares are loose after installation.
Please ensure that all required mounting brackets / hardware’s are installed & tighten correctly.
2. Missing / Excess Hardware.
Re-check hardware count as per the part list.
Keystone Automotive Operations Inc. (KAO) warrants this product to be free of defects in material and workmanship at the time of
purchase by the original retail consumer. KAO disclaims any other warranties, express or implied, including the warranty of fitness
for a particular purpose or an intended use. If the product is found to be defective, KAO may replace or repair the product at our
option, when the product is returned prepaid, with proof of purchase. Alteration to, improper installation, or misuse of this product
voids the warranty. KAO’s liability is limited to repair or replacement of products found to be defective, and specifically excludes
liability for any incidental or consequential loss or damage.
/