First
Aid
kvm-tec
ultra line
Misprints, errors and technical changes reserved
Delivery content
LOCAL/CPU Unit UVX Fiber
1 x UVX1-F Local (CPU)
1 x power cord IEC C13
1 x DP – DP cable 1, 8m/5.9ft
1 x USB A-B cable 1, 8m/5.9ft
1 x SFP+ Module-Multimode up to
300m/984ft
alternativ Single mode module up to
10km/6.2mi ItemNr 6912
4 x rubber feet
REMOTE/CON Unit
1 x UVX1-F Remote (CON)
1 x power cord IEC C13
1 x SFP+ Module-Multimode up to
300m/984ft
alternativ Single mode modul up to
10km/6,2mi ItemNr 6912
4 x rubber feet
additional Software feature for 4K Ultraline
in combination with
Swithing Manager Software or stand alone
Mouse Glide &Switch
4K Multiview Commander
4 dierent PCs can be operated and controlled on one 4K monitor
1 x UVX + 4x MX Local units
stand alone or in in combination with Switching Manager
Built In MST-HUB Splitter
allows the transmission of two dierent image contents via
one cable up to a max. resolution of 2560 x 1440
With a 4k resolution one screen content is transmitted which is
available on both outputs at the same time
2. USB from
keyboard and mouse
3. Duplex Multimode OM3-Fibercable up to 300m/984ft
RS232
UVX1-F CPU
dp in
aux
usb 2.0 dp out 1 dp out 2
audio
4k displayport 1.2 kvm-extender power/status
100-240V AC
50-60Hz 24VA
red. Power
12V 2A
1. power plug
12V 2A
Earth
connection
1. power plug
100-240 VAC
4. DP in
from PC
2. USB to PC
6. Audio
to PC
5. Audio
from PC
4. DP out
to Monitor
4. DP out
to Monitor
RS232
UVX1-F CON
auxusb 2.0 dp out 1 dp out 2
audio
4k displayport 1.2 kvm-extender power/status
100-240V AC
50-60Hz 24VA
red. Power
12V 2A
1. power plug
12V 2A
6. Audio from
Microphone
5. Audio to
speaker
1. power plug
100-240 VAC
4. DP to
Monitor
4. DP to
Monitor
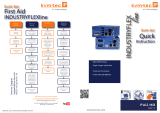
1.1. First check your delivery content....
3.3. Than check your installation....
Quick Installation 4K ULTRALINE Fiber Extender local / CPU – remote / CON
1. Connect the CON / Remote and the CPU / Local Unit with the supplied IEC power cable. Optionally, you can also use
a 12V 2A power supply.
2. Now connect the USB cable to a USB port on your PC and connect the other end of the USB cable to the CPU /
Local Unit. Connect keyboard and mouse to the CON / Remote Unit.
3. Connect the CPU / Local and the CON / Remote Unit with a ber cable.
4. Connect the DP cable in the DP socket of the PC to the DP socket DP / in of the local device and connect the screen
on the remote side with the DP cable. Optionally, connect the DP cable from the Local DP / out to the monitor.
5. Then connect PC audio/out with the audio cable to Local audio/in. Then connect audio/out via the audio cable
6. Almost done! Now connect the audio cable Local audio/out to the PC audio/in and Remote audio/out with the audio
cable to the microphone.
HAVE FUN - your kvm-tec Extender is now in use for many years (MTBF approx 10 years)