master Easy kvm-tec Installation guide

Category
KVM switches
Type
Installation guide
Misprints, errors and technical changes reserved
kvm-tec
First Aid
masterEASY
Video error
(stripes in the
picture)
USB is not
working
No Power
(No LED)
Check the
powerplug
Is the power
supply ok? Try
another Unit.
Contact kvm-tec
support
Are the USB
Devices plugged
in correctly?
Is the USB cable
on the Local side
plugged into the
PC?
Are the USB
Devices working
directly on the
PC?
Check if local
and remote Unit
have the same
rmware
Replace the USB
cable from PC to
the Local
Extender
Check if the local
or the remote
Unit is causing
the problem by
swaping  rst the
local and than the
remote Unit to
another Unit
Contact kvm-tec
support
Check if all
cables are plug-
ged in correctly
Check if the PC is
sending a Image by
plugging in a
monitor on the
local out of the
local Unit
Check if the DDC is
set correctly (in menu
under point „O“)
Check if both
Units have the
correct  rmware
No Video
Contact kvm-tec
support
Check if all
cables are plug-
ged in correctly
Check if the PC is
sending a Image
by plugging in a
monitor on the
local out of the
local Unit
Check if local and re-
mote Unit have the
correct  rmware
Check if the DDC
is set correctly (in
the menu under
point „o“)
Check if the
network switch
is setup correctly
and has enough
bandwidth
Contact kvm-tec
support
Check if other units
have the same
behaviour
We are here for you to answer
your questions about installation?
Manual download www.kvm-tec.com
or
kvm-tec Installationchannel on our homepage
personally +43 2253 81912
kvm-tec Support
kvm-tec Support
Phone: +43 2253 81912 - 30
master
Easy
FULL HD - KVM EXTENDER OVER IP
Tune in the easy KVM World
Check out
our Installation Channel:
Quick
Instructions
Tune in the easy KVM World
Instructions
masterEASY
Single in copper
Art Nr KT - 8112
www.kvm-tec.com
V102022
Misprints, errors and technical changes reserved
Power plug
1V 1A
Power plug
12V 1A
USB to PC
DVI in
from PC
DVI to Monitor
USB from
Keyboard and mouse
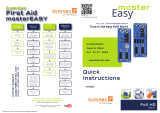
Quick Installation masterEASY Single local / CPU – remote / CON
1. Connect the CON / Remote and the CPU / Local Unit to the included 12V 1A power supply.
2. Now connect the USB cable to a USB port on your PC and connect the other end of the USB cable to the CPU / Local Unit.
Connect keyboard and mouse to the CON / Remote Unit.
3. Connect the CPU / Local and the CON / Remote Unit with a network cable.
4. Now connect the DVI cable to the DVI socket of the PC and the other end to the DVI socket of the CPU Local Unit (PC-in).
5. Opt: Connect PC audio/out with the audio cable to local audio/in. Connect audio/out via the audio cable
6. Almost done! Opt: Connect the audio cable local audio/out to the PC audio/in and remote audio/out with audio cable to
the microphone
7. If you are using a switch: Connect all endpoints to the switch. Ensure that all connections have a bandwith of 1Gbit/sec. For
video sharing the network has to support IGMP snooping (Switch Layer 3)
HAVE FUN - your kvm-tec Extender is now in use for many years (MTBF approx 10 years)
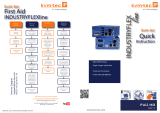
Network cable CAT5e/6/7/ up to 150m/492ft (redundant)
DVI out
to Monitor
Network cable CAT5e/6/7/ up to 150m/492ft - main link
Audio from PC
Audio to PC
Audio to
speaker
Audio from
microfone
Power plug
12V 1A (redundant)
Power plug
12V 1A (redundant)
Öpen OSD menu
Öpen OSD menu
The OSD main menu is opened with the
standard shortcut: 5 x ALT Gr
(Attention: the  rst 20 seconds 5 x Scroll
always works, in case the shortcut was
forgotten.)
forgotten.)
Switching list
Switching list
: CTRL+ALT+PRINT
: CTRL+ALT+PRINT
Changing the shortcuts
in the OSD menu
in the OSD menu
Go to the Remote Settings and then navi-
gate to Keyboard Shortcut.
Delivery Content
Delivery Content
LOCAL/CPU Unit
LOCAL/CPU Unit
1 x ME1 local (CPU)
1 x ME1 local (CPU)
1 x wall power supply 12V 1A INT or (EU-plug)
2 x DVI - DVI cable 1,8m/5,9ft
1 x VGA -DVI cable 1,8m/5,9ft opt
2 x Audio cable 1,8m/5,9ft opt
1 x USB cable 1,8m/5,9 ft
4 x rubber feets
4 x rubber feets
REMOTE/CON Unit
REMOTE/CON Unit
1 x ME1 remote (CON)
1 x wall power supply 12V 1A (EU-plug)
4 x rubber feets
4 x rubber feets
Misprints, errors and technical changes reserved
ACCESS TO MAIN MENU
Use the monitor and the keyboard to access the main menu
Access to the main menu.
1. make sure the extenders, monitors, and computers are turned on.
2.Press the Scroll Lock button ve times quickly. The main menu and an overview of the
submenus are displayed.
3.To enter a submenu, press the corresponding key.
Main meu Short Cuts :
S Status Overview Menu Status / current Status
U Update Flash FW Firmware update
F Features Overview Settings Features
D DDC Option DDC Option Fix
L Local Settings Settings Local
R Remote Settings Settings Remote
A About Overview Exit
Key „Esc“
DISPLAYING THE FIRMWARE VERSION
Make sure that the main menu is open. Under „A“ - About the currently installed rmware
version of the remote (CON) and local (CPU) extender is displayed.
FEATURES
Press the F key to enter the Features menu.
Switching mode is set by default
Misprints, errors and technical changes reserved
FRONTBRIDGING
HARDWARE: 1 X DUAL LOCAL + 2 X SINGLE REMOTE
The „Status Menu“ displays the current status of the extender connection. The menu shows the
information about the connection, the resolution of the video channel and the USB status.
The link status shows if a connection is possible. Connected shows if the kvm  les can currently
be transferred.
Video and USB show if data is currently being transferred
Single
Single
BACKBRIDGING
HARDWARE: 1 X DUAL LOCAL + 2 X SINGLE REMOTE
The „Status Menu“ displays the current status of the extender connection. The menu shows the
information about the connection, the resolution of the video channel and the USB status.
The link status shows if a connection is possible. Connected shows if the kvm  les can currently
be transferred.
Video and USB show if data is currently being transferred
KVM-TEC
Gewerbepark
Mitterfeld 1 A
2523 Tattendorf
Austria
www.kvm-tec.com
IHSE USA LLC
1 Corp.Dr.Suite
Cranburry NJ 08512
USA
www.ihseusa.com
IHSE GMBH Asia
158Kallang
Way,#07-13A
349245 Singapore
www.ihse.com
IHSE China Co.,Ltd
Room 814
Building 3, Kezhu Road
Guangzhou PRC
www.ihse.com.cn
IHSE GmbH
Benzstr.1
88094 Oberteuringen
Germany
www.ihse.com
KVM-TEC ASIA
p +9173573 20204
KVM-TEC CHINA
- P + 86 1360 122 8145
www.kvm-tec.com
  • Page 1 1
  • Page 2 2
  • Page 3 3
  • Page 4 4

master Easy kvm-tec Installation guide

Category
KVM switches
Type
Installation guide

Ask a question and I''ll find the answer in the document

Finding information in a document is now easier with AI