KVM-TEC 6701L Classic 48 Full HD KVM Extender over IP User guide

Type
User guide

The KVM-TEC kvm-tec 6701L Classic 48 Full HD KVM Extender over IP allows users to control multiple computers from a single keyboard, mouse, and monitor setup over a standard IP network. With a maximum resolution of 1920x1200 at 60Hz and support for DVI, USB 2.0, and audio signals, the extender delivers high-quality video and peripheral connectivity. Additionally, the extender features low latency, making it suitable for gaming and other applications that require fast response times. It also supports multiple user access, enabling collaboration and remote management of multiple computers.

The KVM-TEC kvm-tec 6701L Classic 48 Full HD KVM Extender over IP allows users to control multiple computers from a single keyboard, mouse, and monitor setup over a standard IP network. With a maximum resolution of 1920x1200 at 60Hz and support for DVI, USB 2.0, and audio signals, the extender delivers high-quality video and peripheral connectivity. Additionally, the extender features low latency, making it suitable for gaming and other applications that require fast response times. It also supports multiple user access, enabling collaboration and remote management of multiple computers.

Misprints, errors and technical changes reserved
Check out
our Installation
Channel:
www.kvm-tec.com
6701 SET Masterline
MVX in Copper
6701L CPU/LOCAL
6701R CON/REMOTE
6702 SET Masterline
MVX1 in Fiber
6801L CPU/LOCAL
6801R CON/REMOTE
CHECK YOUR EXTENDER
line
master
kvm-tec
First
Aid
First
Aid
kvm-tec
line
master
Misprints, errors and technical changes reserved Misprints, errors and technical changes reserved
Delivery content
LOCAL/CPU Unit MVX1
1 x MVX 1 local (CPU)
1 x wall power supply unit l 12V 2A
(EU-plug or INT plug)
1 x DVI - DVI cable 1,8m/5.9ft
1 x USB cable 1,8m/5.9ft
1 x VGA-DVI cable 1,8m/5.9ft (opt)
2 x Audio cable 1,8m /5.9ft (opt)
4 x rubber feet
REMOTE/CON Unit
1 x MVX1 remote (CON)
1 x wall power supply unit l 12V 2A
(EU-plug or INT. plug)
4 x rubber feet
for your FIBER Extender
2 x SFP Module-Multimode up to
500m/1640 ft.
alternativ with Single-Mode up to 20km/
12mi- ItemNr6831
possible upgrades for MASTERLINE
USB Memory
Analog VGA- transmitted as DVI (included in US)
Sound analog in both directions as CD quality
Matrix Switching System up to 48 endpoints ( included in US )
1. Power plug
12V 2A
6 5
4
7
89
10
1 2 3
MVX2
digital kvm-extender power/status
11
power/status
4. DVI in
from PC
2. USB to PC
4. DVI out
to Monitor
5. Audio
from PC
6. Audio to PC
2. USB from
Keyboard and mouse
6. Audio from
Microphone
5. Audio to
Speaker
3. Network cable CAT5e/6/7 up to 150m/492ft
Quick Installation MVX1 Masterline local / CPU – remote/ CON
1. Connect the CON / Remote and the CPU / Local Unit to the included 12V 2A power supply.
2. Now connect the USB cable to a USB port on your PC and connect the other end of the USB cable to the CPU / Local Unit.
Connect keyboard and mouse to the CON / Remote Unit.
3. Connect the CPU / Local and the CON / Remote Unit with a network cable.
4. Now connect the DVI cable to the DVI socket of the PC and the other end to the DVI socket of the CPU / Local Unit (DVI-in).
Then connect the monitor to the CON / Remote Unit with a DVI cable.
5. Then connect PC audio out with the audio cable to Local Audio in. Then connect audio / out via the audio cable
6. Almost done! Now connect the audio cable Local Audio / out to the PC Audio in and Remote Audio / out with the audio cable
to the microphone.
HAVE FUN - your kvm-tec Extender is now in use for many years (MTBF approx 10 years)
1. Power plug
12V 2A
4. DVI out to Monitor
1.1. First check your delivery content for MVX1....
2.2. Are your upgrades for
MASTERLINE unlocked
3.3. Than check your installation....
to unlock upgrades, please send an email or give us a
calll. Please have your ID code ready.( you nde your ID
in the OSD menu by pressing the button „M“ - Device ID
You´ll get a code from our support team.
Please, enter the code
First
Aid
kvm-tec
line
master
Misprints, errors and technical changes reserved
Delivery content
LOCAL/CPU Unit MVX1-F
1 x MVX1-F local (CPU)
1 x wall power supply unit l 12V 2A (EU-
plug or INT. plug)
1 x DVI - DVI cable 1,8m/5.9ft
1 x USB cable 1, 8m/5.9 ft.
1 x VGA - DVI cable 1, 8m/5.9 ft. (opt)
2 x Audio cable 1, 8m/5.9 ft. (opt)
1 x SFP Module-Multimode up to
500m/1640 ft.
alternativ with Single-Mode up to 20km/
12mi- ItemNr6831
4 x rubber feet
REMOTE/CON Unit
1 x MVX1-F remote (CON)
1 x wall power supply unit 12V 2A
(EU-plug or INT. plug)
4 x rubber feet
1 x SFP Module Multimode up to
500m/1640 ft.
alternativ with Single-Mode up to 20km/
12mi ItemNr6831
to unlock upgrades, please send an email or give us a
calll. Please have your ID code ready.( you nde your ID
in the OSD menu by pressing the button „M“ - Device ID
You´ll get a code from our support team.
Please, enter the code.
possible upgrades for
MASTERTLINE MVX1 -F
USB Memory
Analog VGA- transmitted as DVI (included in US)
Sound analog in both directions as CD quality
Matrix Switching System up to 48 endpoints ( included in US )
1. Power plug
12V 2A
fibre
4. DVI in
from PC
2. USB to PC
4. DVI out
to Monitor
5. Audio
from PC
6. Audio to PC
fibre
2. USB from
Keyboard and mouse
6. Audio from
Microphone
5. Audio to
Speaker
1. Power plug
12V 2A
4. DVI out to Monitor
3. Multimode OM3-Fiber cable up to 500m/1640 ft
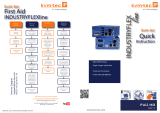
Quick Installation MVX1-F FIBER MASTERLINE local / CPU – remote/ CON
1. Connect the CON / Remote and the CPU / Local Unit to the included 12V 2A power supply.
2. Now connect the USB cable to a USB port on your PC and connect the other end of the USB cable to the CPU /
Local Unit. Connect keyboard and mouse to the CON / Remote Unit.
3. Connect the CPU / Local and the CON / Remote Unit with a ber cable.
4. Now connect the DVI cable to the DVI socket of the PC and the other end to the DVI socket of the CPU / Local Unit
(DVI-in). Then connect the monitor to the CON / Remote Unit with a DVI cable.
5. Then connect PC audio out with the audio cable to Local Audio in. Then connect audio / out via the audio cable
6. Almost done! Now connect the audio cable Local Audio / out to the PC Audio in and Remote Audio / out with the
audio cable to the microphone
HAVE FUN - your kvm-tec Extender is now in use for many years ( MTBF approx 10 years)
1.1. First check your delivery content MVX1-F....
2.2. Are your upgrades for
MASTERLINE unlocked
3.3. Than check your installation....
First
Aid
kvm-tec
line
master
Misprints, errors and technical changes reserved Misprints, errors and technical changes reserved
4.4. Check the LEDS to get more information....
Error Cause Solution
LED is not
lighting
The devices get no power Is the power supply connected? (white box)
LED is lighting
in red
No connection between
Loc and Rem
Check if the RJ45/network cable is connected well. (Clicking noise when
plugging in)
Control both, if it does not work please send an e-mail to support@kvm-
tec.com
LED is lighting
in orange
No picture on the monitor Check if the local/CPU (PC) cable is connected well.
Check if the remote/CON (monitor) cable is connected well.
If everything is connected well but no function appears, reconnect
power supply again.
If the menu is visible, press the O key and choose the resolution of the
monitor. Then press the assigned number on your keyboard.
LED is lighting
green
Screen occurs but the
keyboard is not working
Plug out/in USB of keyboard and wait until driver is installed (after few
seconds).
Check all USB connections on both sides (Local and Remote)
If it is still not working, plug out/in DC once more
LED is lighting
green
No audio Establish audio connection:
plug stereo-jack to the audio output of the PC (green) connection with
local: IN
remote: headset OUT
Establish microphone connection:
plug stereo-jack to the microphone input of the PC (pink)
connection with local OUT
LED is lighting
green
The screen ickers, has
an incorrect display
Install current rmware from our homepage www.kvm-tec.com/
support/rmware-download
LED is blinking
green
Different rmware or
USB is not compatible
LED are
lighting
differently
Different rmware To enter on screen menu/check rmware version:
To enter the On screen menu, press the Scroll Lock key ve times in
quick succession. The currently installed rmware version is displayed
below the menu
If rmware update does not work, please send an e-mail to support@
kvm-tec.com
First
Aid
kvm-tec
line
master
Misprints, errors and technical changes reserved
5.5. Your Extender....
Video error
(stripes in the
picture)
USB is not
working
No Power
(No LED)
Check the
powerplug
Is the power
supply ok? Try
another Unit.
Try reprogramming
the Unit by using a
JTAG programmer
Contact kvm-tec
support
Are the USB
Devices plugged
in correctly?
Is the USB cable
on the Local side
plugged into the
PC?
Are the USB
Devices working
directly on the
PC?
Check if local and
remote Unit have
the same rm-
ware
Replace the USB
cable from PC to
the Local Exten-
der
Check if the local
or the remote
Unit is causing
the problem by
swaping rst the
local and than the
remote Unit to
another Unit
Contact kvm-tec
support
Check if all
cables are plug-
ged in correctly
Check if the PC is
sending a Image by
plugging in a
monitor on the
local out of the
local Unit
Check if the DDC is
set correctly (in menu
under point „O“)
Check if both
Units have the
correct rmware
No Video
Contact kvm-tec
support
Check if all
cables are plug-
ged in correctly
Check if the PC is
sending a Image
by plugging in a
monitor on the
local out of the
local Unit
Check if local and re-
mote Unit have the
correct rmware
Check if the DDC
is set correctly (in
the menu under
point „o“)
Check if the net-
work switch is
setup correctly
and has enough
bandwidth
Contact kvm-tec
support
Check if other units
have the same
behaviour
We are here for you to answer
your questions about installation?
Manual download www.kvm-tec.com
or
kvm-tec Installationchannel on our homepage
personally +43 2253 81912
kvm-tec Supportkvm-tec Support
Phone: +43 2253 81912 - 30Phone: +43 2253 81912 - 30
First
Aid
kvm-tec
line
master
Misprints, errors and technical changes reserved Misprints, errors and technical changes reserved
6.6. Check the rmware version ....
To view the rmware version
Make sure the main menu is open. The currently installed rmware version of the remote and local units are
displayed (e.g. ‘4267’) and check that you have the same rmware on both units.
Ways to update the rmware version ....
There are four ways to perform an update:
1. update via a bitmap image
2. automatic update
3. network update
how to update the rmware version ....
To perform a rmware update:
1. Make sure the main menu is open.
2. Press the N key to do a network update.
3. Press the A key to do an automatic update.
4. Press the U key to do a direct update.
5. Press the S key to do a USB Update.
Update service with kvm-tec Switching Manager....
For all our devices of the SVX and MVX series we deliver a free demo version of the kvm-tec Switching Manager Software
(Item No. 4004) for a comfortable update of all units in the switching system. For our devices of the MX and UVX series
the Switching Manager is included.
This is a comfortable update management for your switching system.
You can update all extenders at the same time. The update is performed in the background and in a second step the
units are rebooting with the new rmware.
Only a short time is needed for the second step.
ATTENTION ! Only when the bar is grey, the update is nished.
First
Aid
kvm-tec
line
master
Misprints, errors and technical changes reserved
o identify your extender
o rst check your delivery content
o are all needed upgrades are unlocked
o all cables are connected and all units are switched on
o check the LED status
o Video - check if the DDC is set correctly (in menu under point „O“ )
o USB - are all cables connected
o in case of issues check the rmware version (download for the newest rmware kvm-tec.com/support )
if everything is working ne - perfect
Tipps from our engineers for engineers
reduce the setting of your system and set up only one local and one remote at the same place
connect the monitor directly to the PC - does the monitor display an image ? (follow the mentioned steps
from above)
LED status is red or blinking - this can be a cable problem - try to get a short patchcable and to connect
the units and be sure that it´s not a cross - over cable
USB problems with mouse and keyboard - please try a different type of mouse and keyboard
Further expert tipps for issues
Adapter - our units are transmitting DVI signals. If you are using adapters try a PC with DVI signal
PC - please try another machine
If you have more sets please make a cross check and change of the units
Further steps
Please, ll out the support form
and contact our support team +43 2253 81912 - 30
7.7. Checklist ....
First
Aid
kvm-tec
line
master
Misprints, errors and technical changes reserved Misprints, errors and technical changes reserved
Support - request
If the shoe pinches, then we are there for you!
Contact Information
Company
Contact person
email
phone number
customer from
device type
Fiber copper
single
Switching Manager
Firmware & Upgrade
Firmware Nr.:
Memory Option
RS232
VGA
Sound
Switching
Other connected devices
(Switches, HUBs, Touch-
screens, Webcams,.....)
To support your case as quickly as possible
and to be able to process and track your data,
we ask you to provide us with
the following information.
After we have received your mail, a sup-
port ticket is automatically created in
our ticket system, where all informati-
on about your support case is stored.
and are traceable at any time.
This way the support team has all the infor-
mation about your system in a direct con-
versation and your advantage is that the
questions can be answered in a targeted and
faster way.
Problem description
Almost done! If you want to be even faster on the phone, the following data would be helpful:
No power
No Link
VGA problem
No connection
DOA (dead on
arrival)
Stripy screen
No Video
No USB
Mouse/ Key-
board doesn´t
work
LED Status local/CPU
LED Status remote/CON
red orange green
glowing ashing
red orange green
glowing ashing
Please send the form to [email protected].
Thank you very much! As soon as we have received your mail, it will be tracked in our system as a support case and we will
contact you immediately!
Resolution:
Fix
kvm-tec electronic gmbh
Gewerbepark Mitterfeld 1A, 2523 Tattendorf, Austria
+43 2253 81912-30 - [email protected]
copper
dual
First
Aid
kvm-tec
line
master
Misprints, errors and technical changes reserved
RMA - request
If the shoe pinches, then we are there for you!
Contact Information
Company
Contact person
email
phone number
customer from
MVX1 Fiber copper
MX48 Fiber copper
MX2000 Fiber copper
UVX Fiber copper
Switching Manager
copper SVX2
MVX2 Fiber copper
copper
Firmware & Upgrade
Firmware Nr.:
Memory Option
RS232
VGA
Sound
Switching
Other connected devices
(Switches, HUBs, Touch-
screens, Webcams,.....)
Problem description
Almost done! If you want to be even faster on the phone, the following data would be helpful:
No power
No Link
VGA problem
No connection
DOA (dead on
arrival)
Stripy screen
No Video
No USB
Mouse/ Key-
board doesn´t
work
LED Status local/CPU
LED Status remote/CON
red orange green
glowing ashing
red orange green
glowing ashing
Please send your RMA to Heidi Brosig email [email protected]
Resolution:
Fix
kvm-tec electronic gmbh
Gewerbepark Mitterfeld 1A, 2523 Tattendorf, Austria
+43 2253 81912-30 - [email protected]
copper
RMA Number
ber
copper
Product
single dual
SWITCHING MANAGER
  • Page 1 1
  • Page 2 2
  • Page 3 3
  • Page 4 4
  • Page 5 5
  • Page 6 6
  • Page 7 7
  • Page 8 8
  • Page 9 9

KVM-TEC 6701L Classic 48 Full HD KVM Extender over IP User guide

Type
User guide

The KVM-TEC kvm-tec 6701L Classic 48 Full HD KVM Extender over IP allows users to control multiple computers from a single keyboard, mouse, and monitor setup over a standard IP network. With a maximum resolution of 1920x1200 at 60Hz and support for DVI, USB 2.0, and audio signals, the extender delivers high-quality video and peripheral connectivity. Additionally, the extender features low latency, making it suitable for gaming and other applications that require fast response times. It also supports multiple user access, enabling collaboration and remote management of multiple computers.

Ask a question and I''ll find the answer in the document

Finding information in a document is now easier with AI