Vicoustic Multif User manual

Type
User manual

Vicoustic Multifuser DC3 is an acoustic panel that can be installed on walls or ceilings to enhance the acoustics of a room. It is a versatile product that can be used in a variety of applications, including home theaters, recording studios, and offices. The Multifuser DC3 is easy to install, using either VicFix Mini clips or Flexi Glue Ultra (not supplied). The panels are available in a variety of colors and finishes to match any décor.

Vicoustic Multifuser DC3 is an acoustic panel that can be installed on walls or ceilings to enhance the acoustics of a room. It is a versatile product that can be used in a variety of applications, including home theaters, recording studios, and offices. The Multifuser DC3 is easy to install, using either VicFix Mini clips or Flexi Glue Ultra (not supplied). The panels are available in a variety of colors and finishes to match any décor.

EN
Multifuser DC3
Installation Manual
EN
MATERIAL NEEDED
Included
Multifuser DC3
Measuring Tape
Not Included
Wall Plugs and Screws
Drill
Level
6mm Phillips Screwdriver
Wall Installation
This product can be installed on the wall with VicFix Mini and on the ceiling using Flexi Glue Ultra (not supplied).
Ceiling Installation
Flexi Glue Ultra
VicFix MiniSilicone Drop
EN
1A 1B
Ways of using the gauge
1C 1D
EN
2
2A 2B
Wall installation - One panel
After dening the place where you want to install the panels, start marking the
position of the Multifuser DC3 xation clips.
2
1
! This product can also be installed using Flexi Glue Ultra.
EN
3
3A
3C
3B
Wall installation - Installation up to three panels
Dene the place where you want to install the panels and x the First VicFix Mini. From there
and with the help of the gauge provided, mark the positioning of the remaining xation clips.
EN
3D
2
1
3E
2
1
EN
3F
1
3G
To install the last Multifuser DC3, use it to mark the inner side of the last xing clip.
Remove the last two panels again and use the gauge provided to ensure the clips
are aligned. Fix the last clip. You can use a bubble level to help in this procedure.
EN
3H
3I
EN
2
1
3J
2
1
3L
Install the last two panels.
EN
4
4A 4C4B
Wall Installation - Vertical Installation
Install the rst panel according to step number 2.
Follow the steps described in the following diagrams.
2
1
2
1
4D 4E
Remove the top
panel so that you can
install the bottom
panel rst.
EN
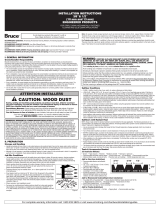
2Place the panel on the suitably chose
position on the ceilling. Once in the desired
place, press rmly against the wall for 15
seconds.
1Apply three lines of glue on the back of the
acoustic panel. Do not wait longer than 10
minutes after applying the glue to attach the
panel to the wall.
Wall and ceilling surfaces should be examined prior to installation, ensuring they are clean, smooth, and dry. If you have
unpainted gypsum board surfaces, these should be primed with a drywall primer (or another material manufactured
especially for the purpose), to equalize the absorption between the gypsum board face paper, joint compound, and skin
coating materials. You should then apply the paint, and allow air circulation in order to dry the paint within the time
frame specied by the paint manufacturer. Please ensure the paint is dry before installing the acoustic panel. Make sure
the room has all the necessary conditions to receive the acoustic panels. After you apply the glue on the back of each
acoustic panel, please ensure you hold the acoustic panel against the wall the required time (mentioned above), and
ensure it stays xed in place. This method is also applicable to ceiling installations.
!To ensure that you maximise the strength of the glue, don’t make any adjustments
to the panel after bonding
50mm
Cut the tip of the glue nozzle according to the diagram.
Ceilling Installtion
© Vicoustic, 2021 | V3
No parts of this document might be copied and/or published without written consent of Vicoustic.
Main Oce, R&D & Logistics
Avenida do Pólo 3, Nº 159, Carvalhosa
4590-137 Paços de Ferreira, Portugal
Oce
Rua Quinta do Bom Retiro Nº 16, Armazém 9
2820-690 Charneca da Caparica, Portugal
T (+351) 212 964 100
Info and Sales
E sales@vicoustic.com
www.vicoustic.com
  • Page 1 1
  • Page 2 2
  • Page 3 3
  • Page 4 4
  • Page 5 5
  • Page 6 6
  • Page 7 7
  • Page 8 8
  • Page 9 9
  • Page 10 10
  • Page 11 11
  • Page 12 12

Vicoustic Multif User manual

Type
User manual

Vicoustic Multifuser DC3 is an acoustic panel that can be installed on walls or ceilings to enhance the acoustics of a room. It is a versatile product that can be used in a variety of applications, including home theaters, recording studios, and offices. The Multifuser DC3 is easy to install, using either VicFix Mini clips or Flexi Glue Ultra (not supplied). The panels are available in a variety of colors and finishes to match any décor.

Ask a question and I''ll find the answer in the document

Finding information in a document is now easier with AI