18 19
04 05 07
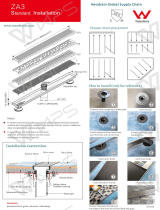
Drop the drain body firmly into
the sealant.
Turn the Fundo base upside
down and apply the rubber
and the fiber gasket.
06
Tighten the gaskets firmly to
the bases‘ steel ring using the
locking nut. Make sure the
drain body is still safely received
in the valve-bead of sealant.
Skim coat the thinset ANSI
118.4 and comb through with
a 1/4” × 1/4” notched trowel
channels pointing to the entrance.
08 10 1109
12
Trowel the thinset on the rear side of the Fundo again using a 1/4” ×
1/4” notched trowel. There are different ways to ensure good bond of
the wedi base to the subfloor. Required is a setting bed thickness of
min. 3/16“ and max. of 5/16“ (compressed). Applying thinset on both,
wedi base and subfloor, is a best practice recommended to achieve full
surface coverage adhesion. Press the wedi Fundo Ligno firmly into the
thinset bed, ensuring that the installation is level and void free. Apply
some weight equally and for at least 30 minutes (thinset bags).
Set up the rubber caulking gas-
ket (with the bevelled side up)
around the 2” pipe in the sub-
floor. The rubber gasket must
be flush with the upper end of
the 2” ABS or PVC pipe.
Do Not use any Lubricants.
14
Apply continuous 1/2” beads of sealant between all connections of panels
and install with thigthly butted seams. Excess sealant must be spread
flat with a putty knife. All seams and fastener heads in the assembly
are covered with a secondary 1/2” bead of sealant and spread fl
at. The
seams should be covered 1” on either side of seam. All fastener / washers are
covered with sealant stretching 1” over the washer
edges.
13
Push the wedi panel all the way
into the channel of the shower
base channel and its bead
of sealant. Smooth out any
pushed out sealant on inside
seam using a putty knife. Fasten
the panels directly to the studs
starting 1 ft above the base and
at a rate of 1 fastener per 1ft.
One extra fastener is set into
the seam to the next panel to
crate a flush transition.
Tighten (squeeze) the rubber
caulking gasket firmly with the
caulking nut (use a flat headed
screwdriver) and finally insert
the plastic frame and strainer
on top (without adhesive). The
frame and drain cover will be
held in a grout joint only once
tiling commences.
Set up a continuous 1/2” bead
of wedi Joint Sealant along
the pans channel on the outer
perimeter and only in areas
where you can immediately
install a building panel into the
fresh sealant.
For the installation to properly work it is critical to waterproof all
penetrations of the wedi product such as shower valves and shower
he
ads using the appropriate sealing gaskets for the application. The
wedi Mixing Valve Flexi Collar and wedi Flexi Collar (for 1/2” – 3/4”
shower pipe protrusions) are used for these applications and are
part of the wedi System complete warranty.