Page is loading ...

ELEVATION REAR BUMPER
2015-23 KAWASAKI MULE PRO-FXT
Page 1 of 4 3/16/20 (AL)
PARTS LIST:
1
Rear Bumper
4
8mm x 24mm OD x 2mm Flat Washers
1
Driver/Left Outer Mounting Bracket
2
8mm Nylon Lock Nuts
1
Passenger/Right Outer Mounting Bracket
2
6mm x 25mm Hex Bolts
2
Inner Mounting Brackets
4
6mm x 18mm OD x 1.6mm Flat Washers
8
10mm x 30mm Hex Bolts
2
6mm Nylon Lock Nuts
16
10mm x 30mm OD x 2.5mm Flat Washers
4
5mm x 20mm Hex Bolts
8
10mm Nylon Lock Nuts
8
5mm x 10mm OD x 1mm Flat Washers
2
8mm x 25mm Hex Bolts
4
5mm Lock Washers
4
8mm x 25mm Self Tapping Bolts
4
5mm Hex Nuts
PROCEDURE:
REMOVE CONTENTS FROM BOX. VERIFY ALL PARTS ARE PRESENT. READ INSTRUCTIONS
CAREFULLY BEFORE STARTING INSTALLATION. BUMPER IS HEAVY, ASSISTANCE IS HIGHLY
RECOMMENDED TO AVOID POSSIBLE INJURY OR DAMAGE TO THE VEHICLE.
1. Start at the rear of the vehicle. Unplug and remove the rear brake lights from the bottom of the bed.
2. Move to the Passenger/Right rear of the vehicle. Locate the mounting holes located above the rear tire
in the bottom of the bed, (Figure 1).
3. Select the Passenger/Right Outer Mounting Bracket. Attach the Bracket to the bottom of the bed with
(2) 8mm Self Tapping Bolts, (Figures 2 & 3). Do not fully tighten hardware at this time. Repeat this
Step to attach the Driver/Left Outer Mounting Bracket to the bottom of the bed.
4. Move to the rear of the vehicle. Locate the holes in the bottom trim of the bed, (Figure 4).
5. Select (1) Inner Mounting Bracket. Attach the Bracket to the Passenger/Right side of the bottom bed
trim with (1) 8mm Hex Bolt, (2) 8mm Flat Washers, (1) 8mm Nylon Lock Nut for the large hole and (1)
6mm Hex Bolt, (2) 6mm Flat Washers and (1) 6mm Nylon Lock Nut for the smaller hole,
(Figures 5 & 6). Do not tighten hardware at this time. Repeat this Step to attach (1) Inner Mounting
Bracket to the Driver/Left side of the vehicle.
6. Select the Elevation Rear Bumper. Remove the factory brake lights from the OE light housing bracket.
Locate the Passenger/Right light mounting location, (Figure 7). Attach the brake light to the mounting
location with (2) 5mm Hex Bolts, (4) 5mm Flat Washers, (2) 5mm Lock Washers and (2) 5mm Hex
Nuts, (Figure 8). IMPORTANT: Do not over tighten bolts or damage to the light may result.
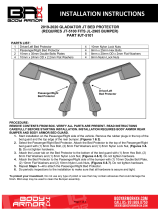
Passenger/Right
Outer Mounting
Bracket
(2) Inner
Mounting
Brackets
Driver/Left
Outer Mounting
Bracket

ELEVATION REAR BUMPER
2015-23 KAWASAKI MULE PRO-FXT
Page 2 of 4 3/16/20 (AL)
7. With assistance, line the Bumper up to the slots in the Mounting Brackets. Using block or jack stands,
temporarily support the weight of the Bumper. WARNING: To avoid possible injury or damage to the
vehicle, do not proceed until the Bumper is fully and safely supported.
8. Attach the Passenger/Right side of the Bumper to the Outer Mounting Bracket with (2) 10mm Hex
Bolts, (4) 10mm Flat Washers and (2) 10mm Nylon Lock Nuts, (Figures 9 & 10). Do not tighten
hardware at this time. Repeat this Step to attach the Bumper to the Driver/Left Outer Mounting Bracket.
9. Attach the Bumper to the (2) Inner Mounting Brackets with (4) 10mm Hex Bolts, (8) 10mm Flat
Washers and (4) 10mm Nylon Lock Nuts, (Figures 11 &12). Do not tighten hardware at this time.
10. Level and adjust the bumper and tighten all hardware.
11. Do periodic inspections to the installation to make sure that all hardware is secure and tight.
To protect your investment, Do not use any type of polish or wax that may contain abrasives that could damage the
finish. Mild soap may be used to clean the Rear Bumper assembly.
Passenger/Right Side Installation Pictured
(Fig 2) Attach the Passenger/Right Outer
Mounting Bracket to the bottom of the bed
(Fig 1) Locate the Passenger/Right
mounting location under the bed
(2) 8mm Self Tapping Bolts
(Fig 3) Passenger/Right Outer Mounting
Bracket attached to the bottom of the bed
Rear
Rear
Rear

ELEVATION REAR BUMPER
2015-23 KAWASAKI MULE PRO-FXT
Page 3 of 4 3/16/20 (AL)
Passenger/Right Side Installation Pictured
(Fig 5) Attach (1) Inner Mounting
Bracket to the Passenger/Right location
(Fig 4) Passenger/Right inner
mounting location
(Fig 6) Inner Mounting Brackets
attached to the rear of the bed
Rear
Rear
For outer hole:
8mm Hex Bolt
(2) 8mm Flat Washers
8mm Nylon Lock Nut
(Fig 7) Passenger/Right rear
light mounting location
Rear
To mount brake light:
(2) 5mm Hex Bolts
(4) 5mm Flat Washers
(2) 5mm Lock Washers
(2) 5mm Hex Nuts
For outer hole:
6mm Hex Bolt
(2) 6mm Flat Washers
6mm Nylon Lock Nut

ELEVATION REAR BUMPER
2015-23 KAWASAKI MULE PRO-FXT
Page 4 of 4 3/16/20 (AL)
Passenger/Right Side Installation Pictured
(Fig 9) Attach the Bumper to the
Passenger/Right Outer Mounting Bracket
(2) 10mm Hex Bolts
(4) 10mm Flat Washers
(2) 10mm Nylon Lock Nuts
Rear
(Fig 8) Rear light attached to the
Passenger/Right mounting location
(Fig 10) Bumper attached to the
Passenger/Right Outer Mounting Bracket
(2) 10mm Hex Bolts
(4) 10mm Flat Washers
(2) 10mm Nylon Lock Nuts
(Fig 11) Attach the Bumper to the
Passenger/Right Inner Mounting Bracket
(Fig 12) Bumper attached to the
Passenger/Right Inner Mounting Bracket
Rear
Rear
Rear
/