Page is loading ...

INSTALLATION GUIDE FOR THE MULE™ 3000 OPERATOR ENCLOSURE
1
INSTALLATION OF THE OPERATOR
E
NCLOSURE FOR THE MULE™ 3000
J
ULY ‘07
www.essexmfg.com PO Box 92864 Southlake, TX 76092 Ph:888-643-7739

INSTALLATION GUIDE FOR THE MULE™ 3000 OPERATOR ENCLOSURE
2
PREPARATION
The passenger side grab handle and mounting brackets-
must be removed for the cab to install. They can be
sawed or ground off.
Loosen the roll cage for cab installation by loosening the
three frame bolts on each side of the rear rollbar at the floor-
boards and loosen the 5 bolts on each bedrail. Position the
bed-sides as far back as they will adjust and retighten. This
will allow you to maximize the clearance between the cab
and the bed.
[Fig 2] Replace the hex head bolt on the front of the bed with
a pan head carriage bolt provided in the bolt kit. Note: DO
NOT TIGHTEN THE ROLL CAGE UNTIL ENTIRE CAB IN-
STALLATION IS COMPLETE!
The enclosure is shipped with all trim and doors preassembled. All hardware is included. The fasteners for the body
panel are 10mm serrated flange nuts and 6mm bolts. Use the black washers provided under the heads of the exter-
nal bolts. The front Quarter panels are fastened with self-tapping Tek screws on each side. 5/16” carriage bolts se-
cure the floorboards. You will need the following tools to complete the installation:
• Metric Sockets, 10, 12 & 14mm, SAE 3/8, 7/16, 1/2 & 9/16
• #3 Phillips Screwdriver / 5/16” Drill Bit / Hacksaw / Angle Grinder
NOTE: Use portions of these instructions for partial cab installation.
1 USE THE LONG 8MM BOLTS and NUTS PROVIDED.
2 Remove the rear screen and seat back. Install the
8mm long bolts provided and reattach the seat back.
3 Fit the lower closeout panel into position over the four
8mm lower screen bolt. Adjust the positition for best fit
and cut out the marked sections at the bottom to fit the
gas or diesel oil details at the frame rail. Use zipties to
secure the panel to the lower and upper cross tubes of
the Mule as shown. There are pairs of holes in the
panel; start the ziptie through the top hole from inside
the cab and feed it back thru the lower hole. Do not
tighten the ties until all of them are started and the
panel has been adjusted for best fit.
REAR FABRIC PANEL
FLOORBOARDS & MOUNTING BRACKETS
Position the left and right treadplate floorboards. The notch
should be located around the front wheel well member. Re-
move the bolt from the rubber boot and use it to secure the
floorboard. Drill two 5/16” holes thru the square holes in the
boards into the floor for the left & right sides. Install carriage
bolts and tighten. If planned, install the heavy duty battery at
this time before the rear quarter panels are installed.
[Fig 2] Loosen the 19mm rollbar bolts to provide a gap for
the front quarter panel brace and the lower windshield brace
to fit alongside the frame.
[Fig 3] Remove the two screws on each front wheel well and
install the left & right side mounting brackets.
Fig. 1.
Fig. 2.
Fig. 3.

INSTALLATION GUIDE FOR THE MULE™ 3000 OPERATOR ENCLOSURE
3
REAR QUARTER PANELS
1 Install the 1x2" angle brackets on the floorboard us-
ing 6mm bolts. Don’t tighten until later. Repeat for
the other side
2 [Fig 2] Set the rear qtr panel on the floorboard and
against the rear cage. Use an 8mm bolt from the
rear screen to fasten the door post tab to the floor-
board on each side. Fasten the panel to the angle
bracket with a 6mm bolt.
3 [Fig 3] Line up the holes in the rear quarter panels
and roof and loosely
install 6mm bolts.
4 Leave the nuts loose until adjustments are made for
the door opening
STEEL HARDTOP
1 [Fig 1] Attach the visor to the roof using six 6mm
bolts. Install the top bolts on each side first, then ro-
tate to a 45 degree position for the others. Use the
black washers under the outside bolt heads.
2 Place the rectangular black gasket over the air intake
before you install the roof. Set the roof in place in-
side the rear window panel Locate the roof as far for-
ward as it will fit. Tighten the rear screen first and
then the seat back.
REAR WINDOW
1 The rear window fits on the outside of the roof
and on the outside of the rear quarter panels.
Foam gasket is preinstalled on the top and
sides of the window.
2 Install the window panel against the bolt tabs
and secure each 8mm bolt with a washer and
two 8mm nuts provided. Adjust the first nut so
that the sliding window operates smoothly and
’lock it with the 2nd nut.
3 [Fig 4] Install the rear screen guard and secure
it with the original 8mm nuts.
Fig. 1.
Fig. 3.
Fig. 2.
Fig. 4.

INSTALLATION GUIDE FOR THE MULE™ 3000 OPERATOR ENCLOSURE
4
WINDSHIELD AND FRONT PANELS
Inside Latch Handle Swell Latch Parts Outside Latch view
Install the "swell" latches into the aligned holes of the windshield and
lower closeout panel. [Fig 4] The pivot handle is on the inside; washer,
rubber sleeve and nut to the outside. [Fig 3] Position the lower windshield
assembly on the hood so that it fits on the rubber sleeves of the upper
corner latches and lies flush against the hood as shown.
ADJUST IT AND CENTER THE LOWER WINDSHIELD PANEL BE-
FORE DRILLING THE MOUNTING HOLES.
Drill 1/4" holes for the mounting bolts on the front side of the lower win-
dow assembly.
[Fig 5] Raise the hood and fasten it with M6 bolts and the inside squeeze
plate as shown. Drill the two rear 1/4" holes from the inside and install
M6 bolts. [Fig 6] Pull the gasket tight and fold it around the lower edge of
the hood. [Fig 7] Install the plastic clip to secure it as shown.
Adjust the swell latches for smooth closure by tightening, or loosening
the nut on the front side. Once adjusted for proper closure, we suggest
that you secure the nut with LocTite or teflon tape to keep it from coming
loose.
Slide the upper windshield assembly with flip-up glass across the front of
the Mule behind the roll cage. [Fig 1] Once it is in position, push the top
forward against the top roll bar frame and start the 6mm bolts in the top
of the windshield to attach it to the nuts welded in the roof. Leave them
loose until the quarter panels and doors are adjusted
[Fig 2] Assemble the quarter panels to the frame by aligning the side
holes with the mounting bracket and with the hole in the side of the roof.
Install the lower closeout bracket in the rollbar bolt slot and the flange
into the seam of the corner beam.
Slide the upper windshield panel into position aligning it with the nuts in
the roof beam. Start M6 bolts to hold it in place. Seat the tongue of the
windshield panel fully into the side seams in the corner beams. Install the M6
bolts to secure the windshield to the corner beams.
Install the T handles for the upper window and adjust the nylock nuts for smooth
operation. The inside tongue fits in the track of frame.
LOWERWINDSHIELD PANEL
Fig. 1
Fig. 7
Fig. 3
Fig. 2
Fig. 6
Fig. 5
Fig. 4

INSTALLATION GUIDE FOR THE MULE™ 3000 OPERATOR ENCLOSURE
5
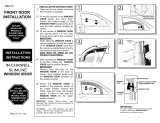
SETTING THE DOORS
• Check and tighten all fasteners and bolts including the roll cage.
• [Fig 3] Install roll cage gaskets, oval shaped holes, at the top of the windshield
on the inside.
• Install the windshield wiper (Refer to page 6)
• See page 6 for additional accessory installation.
Note: LEAVE the cab bolts LOOSE to permit adjustment of the margins for the doors.
1 [Fig 1] Install the door headers and fit the gasket to them.
2 Install the hinges on each side and leave them finger tight to permit adjustment of
the gap on the edges of the doors.
3 Install the latches in the doors and secure with the Torx head screws provided.
Leave the latch loose enough to adjust and fit to the strike.
4 [Fig 2] Set the doors on the hinges to check for height and clearance. There should
be 1/8” clearance around the door. A paint stick works well as a spacer during ad-
justment.
5 Adjust the hinges and rear post as needed. The hinge plates have adjustment range
in each direction. Adjust the rear post and tighten the bolt to the floorboard. The door
strike can also be adjusted by bending it open to meet the latch.
6 Once the door is aligned in the frame, tighten the hinge plates.
Note: If you still have trouble setting the doors, simply loosen up the bolts on the quarter
panels and roof and move them until the door sets up.
Fig. 1
FINISHING THE INSTALLATION
Fig. 3
Fig. 2

INSTALLATION GUIDE FOR THE MULE™ 3000 OPERATOR ENCLOSURE
6
3000FCP: Floorpan and Close Out Panel
The floor pan bolts to the underside of the frame. Use these in-
structions for it and for the full 2500FCP. The Insulated Close
Out Panel installs behind the seat with the soft gray sound ab-
sorbing foam to the engine side and are bolted to the bolt tabs on
the seat frame cross tube.
CLOSE OUT PANEL
1. The panel is diecut to fit the opening behind the seat and is
cut to fit around all of the hoses, lines and harness. Start on the
passenger side, it has the most detail to fit.
2. The top corner by the fuse box is a tight fit. Bend the fuse box mount-
ing bracket up slightly to create clearance; slide the panel into position
over the tab on the back rail. Bend the bracket back to its horizontal posi-
tion.
FLOORPAN
1. Stuff the three pieces of front cross member insulators in the air gaps
between the front cross channel of the frame and the passenger com-
partment floor.
2. Position the Floor Pan with the foam side up, by locating the front notch
on the bolt in the edge of the front cross member under the floor panel.
Align the panel evenly with the frame members and check the fit of the
panel with the back side of the cross member.
3
. Using the guide holes in the floorpan, install TEK screws provided into
the frame working from front to rear. Use a drive gun.
CAB ACCESSORY PACKAGE
The following section includes installation instructions for accessories that may have been included in your Cab
enclosure package.
ACCESSORY HARNESS
The roof has a wiring harness preinstalled at the factory.
Together with the fuse panel this will save time in installa-
tion and servicing of powered accessories.
• Connect the 4-way female connector to the male con-
nector in the headliner. Route the loom down the left
rear post into the compartment under the seat. Secure
with cable ties.
• Mount the fuse block to the side panel, near the other
fuses holders, with the Tek screws provided. Insert the
male bullet connector to the brown wired female bul-
let. , This +12v is keyed to the ignition switch. Attach
the ring terminal to + battery terminal for constant
power.sources
WINDSHIELD WIPER
• Install the windshield wiper through the hole provided
in the windshield for the shaft and with the #10 screw and
bolt. The small bolt makes the ground for the motor; be
sure it is tightened to make contact. Attach the roof har-
ness spade connector to the motor.
• Operate the motor and turn it off in the left most posi-
tion of travel.
• With the shaft in the left most position, set the arm
along the top left edge of the window.
• The arm is adjustable in length. Pivot the lever under
the joint in the arm and to set the arm length to best cover the windshield. The
wiper s set for 120 degree sweep.
• To permit the windshield to open without wiper interference, stop the motor when the arm is at the full left
sweep position. The arm will then be out of the way when the lift windshield is opened

INSTALLATION GUIDE FOR THE MULE™ 3000 OPERATOR ENCLOSURE
7
COOLING DEFROST FAN
Mount the fan to the top passen-
ger windshield. Ground the ring
terminal to the cab and connect
the +12v lead to the roof har-
ness. Alternatively, the fan can
be mounted on top of the dash
on either the driver or passen-
ger side.
CAB ACCESSORY
The following section includes installation instructions for accessories that may have been included in your Cab
enclosure package.
REARVIEW MIRROR
The heavy duty wide angle mirror can be bolted to the channel
inside the roof with the self tapping Tek screws provided;
Or, it can be mounted to the windshield frame above the
Driver’s side using the No.10 machine screws provided.
BREAKAWAY EXTERIOR MIRRORS
Using the mounting template, Drill two 1/4” holes in front
of the hinge on the driver’s quarterpanel and fasten the
arm with the M6 bolts. DO NOT OVERTIGHTEN.
Mount the right mirror arm on the door as shown. Drill two
1/4” holes with the template and fasten to the door.
Install the mirrors on the arms & adjust for best view.
DOMELIGHT & POWERPORTS
Face the Powerports down on the inside of the rollbar
air intake & ‘Tek’ screw them with the ground lead as
shown. Connect to the accessory harness. The
domelight should be preinstalled at the factory and
A
VAILABLE
MULE
ACCESSORIES
Essex “SureFoot”
runflat tires
Essex Lift Kits
provide increased
clearance, better ride
and superior handling
and come
standard with
tire kits.
Winch Bumper
& Grille guard
BED SEATS
BED SEATS
P.O. Box 92864 Southlake, TX 76092
SEE THE REST OF OUR PRODUCT LINE AT ESSEXMFG.COM
OR CALL US AT 1-888-64-ESSEX
THANK YOU FOR YOUR BUSINESS!

INSTALLATION GUIDE FOR THE MULE™ 3000 OPERATOR ENCLOSURE
8
CAB CARTON #1 HARDTOP & WLT
FRONT QTR PANELS, LEFT & RIGHT
FRONT QTR MOUNTING BRACKETS, L & R
HARDTOP WITH DOME LIGHT
FRONT VISOR
LOWER WINDSHIELD ASSEMBLY
LOWER WINDSHIELD CLOSEOUT BRACKETS
LIFT WINDSHIELD PANEL W/GAS PROPS
3000S1/2CAB SMALL PARTS BAG #1
⇒ HARDTOP/ WLT BOLT KIT
21 - 6MM X 12MM HEX SERRATED BOLTS
12 - 6
MM HEX FLANGE NUTS
21
M6 FLAT WASHERS FOR USE ON OUTSIDE BOLTS.
F
OUR 6 X 25 MM CAP HEAD BOLTS FOR THE FRONT
M
OUNTING BRACKETS
2 "S
WELL" CAM LATCHES FOR SECURING THE
LOWER WINDSHIELDPANEL TO THE UPPER FRAME
2 P
LASTIC “U” CLIPS FOR SECURING THE ENDS OF
THE LOWER HOOD GASKET
⇒ A
CCESSORY HARNESS & 4 FUSE BLOCK
⇒ 2
ADHESIVE GASKETS (OVAL) FOR WINDSHIELD TO
ROLL CAGE CLOSEOUT
⇒ S
PARE PARTS KIT, FASTENERS AND FUSES
⇒ H
ANDLES FOR THE SAFARI LIFT WINDSHIELD
CAB CARTON #2 CABUPGD
REAR QTR PANELS, LEFT & RIGHT
DOOR HEADER PANELS, L & R
FLOORBOARDS, L & R
LOWER REAR CLOSEOUT PANEL BLACK
REAR SLIDING GLASS WINDOW
3000 CABUPGD SMALL PARTS BAG #2
⇒ W
INDSHIELD WIPER KIT{MOTOR, ARM, BLADE & FASTENE R
AIR CLEANER CLOSEOUT GASKET
♦ REAR WINDOW BOLT BOX: SIX 8MM BOLTS, 12 NUTS &
10
WASHERS FOR THE USE THE 8MM BOLTS/NUTS FROM
THE REAR SCREEN FOR THE DOOR POSTS.
♦ 4 - 5/16”
CARRIAGE BOLTS & NUTS FOR FLOOR
BOARDS
♦ 2 - M6 C
ARRIAGE BOLTS FOR THE FRONT OF THE BED
AND ON THE REAR QTR PANELS.
♦ 8 - 11" C
ABLE TIES FOR REAR CLOSEOUT PANEL INSTAL-
LATION
♦ 2
ANGLE CLIPS FOR REAR QTR TO FLOOR ATTACHMENT
♦ T
EN 6MM NUTS, BOLTS & WASHERS FOR DOOR HEADERS
AND QTR PANELS
OPTIONAL ACCESSORIES
DOORS, L & R W/ 2 KEYS AND HINGES
⇒ STEEL DOORS W/SLIDER WINDOW
⇒ M
ARINE VINYL COVERED DOORS W/ZIPPERED WINDOW
CAB PACKAGE:
♦ DEFROSTER FAN
♦ F
LOOR PAN AND ENGINE CLOSEOUT PANEL
♦ F
LOORMAT
♦ E
XTERNAL MIRRORS, LEFT - RIGHT
♦ R
EAR VIEW MIRROR
ROOF MOUNT DIGITAL RADIO, CASSETTE OR CD,
SPEAKERS
BODY ARMOR: ENGINE SKID PLATE & CV GUARDS
17,500 BTU CAB HEATER W/ 2 SPEED FAN
GAUGE PKG - OIL & VOLTMETER
BACK-UP ALARM
TURN SIGNALS – 2 & 4 WAY
GUN RACKS
STROBE LIGHT, 70 FPM BEACON
55 AMP ALTERNATOR, 110V POWER AND WELDING
P O B 92864 S thl k TX 76092
CAB INSTALLATION TIPS:
⇒ LOOSEN THE 3 BOLTS THAT SECURE THE REAR
ROLL CAGE TO THE FLOOR. [12MM SOCKET]
⇒ LOOSEN THE BED SIDE BOLTS AND SLIDE THE BED
RAILS BACK AS FAR AS THEY WILL ADJUST
W
ITH THE BACK OF THE CAB INSTALLED BUT NOT
TIGHTENED, WEDGE 1/2" OR SO OF FOAM MATERIAL
BETWEEN THE CAB AND BED. LOWER AND LATCH THE
BED AND TIGHTEN THE BED RAILS AND THE LOWER
ROLL CAGE BOLTS. THIS WILL GENERATE CLEARANCE
BETWEEN THE BED AND THE REAR OF THE CAB.
SEE THE REST OF OUR PRODUCT LINE AT ESSEXMFG.COM
OR CALL US AT 888-64-ESSEX
THANK YOU FOR YOUR BUSINESS!
/