Page is loading ...

Installation Guide
Part # TBG114035
Trails by Grimmspeed | Installation Guide for Part # TBG114035 1
Subaru Outback 2020+
Fender Flare Install Instructions
Fender Flare Installation Disclaimer
●Failure to install this product according to these instructions will
invalidate the warranty. This includes, but is not limited to using
alternative installation methods, hardware, or materials.
●This product uses double sided tape for some components. It is
VERY IMPORTANT to install the flare on a clean vehicle in the
proper temperature. For best adhesion, install must be performed
in 60º - 85ºF and remain for 12-24 hours before being driven.
●It is highly recommended to use the supplied alcohol wipe to
remove any wax or sealant from the vehicle paint where all taped
components will be making contact.
●DO NOT USE Loctite®, SuperGlue®, or similar products on the
hardware or the product.
●Verify the fit of the product to vehicle prior to installation.
●If painting is desired (not required) it must be done prior to
installing product on vehicle. Clean outer surface with a good
grade degreaser.
●DO NOT USE LACQUER THINNER OR ENAMEL REDUCER AS A
DEGREASER. Wipe outer surface thoroughly with a tack rag prior
to paint. Application of plastic adhesion promoter for TPO
(thermoplastic polyolefin) plastic as per your paint system
manufacturer’s recommendations is required. Paint flares using a
high-quality enamel or polyurethane automotive paint. Do not paint
edge trim.
●Using larger tires may increase area required to turn the vehicle.
Some wheel and tire combinations may require further
modification to prevent tire from contacting flare or inner fender
liner while turning.
●All exposed fasteners and bare metal should be treated with rust
resistant paint BEFORE installing flares.
●This product may interfere with existing decals on vehicle. Though
not required, if you wish, remove decals prior to installation of
flares.
●Care & Cleaning: Do not use any harsh abrasive detergents.
PLEASE NOTE
Dirt and debris can become lodged between the product and the
body, causing scratching and paint wear from vibration. Trails by
Grimmspeed is not responsible for any damage, and the
installation of this product is done with the buyer’s understanding
that this scratching and paint wear may occur.
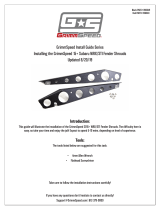
Hardware Kit Components
EDGE TRIM SPRING NUT x8
SHEET METAL
CLIP x 4 (NO GAP)
PLASTIC-PANEL CLIP x 22
(SMALL GAP)
SCREW x 36 DOOR SPACING TOOL x 2
SM ALCOHOL WIPES x 4
LG ALCOHOL WIPES x 2
Installation Tools Required
1. #2 Phillips screwdriver (stubby
preferred)
2. 5/16” / 8mm Socket
3. 7/16” / 12mm Socket
4. Flathead screwdriver
5. Drill with 5/16” Bit
6. Plastic trim prybar
7. Grease pencil / paint marker
8. Microfiber cloth or alcohol wipe (4
small wipes provided for decal
application; 2 large wipes provided
for door piece application)

Installation Guide
Part # TBG114035
Trails by Grimmspeed | Installation Guide for Part # TBG114035 2
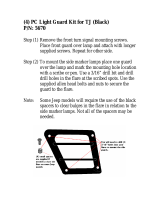
STEP 1: Assemble front main flare to bumper flare
piece using supplied spring nuts and screws in two (2)
places. Tighten with Phillips screwdriver.
STEP 2: Install supplied edge trim on assembled front
flare, cutting a “U” notch when you reach the
main/bumper piece assembly connection point.
STEP 3: If vehicle is not equipped with factory mud flaps,
skip to STEP 6.
If vehicle is equipped with factory mud flaps: Using a
5/16” / 8mm socket or Phillips screwdriver, remove three
(3) factory bolts from inside wheel well. Retain two (2)
factory bolts for installation. It may be helpful to turn the
wheel for better access.
STEP 4: Remove one (1) factory bolt from underside of
mud flap using 7/16” / 12mm socket. Discard.
FRONT FENDER FLARE INSTALLATION

Installation Guide
Part # TBG114035
Trails by Grimmspeed | Installation Guide for Part # TBG114035 3
STEP 5: Remove mud flap from vehicle and discard. There
will be two (2) factory clips installed on fender under mud
flap – keep these in place.
STEP 6: If factory mud flap is not present, peel back wheel
well liner and install two (2) supplied sheet metal clips
over two (2) outer factory hole locations in rear of wheel
well. The flat side of the clip will be at the wheel well side.
STEP 7: Bumper cladding removal: Using Phillips
screwdriver, push two (2) plastic retainers at front of
wheel well inward toward bumper to disengage
(retainers will click when disengaged).
STEP 8: Using a trim removal tool, remove three (3)
plastic retainers. Pry plastic bumper cladding piece from
vehicle, disengaging three (3) plastic tabs located inside
cladding piece. Discard cladding and plastic retainers.

Installation Guide
Part # TBG114035
Trails by Grimmspeed | Installation Guide for Part # TBG114035 4
STEP 9: Install two (2) supplied plastic-panel clips over
factory holes in bumper.
STEP 10: Align assembled front flare on fender, making
sure that bottom of flare are snug against underside of
fender and top is not bowed.
Using a grease pencil or paint marker, mark three (3) hole
locations on fender using the holes in the flare as a guide.
STEP 11: Drill three (3) marked hole locations with a 5/16”
drill bit.
STEP 12: Install three (3) supplied plastic-panel clips
over holes drilled in step 11.

Installation Guide
Part # TBG114035
Trails by Grimmspeed | Installation Guide for Part # TBG114035 5
STEP 13: Install supplied screws through seven (7) holes in
flare and into clips installed in previous steps. Install
factory bolts into factory mud flap clips if present.
STEP 14: Ensuring continued fit of flare against fender,
tighten all screws/bolts (locations shown).

Installation Guide
Part # TBG114035
Trails by Grimmspeed | Installation Guide for Part # TBG114035 6
STEP 1: Install rear main flare to bumper flare piece using
supplied spring nuts and screws in two (2) places. Tighten
with Phillips screwdriver.
STEP 2: Install supplied edge trim on assembled rear
flare, cutting a “U” notch when you reach the
main/bumper piece assembly connection point.
e
STEP 3: If vehicle is not equipped with factory mud flaps,
skip to STEP 6.
If vehicle is equipped with factory mud flaps: Using a 5/16” /
8mm socket, remove two (2) factory bolts from inside
wheel well. Retain two (2) factory bolts for installation.
STEP 4: Using trim removal tool or flathead screwdriver,
remove one (1) plastic retainer underneath mud flap and
another inside wheel well. Discard retainer.
REAR FENDER FLARE INSTALLATION

Installation Guide
Part # TBG114035
Trails by Grimmspeed | Installation Guide for Part # TBG114035 7
STEP 5: Remove mud flap from vehicle and discard.
There will be two (2) factory clips installed on fender
underneath mud flap – keep these in place.
STEP 6: If factory mud flap is not present, peel back wheel
well liner and install two (2) supplied plastic-panel clips
over two (2) outer factory hole locations in rear of wheel
well. The flat side of the clip will be at the wheel well side.
STEP 7: Using Phillips screwdriver, push one (1) plastic
retainer located at upper rear of wheel well toward
vehicle body to disengage (retainer will click when
disengaged).
Do not remove plastic retainer at lower rear
of wheel well or rear cladding
.
STEP 8: Using trim removal tool, remove plastic retainer
and discard. Install one (1) supplied plastic-panel clip
over factory hole vacated by plastic retainer.

Installation Guide
Part # TBG114035
Trails by Grimmspeed | Installation Guide for Part # TBG114035 8
STEP 9: Align assembled rear flare on fender, making
sure that bottoms of flare are snug against underside of
fender.
Using a grease pencil, mark four (4) hole locations on
fender using the holes in the flare as a guide.
STEP 10: Drill four (4) marked hole locations with a 5/16”
drill bit.
STEP 11: Install four (4) supplied plastic-panel clips over
holes drilled in step 10.
STEP 12: Install supplied screws through seven (7) holes in
flare and into clips installed in previous steps, and factory
bolts into factory mud flap clips if present.

Installation Guide
Part # TBG114035
Trails by Grimmspeed | Installation Guide for Part # TBG114035 9
STEP 13: Ensuring continued fit of flare against fender,
tighten all screws/bolts.
STEP 14: Thoroughly clean rear portion of door to prep
for door piece install. Use supplied alcohol wipe to
remove any wax or sealant from vehicle to ensure proper
tape adhesion. Do not touch this area until parts are
adhered.
STEP 15: To install rear door piece, make sure that door
area is clean and temperature is above 60 degrees F. Fold
back tape liner tab on back of piece as shown.
STEP 16: Use 2 supplied door spacing tools to align door
piece with rear flare, maintaining uniform gap along seam.
(NOTE: it may be helpful to apply a small amount of tape
to hold spacers in place during install.)

Installation Guide
Part # TBG114035
Trails by Grimmspeed | Installation Guide for Part # TBG114035 10
STEP 17: Making sure the door piece is properly aligned,
carefully peel tape liner from tape incrementally. NOTE: If
the part slips in the early stages of taping, it is possible to
move it if needed. Once part is adhered enough to stay
aligned, press as you go.
STEP 18: Press door piece against vehicle body to
completely adhere tape once liner is peeled. Use 2-3
spring clamps to hold piece in place during bonding (for a
total of 5 minutes). Tape bonds fully within 24 hours at 60
degrees F.
STEP 19: Prep for Trails by Grimmspeed bubble sticker
install on all 4 flares by cleaning the upper flare vent area
with the supplied alcohol wipe.
STEP 20: Apply Trails by Grimmspeed bubble sticker to
each flare by aligning the wider curve with the forward
upper curve of the “vent” area. The stickers are left or right
specific but can be installed on both front and rear.
/