GrimmSpeed Hood Struts - Subaru WRX/STI 08-14 Installation guide
- Type
- Installation guide

STOCK OEM GRIMMSPEED
GrimmSpeed Install Guide Series
Installing the GrimmSpeed 08-14 Subaru WRX / STI Hood Strut Kit
Updated 3/15/18
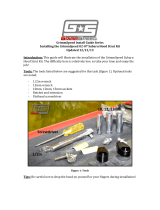
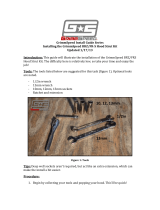
Introduction:
This guide will illustrate the installation of the GrimmSpeed Subaru Hood Strut Kit. The difficulty here is rela-
tively low, so take
your time and enjoy the job!
Tools:
The tools listed below are suggested for this task. Optional tools are noted.
• 12mm Wrench
• (2) 13mm Wrenches
• Socket Wrench with 10mm Socket
Be careful; not to drop the Hood on yourself or your hands or fingers during the installation!
If you have any questions don’t hesitate to contact us directly!
[email protected] | 612-379-0000

Procedure:
1. Begin by collecting your tools and popping you hood..
2. We will start on the passenger side of the car
Begin by removing the top 2 bolts on the OEM bracket with the 10mm Socket
3. Move to the drivers side and LOOSEN the 2 top bolts on the hood.
Notice that there are 2 different sets of screw holes on each side
The top set are the mounting holes, The bottom set are the service position holes.
Loosely screw the 2 bolts into the service position holes.
This will help hold the hood up while working on the passenger side strut.
MOUNTING HOLES
SERVICE POSITION
MOUNTING HOLES
SERVICE POSITION

1. Now move back to the passenger side of the vehicle
With the 12mm wrench, unscrew and remove the bottom bolt from the chassis.
This will allow the removal of the OEM strut from the car.
2. Prepping the new strut bracket
The OEM Strut bracket that attaches to the hood has red composite washers on the bolts. You will need to remove these
to use them on the new strut bracket.
Use the included hardware to bolt the new bracket to the top two screw holes on the hood.
3. Screw in the new strut to the chassis making sure to use the GOLD threaded bolt. Tighten securely.

1. Bolt the top of the strut to the new hood bracket using the included 13mm nut.
The ball on the strut should be on the outside of the bracket
**Make sure that the correct bracket is used. The hole on the bracket should be orientated down and the screws should be
on the outside of the bracket
2. Apply the Grimmpeed branding tags
3. Repeat steps 1 - 8 for the drivers side strut
4. All Done! Enjoy the added hood clearance when working on your car and the additional underhood lighting.
Disclaimer: Notice that the GrimmSpeed Hood Struts open the hood much faster than the OEM units. It is advised to help guide the hood and avoid lifting at full speed.
-
 1
1
-
 2
2
-
 3
3
-
 4
4


GrimmSpeed Hood Struts - Subaru WRX/STI 08-14 Installation guide
- Type
- Installation guide
Ask a question and I''ll find the answer in the document
Finding information in a document is now easier with AI
Related papers
-
 GrimmSpeed Hood Struts - Subaru 02-07 Impreza/WRX/STI Installation guide
-
 GrimmSpeed Hood Struts - 2013-21 BRZ/FRS/86 Installation guide
-
 GrimmSpeed Hood Struts - 2022+ BRZ/GR86 Installation guide
-
 GrimmSpeed Hood Struts - Subaru WRX/STI 08-14 Installation guide
-
 GrimmSpeed Master Cylinder Brace - Subaru 93-07 Impreza / 05-06 Saab 92-X/94-99 Legacy/ 03-08 Forester/Baja Installation guide
-
 GrimmSpeed Master Cylinder Brace - Subaru Legacy GT '05-mid '07 NON VDC Installation guide
-
 GrimmSpeed Master Cylinder Brace - Mitsubishi EVO 8/9 Installation guide
-
 GrimmSpeed 15-21 WRX/STI Fender Shrouds Installation guide
-
 GrimmSpeed Billet Top Mount Intercooler Kit - 22+ WRX, 19+ Ascent, 20+ Outback XT, 20+ Legacy XT Installation guide
-
 GrimmSpeed Pulley Cover - 2015-21 Subaru WRX Installation guide


Other documents
-
Edelbrock Edelbrock Pro-Tuner Supercharger #1585 For 2005-09 Mustang GT 4.6L 3V W/O Tune Installation guide
-
-
-
-
-
-
-
-
-