Page is loading ...

FläktGroup DC_8669GB 20180228_R0 Specifications are subject to alteration without notice
GENERAL
As dust is gradually collected in the filter, the flow resistance of
the filter correspondingly increases. This causes a reduction in
the airflow. The filter must therefore be changed regularly, at inter-
vals determined by the dust concentration in the air.
Indication of when the filter should be changed is indicated by an
electric signal from some type of filter monitor.
A set of replacement filters should be available for every instal-
lation. This also applies to cleanable filter mats, since when the
mats that have been in service must be cleaned, the spare mats.
DRAIN TRAY
Before you begin cleaning, remove the perforated spacer plate.
DIRECTION OF AIRFLOW
The direction of airflow is indicated by arrows on the filter section
and the filter inserts.
CAUTION!
APPLIES TO SIZES 005–032.
The EQPA filter can be installed vertically.
EUP(A,B,C,K) 3;2
EUP(A,B,C,K) 3;2
WARNING!
Dust from dirty filters can be a health hazzard,
wear face mask (lowest class FFP2) when
handling.
Dirty filters must be disposed of an environ-
mentally responsible way accordance with
local regulations.
Panel filter
EQPA PANEL FILTER
INSTALLATION AND MAINTENANCE

EQPA PANEL FILTER
Installation and maintenance instructions
2
FläktGroup DC_8669GB 20180228_R0 Specifications are subject to alteration without notice
TO CHANGE FILTER MATS FOR THE EQPA PANEL FILTER
TO CLEAN REPLACEMENT FILTERS EQPZ-01, -02
TO CHANGE FILTER CASSETTES OF THE EQPA PANEL FILTER
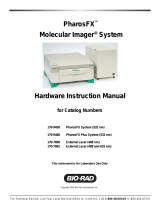
A. Withdraw the old filter cassettes along the guide rails in the
unit. For sizes 041-090 use the hook supplied for with drawing
the inner cassettes, see Fig. 1.
B. Insert the new filter cassettes along the guide rails as shown
in Fig. 1 making sure that they are tight against the casing or
the adjacent filter insert.
Fit the cassettes so that the airflowdirection arrows on each
cassette and the unit section point in the same direction.
See Fig. 2.
C. Check that the sealing strip on the inspection door is not
damaged.
A. Withdraw the filter cassettes from the unit casing.
For the EQ, sizes 041-090 use the hook supplied for with
drawing the inner cassettes.
B. Remove the filter mat from the cassettes. Clean the mat.
See To Clean Replacement Filters on page 6.
C. Place the cleaned filter mat onto the cassette and press it
down. Start in the centre of the cassette. See Fig. 4. Check
that the filter mat extends right out to the cassette frame all
around.
D. Insert the filter cassettes along the guide rails. Make sure that
the fitted sealing strips are tight against the casing or the
adjacent filter insert. Fit the cassettes so that the airflow direc-
tion arrows on each cassette and unit section casing point in
the same direction.
E. Check that the sealing strip on the inspection door is not
damaged.
A. Vacuum clean starting from the contaminated side of the filter.
B. Shake the filter with the contaminated side facing downwards.
C. Blow clean with compressed air or steam (at up to 300 kPa or
45 psi), starting from the clean side of the filter.
D. Wash or flush with warm water, with or without synthetic deter-
gent. Blow the filter dry with compressed air (at up to 300 kPa
or 45 psi) or leave it to dry naturally.
EUP(A,B)S 1
Sizes 005-216
EUP(A,B)S
Sizes 081–216
1. Filter cassette
2. Direction of airflow
3. Filter bank
4. Sealing strip
When inserting the filter
cassettes, check that
the sealing tabs are
facing the right direction.
Fig. 1
Fig. 2
Fig. 3
CAUTION!
Cleanable filtermatsmust be inserted with
the hard surface facing downstream in
the direction of airflow.
3634 5;3 EUMM fig
Fig. 4
Filter insert
Hard surface
Airflow direction arrow
Sealing strip
3634 5;3 EUMM fig
D
C
A

EQPA PANEL FILTER
Installation and maintenance instructions
3
FläktGroup DC_8669GB 20180228_R0 Specifications are subject to alteration without notice
TO ORDER REPLACEMENT FILTERS
Replacement filters can be ordered from your nearest FläktGroup
sales representative.
Replacement filter EQPZ-01-bbb-cc-d-e-1
for the EQPA, set
Unit size (bbb)
005-216
Filter class (cc)
2 = G2
4 = G4
Type of filter (d)
1 = aluminium, cleanable (c=2 only)
2 = synthetic, cleanable (c=4 only)
Filter frame (e)
1 = galvanised sheet steel
2 = stainless sheet steel (AISI 304)
Filtermat for the EQPA, set EQPZ-02-bbb-c-d-1
Unit size (bbb)
005-216
Filter class (c)
4 = G4
Type of filter (d)
2 = synthetic, cleanable
Unit
size
Filter dimensions and
Filter arrangement
Unit
size
Filter dimensions and
Filter arrangement
005
592x287
041
3x(592x592) + 3x(592x287)
008
792x392
045
4x(592x592) + 2x(287x592)
009
592x592
050
8x(492x492)
011
2x(492x492)
054
6x(592x592)
014
592x592 + 287x592
056
4x(592x592) + 2x(592x287) +
2x(287x592) + 287x287
018
2x(592x592)
063
6x(592x592) + 2x(287x592)
020
592x592 + 287x592 +
592x287 + 287x287
068
3x(592x592) + 3x(592x287)
023
2x(592x592) + 287x592
072
8x(592x592)
027
2x(592x592) + 2x(592x287)
079
6x(592x592) + 3x(592x287) +
2x(287x592 + 287x287
032
4x(392x792)
090
8x(592x592) + 4x(592x287)
036
4x(592x592)
/