Page is loading ...

Non-display Industrial Computers
Catalog Numbers 6177R-M4AXP, 6177R-M4PXP, 6177R-M4SXP, 6177R-R4PXP, 6177R-R4SXP, 6177R-R4LXP, 6177R-M4AS3RD,
6177R-R4AS3RD, 6177R-M3PXP, 6177R-M3PXPDC, 6177R-M3AS3
User Manual

Important User Information
Read this document and the documents listed in the additional resources section about installation, configuration, and
operation of this equipment before you install, configure, operate, or maintain this product. Users are required to
familiarize themselves with installation and wiring instructions in addition to requirements of all applicable codes, laws,
and standards.
Activities including installation, adjustments, putting into service, use, assembly, disassembly, and maintenance are required
to be carried out by suitably trained personnel in accordance with applicable code of practice.
If this equipment is used in a manner not specified by the manufacturer, the protection provided by the equipment may be
impaired.
In no event will Rockwell Automation, Inc. be responsible or liable for indirect or consequential damages resulting from the
use or application of this equipment.
The examples and diagrams in this manual are included solely for illustrative purposes. Because of the many variables and
requirements associated with any particular installation, Rockwell Automation, Inc. cannot assume responsibility or
liability for actual use based on the examples and diagrams.
No patent liability is assumed by Rockwell Automation, Inc. with respect to use of information, circuits, equipment, or
software described in this manual.
Reproduction of the contents of this manual, in whole or in part, without written permission of Rockwell Automation,
Inc., is prohibited.
Throughout this manual, when necessary, we use notes to make you aware of safety considerations.
Labels may also be on or inside the equipment to provide specific precautions.
Allen-Bradley, Rockwell Software, and Rockwell Automation are trademarks of Rockwell Automation, Inc.
Trademarks not belonging to Rockwell Automation are property of their respective companies.
WARNING: Identifies information about practices or circumstances that can cause an explosion in a hazardous environment,
which may lead to personal injury or death, property damage, or economic loss.
ATTENTION: Identifies information about practices or circumstances that can lead to personal injury or death, property
damage, or economic loss. Attentions help you identify a hazard, avoid a hazard, and recognize the consequence.
IMPORTANT
Identifies information that is critical for successful application and understanding of the product.
SHOCK HAZARD: Labels may be on or inside the equipment, for example, a drive or motor, to alert people that dangerous
voltage may be present.
BURN HAZARD: Labels may be on or inside the equipment, for example, a drive or motor, to alert people that surfaces may
reach dangerous temperatures.
ARC FLASH HAZARD: Labels may be on or inside the equipment, for example, a motor control center, to alert people to
potential Arc Flash. Arc Flash will cause severe injury or death. Wear proper Personal Protective Equipment (PPE). Follow ALL
Regulatory requirements for safe work practices and for Personal Protective Equipment (PPE).

Rockwell Automation Publication 6177R-UM001G-EN-P - February 2014 3
Summary of Changes
This manual contains new and updated information. Changes throughout this
revision are marked by change bars, as shown to the right of this paragraph.
New and Updated
Information
This table contains the changes made to this revision.
Topic Page
Expanded Abbreviations table 10
Updated ‘Chapter Objectives’ section
11, 25, 39, 43, 61
Added link to Rockwell Automation Product Compatibility and Download Center (PCDC) website 11, 71
Removed ‘Multilingual User-interface CD Pack’ section 12
Reduced what compact discs (CDs) are shipped with computer in ‘Parts List’ section 13
Removed ‘Accessories and Replacement Parts’ section 23
Moved existing information into ‘Installation Precautions’ section 26
Added information in ‘Installation Guidelines’ section 27
Updated information in ‘Mounting Clearance Requirements’ section 27
Moved existing installation and mounting information into ‘Install the Computer’ section 29
Revised and added information in ‘Install the Computer’ subsections 30
Moved existing AC and DC power information into ‘Connect Power’ section 35
Added information in ‘Connect AC Power’ section 35
Added information in ‘Functional Ground Screw’ section 37
Added information in ‘Connect to a Network’ section 37
Added information in ‘Start the Computer’ section 40
Replaced ‘reset’ with ‘restart’ in ‘Restart the Computer’ section 41
Updated and added information in ‘Shut Down the Computer’ section 42
Updated link to Rockwell Automation Computers and Operators Interface website 43, 67
Moved existing cover removal information into ‘Remove the Cover’ section 46
Moved existing cover reinstall information into ‘Reinstall the Cover’ section 47
Added ‘Drive Precautions’ section 48
Moved existing HDD replace information into ‘Replace or Install a Drive’ section 48
Moved existing add-in card install information into ‘Install Add-in Cards’ section 53
Revised and added information in ‘Replace or Add Memory Modules’ section 58
Added ‘Hardware Monitoring’ section 61
Added information in ‘Troubleshooting’ section 62
Added information in ‘Diagnostic Utility’ section 64
Added ‘Clear the CMOS’ section 65
Changed title and added Specifications column to Table 1 67
Added Turkey RoHS statement in Certifications table 69
Revised information in ‘Upgrade the BIOS from a CD Drive’ section 71
Revised information in ‘Upgrade the BIOS from an External Floppy Disk Drive’ section 73

4 Rockwell Automation Publication 6177R-UM001G-EN-P - February 2014
Summary of Changes
Notes:

Rockwell Automation Publication 6177R-UM001G-EN-P - February 2014 5
Table of Contents
Preface
Preface Objectives. . . . . . . . . . . . . . . . . . . . . . . . . . . . . . . . . . . . . . . . . . . . . . . . . . 9
Purpose of This Manual . . . . . . . . . . . . . . . . . . . . . . . . . . . . . . . . . . . . . . . . . . . . 9
Additional Resources . . . . . . . . . . . . . . . . . . . . . . . . . . . . . . . . . . . . . . . . . . . . . . . 9
Abbreviations. . . . . . . . . . . . . . . . . . . . . . . . . . . . . . . . . . . . . . . . . . . . . . . . . . . . 10
Chapter 1
Features
Chapter Objectives. . . . . . . . . . . . . . . . . . . . . . . . . . . . . . . . . . . . . . . . . . . . . . . 11
Computer Overview . . . . . . . . . . . . . . . . . . . . . . . . . . . . . . . . . . . . . . . . . . . . . 11
Operating Systems . . . . . . . . . . . . . . . . . . . . . . . . . . . . . . . . . . . . . . . . . . . . . . . 11
Computer Options. . . . . . . . . . . . . . . . . . . . . . . . . . . . . . . . . . . . . . . . . . . . . . . 12
Before You Begin . . . . . . . . . . . . . . . . . . . . . . . . . . . . . . . . . . . . . . . . . . . . . . . . 12
Parts List . . . . . . . . . . . . . . . . . . . . . . . . . . . . . . . . . . . . . . . . . . . . . . . . . . . . . . . . 13
Hardware Features . . . . . . . . . . . . . . . . . . . . . . . . . . . . . . . . . . . . . . . . . . . . . . . 13
650R Computer. . . . . . . . . . . . . . . . . . . . . . . . . . . . . . . . . . . . . . . . . . . . . . 14
750R Computer . . . . . . . . . . . . . . . . . . . . . . . . . . . . . . . . . . . . . . . . . . . . . 16
1450R Computer . . . . . . . . . . . . . . . . . . . . . . . . . . . . . . . . . . . . . . . . . . . . 18
Status Indicators . . . . . . . . . . . . . . . . . . . . . . . . . . . . . . . . . . . . . . . . . . . . . 19
System Boards. . . . . . . . . . . . . . . . . . . . . . . . . . . . . . . . . . . . . . . . . . . . . . . . 20
Chapter 2
Installation
Chapter Objectives. . . . . . . . . . . . . . . . . . . . . . . . . . . . . . . . . . . . . . . . . . . . . . . 25
Installation Precautions. . . . . . . . . . . . . . . . . . . . . . . . . . . . . . . . . . . . . . . . . . . 26
Environment and Enclosure Information. . . . . . . . . . . . . . . . . . . . . . . 26
European Union Compliance . . . . . . . . . . . . . . . . . . . . . . . . . . . . . . . . . 26
Installation Guidelines . . . . . . . . . . . . . . . . . . . . . . . . . . . . . . . . . . . . . . . . . . . 27
Mounting Clearance Requirements. . . . . . . . . . . . . . . . . . . . . . . . . . . . . . . . 27
Mounting Hardware . . . . . . . . . . . . . . . . . . . . . . . . . . . . . . . . . . . . . . . . . . . . . 28
Computer Dimensions . . . . . . . . . . . . . . . . . . . . . . . . . . . . . . . . . . . . . . . . . . . 28
Required Tools . . . . . . . . . . . . . . . . . . . . . . . . . . . . . . . . . . . . . . . . . . . . . . . . . . 29
Install the Computer . . . . . . . . . . . . . . . . . . . . . . . . . . . . . . . . . . . . . . . . . . . . . 29
Mount the 650R Computer . . . . . . . . . . . . . . . . . . . . . . . . . . . . . . . . . . . 30
Mount the 750R Computer . . . . . . . . . . . . . . . . . . . . . . . . . . . . . . . . . . 31
Mount the 1450R Computer in a Rack Cabinet . . . . . . . . . . . . . . . . 32
Connect Peripherals. . . . . . . . . . . . . . . . . . . . . . . . . . . . . . . . . . . . . . . . . . . . . . 34
Connect Power . . . . . . . . . . . . . . . . . . . . . . . . . . . . . . . . . . . . . . . . . . . . . . . . . . 35
Connect AC Power. . . . . . . . . . . . . . . . . . . . . . . . . . . . . . . . . . . . . . . . . . . 35
Connect DC Power . . . . . . . . . . . . . . . . . . . . . . . . . . . . . . . . . . . . . . . . . . 35
Functional Ground Screw . . . . . . . . . . . . . . . . . . . . . . . . . . . . . . . . . . . . . . . . 37
Connect to a Network. . . . . . . . . . . . . . . . . . . . . . . . . . . . . . . . . . . . . . . . . . . . 37

6 Rockwell Automation Publication 6177R-UM001G-EN-P - February 2014
Table of Contents
Chapter 3
Operation
Chapter Objectives . . . . . . . . . . . . . . . . . . . . . . . . . . . . . . . . . . . . . . . . . . . . . . . 39
Operating Guidelines . . . . . . . . . . . . . . . . . . . . . . . . . . . . . . . . . . . . . . . . . . . . . 39
Start the Computer. . . . . . . . . . . . . . . . . . . . . . . . . . . . . . . . . . . . . . . . . . . . . . . 40
Restart the Computer. . . . . . . . . . . . . . . . . . . . . . . . . . . . . . . . . . . . . . . . . . . . . 41
Restart the Computer with the Reset Button. . . . . . . . . . . . . . . . . . . . 41
Shut Down the Computer . . . . . . . . . . . . . . . . . . . . . . . . . . . . . . . . . . . . . . . . 42
Chapter 4
Component Replacement
Chapter Objectives . . . . . . . . . . . . . . . . . . . . . . . . . . . . . . . . . . . . . . . . . . . . . . . 43
Accessories and Replacement Parts. . . . . . . . . . . . . . . . . . . . . . . . . . . . . . . . . 43
Voltage Precautions . . . . . . . . . . . . . . . . . . . . . . . . . . . . . . . . . . . . . . . . . . . . . . 43
Electrostatic Discharge Precautions . . . . . . . . . . . . . . . . . . . . . . . . . . . . . . . . 44
Pre-configuration. . . . . . . . . . . . . . . . . . . . . . . . . . . . . . . . . . . . . . . . . . . . . . . . . 44
Post-configuration. . . . . . . . . . . . . . . . . . . . . . . . . . . . . . . . . . . . . . . . . . . . . . . . 45
Required Tools. . . . . . . . . . . . . . . . . . . . . . . . . . . . . . . . . . . . . . . . . . . . . . . . . . . 45
Remove the Cover. . . . . . . . . . . . . . . . . . . . . . . . . . . . . . . . . . . . . . . . . . . . . . . . 46
Reinstall the Cover . . . . . . . . . . . . . . . . . . . . . . . . . . . . . . . . . . . . . . . . . . . . . . . 47
Drive Precautions . . . . . . . . . . . . . . . . . . . . . . . . . . . . . . . . . . . . . . . . . . . . . . . . 48
Replace or Install a Drive. . . . . . . . . . . . . . . . . . . . . . . . . . . . . . . . . . . . . . . . . . 48
Replace the Existing HDD . . . . . . . . . . . . . . . . . . . . . . . . . . . . . . . . . . . . 48
Install a Second HDD. . . . . . . . . . . . . . . . . . . . . . . . . . . . . . . . . . . . . . . . . 51
Install an Add-in Card . . . . . . . . . . . . . . . . . . . . . . . . . . . . . . . . . . . . . . . . . . . . 53
650R Computers . . . . . . . . . . . . . . . . . . . . . . . . . . . . . . . . . . . . . . . . . . . . . 53
750R/1450R Computers. . . . . . . . . . . . . . . . . . . . . . . . . . . . . . . . . . . . . . 55
Replace or Add Memory Modules . . . . . . . . . . . . . . . . . . . . . . . . . . . . . . . . . 58
Memory Configuration Guidelines. . . . . . . . . . . . . . . . . . . . . . . . . . . . . 58
Replace or Add a Memory Module . . . . . . . . . . . . . . . . . . . . . . . . . . . . . 58
Replace the RTC Battery. . . . . . . . . . . . . . . . . . . . . . . . . . . . . . . . . . . . . . . . . . 59
Chapter 5
System Troubleshooting
Chapter Objectives . . . . . . . . . . . . . . . . . . . . . . . . . . . . . . . . . . . . . . . . . . . . . . . 61
Hardware Monitoring . . . . . . . . . . . . . . . . . . . . . . . . . . . . . . . . . . . . . . . . . . . . 61
Troubleshooting . . . . . . . . . . . . . . . . . . . . . . . . . . . . . . . . . . . . . . . . . . . . . . . . . 62
Troubleshooting Checklists . . . . . . . . . . . . . . . . . . . . . . . . . . . . . . . . . . . . . . . 62
Issues during Startup . . . . . . . . . . . . . . . . . . . . . . . . . . . . . . . . . . . . . . . . . 62
Issues after Startup . . . . . . . . . . . . . . . . . . . . . . . . . . . . . . . . . . . . . . . . . . . 63
Issues Running New Software . . . . . . . . . . . . . . . . . . . . . . . . . . . . . . . . . 63
Issues with the Add-in Card . . . . . . . . . . . . . . . . . . . . . . . . . . . . . . . . . . . 64
Issues with the RAID Card . . . . . . . . . . . . . . . . . . . . . . . . . . . . . . . . . . . . 64
Issues with an External Display . . . . . . . . . . . . . . . . . . . . . . . . . . . . . . . . 64
Diagnostic Utility . . . . . . . . . . . . . . . . . . . . . . . . . . . . . . . . . . . . . . . . . . . . . . . . 64
Load the System Defaults . . . . . . . . . . . . . . . . . . . . . . . . . . . . . . . . . . . . . . . . . 65
Clear the CMOS . . . . . . . . . . . . . . . . . . . . . . . . . . . . . . . . . . . . . . . . . . . . . . . . . 65
Ship or Transport the Computer . . . . . . . . . . . . . . . . . . . . . . . . . . . . . . . . . . 66

Rockwell Automation Publication 6177R-UM001G-EN-P - February 2014 7
Table of Contents
Appendix A
Specifications
. . . . . . . . . . . . . . . . . . . . . . . . . . . . . . . . . . . . . . . . . . . . . . . . . . . . . . . . . . . . . . . . . 67
Appendix B
Upgrade to a New BIOS
BIOS Upgrade Procedure. . . . . . . . . . . . . . . . . . . . . . . . . . . . . . . . . . . . . . . . . 71
Upgrade the BIOS from the CD Drive. . . . . . . . . . . . . . . . . . . . . . . . . . . . . 71
Upgrade the BIOS from an External Floppy Disk Drive . . . . . . . . . . . . . 73
Index
. . . . . . . . . . . . . . . . . . . . . . . . . . . . . . . . . . . . . . . . . . . . . . . . . . . . . . . . . . . . . . . . . 75

8 Rockwell Automation Publication 6177R-UM001G-EN-P - February 2014
Table of Contents
Notes:

Rockwell Automation Publication 6177R-UM001G-EN-P - February 2014 9
Preface
Preface Objectives
This preface covers the following topics:
• Purpose of This Manual
• Additional Resources
• Abbreviations
Purpose of This Manual
This manual is a user guide for non-display industrial computers. It provides
procedures to the following:
• Install the computer.
• Make computer connections.
• Operate the computer.
• Troubleshoot the computer.
Additional Resources
These documents contain additional information to related products from
Rockwell Automation.
You can view or download publications at http://www.rockwellautomation.com/
literature.
To order paper copies of technical documentation, contact your local
Allen-Bradley distributor or Rockwell Automation sales representative.
Resource Description
Industrial Non-display Computers
Installation Instructions, publication
6177R-IN001
Provides information on mounting the non-display computers inside a
machine or in a rack.
Cloning Utility for Rockwell Automation
Industrial Computers Technical Data,
publication 6000-TD002
Provides information on how to create and restore a back-up image of
your computer’s hard disk drive.
Industrial Automation Wiring and
Grounding Guidelines, publication
1770-4.1
Provides general guidelines for installing a Rockwell Automation®
industrial system.

10 Rockwell Automation Publication 6177R-UM001G-EN-P - February 2014
Preface
Abbreviations
This publication can use the following abbreviations.
Abbr Meaning Abbr Meaning
ACPI Advanced configuration (and) power
interface
PCB Printed circuit board
AHCI Advanced host controller interface PCDC Product Compatibility and Download Center
AMI American Megatrends, Inc. PCH Platform control hub
AMT Active management technology PCI Peripheral component interconnect
BIOS Basic input/output system PCIe Peripheral component interconnect express
CF CompactFlash PEG PCI express graphics
CPU Central processing unit PELV Protective extra-low voltage
CMOS Complementary metal oxide semiconductor PERR PCI parity error
COM Communication (serial port interface) POST Power on self test
CRC Cyclic redundancy clock PSU Power supply unit
DDR Double data rate (RAM) PXE Pre-boot execution environment
DIMM Dual in-line memory module RAID Redundant array (of) independent disks
DVI Digital video interface RAM Random access memory
DVMT Dynamic video memory technology RIUP Remove or insert under power
ECC Error correcting code RMS Root-mean-square
EEA European Environment Agency RTC Real-time clock
EMC Electromagnetic compatibility SAS Serial attached SCSI
EOS Embedded operating system SATA Serial advanced technology attachment
ESD Electrostatic discharge SCSI Small computer system interface
EWF Enhanced write filter SELV Safety extra-low voltage
FAT File allocation table SERR PCI signal error
HDD Hard disk drive SPD Serial presence detect
HORM Hibernate once, resume many SSD Solid-state drive
IDE Integrated device electronics TFT Thin film transistor
IEC International Engineering Consortium UEFI Universal extensible firmware interface
IGD Intel graphics driver USB Universal serial bus
KVM Keyboard video mouse UPS Uninterruptible power source
LAN Local area network VBAT Voltage (battery)
NEMA
National Electrical Manufacturers Association
VDDR Voltage (DDR RAM)
ODD
Optical disk drive
VGA Video graphics array

Rockwell Automation Publication 6177R-UM001G-EN-P - February 2014 11
Chapter 1
Features
Chapter Objectives
This chapter provides information on the following topics:
• Computer Overview
• Operating Systems
• Computer Options
• Before You Begin
• Parts List
• Hardware Features
Computer Overview
Non-display industrial computers run operations from small visual interface and
maintenance applications to large control and information applications. Combine
an industrial display with the 650R (catalog number 6177R-M3), 750R (catalog
number 6177R-M4), or 1450R (catalog number 6177R-R4) computer to complete
your system.
These computers are available with standard, performance, and advanced features.
They come standard with a selection of I/O ports for peripheral connections and
expansion slots.
Operating Systems
The following Microsoft-licensed operating systems are available:
• Windows Server 2003 R2, Service Pack 2
• Windows XP Professional, Service Pack 3
No operating system updates have been applied to the factory image beyond the
service packs.
The I386 source directory for Microsoft Windows is on the system drive of your
computer off the root directory, C:\I386. This allows for easy removal and
addition of Windows components.
Computers with HDDs include a recovery partition with the original factory
image. Refer to the Cloning Utility for Rockwell Automation Industrial
Computers Technical Data, publication 6000-TD002
, for instructions.
To obtain a copy of a factory system image, contact your local technical support
center or access the Rockwell Automation Product Compatibility and Download
Center (PCDC) at http://www.rockwellautomation.com/support/pcdc.page
.

12 Rockwell Automation Publication 6177R-UM001G-EN-P - February 2014
Chapter 1 Features
Computer Options
This table summarizes the options available for non-display industrial computers.
A comparative summary of features for the computers is in Appendix A,
Specifications
on page 67.
Before You Begin
Before unpacking the computer, inspect the shipping carton for damage. If
damage is visible, immediately contact the shipper and request assistance.
Otherwise, proceed with unpacking.
Keep the original packing material in case you need to return the computer for
repair or transport it to another location. Use both inner and outer packing
cartons to provide adequate protection for a computer returned for service.
Cat. No. Model Form Factor Package Windows OS
6177R-R4PXP 1450R 4U rack mount Performance XP Professional SP3
6177R-R4LXP Legacy
6177R-R4SXP Standard
6177R-R4AS3RD Server Server 2003 SP2
(1)
(1) RAID-enabled.
6177R-M3PXP 650R — Performance XP Professional SP3
6177R-M3PXPDC
6177R-M3AS3 M3 Machine mount Advanced Server 2003 SP2
6177R-M4AXP 750R M4 Machine mount XP Professional SP3
6177R-M4PXP Performance
6177R-M4SXP Standard
6177R-M4AS3RD Server Server 2003 SP2
(1)

Rockwell Automation Publication 6177R-UM001G-EN-P - February 2014 13
Features Chapter 1
Parts List
The computers ship with the following items.
Hardware Features
The illustrations in this section show the hardware features of each computer:
• Exterior views
– Front panel
– Rear panel
– Side panel (650R)
• Status indicators
• System boards
– Motherboard
– Front panel board
– HDD adapter boards
– PCI expansion board
– RAID controller board on systems with the Windows 2003 Server
Item Description
Hardware • Power cord for AC power models
• Mounting hardware
– Rack handles for 1450R computers
– Mounting brackets for 650R computers
– Mounting brackets for 750R computers
– Mounting fasteners
• Keys for door lock for 1450R computers
• Assembly screw bag
• Industrial Computer System Cloning Utility CD (red)
• CD with CD/DVD burning software
(1)
(1) Shipped only with Performance models; see the table in Computer Options on page 12 for more information.
Documents • Non-display Industrial Computers Installation Instructions, publication 6177R-IN001
• Shipped Compact Discs (CDs) Update Release Note, publication 6000-RN009
• China RoHS hazardous material table insert
• Production test report

14 Rockwell Automation Publication 6177R-UM001G-EN-P - February 2014
Chapter 1 Features
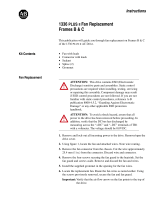
650R Computer
Figure 1 - Side Panel
Item Component Item Component
1 PS/2 mouse port 11 LAN port 1
2 PS/2 keyboard port 12 PSU fan
3 Microphone-in jack 13 Power input, AC
4 DVI-I port
(1)
(1) Use a DVI to HD-15 adapter connector to connect to the analog interface. This connector is not included with the
computer’s shipped contents.
14 HD-15 (VGA) port
5 Line-in jack 15 Functional ground screw
6COM 1 16Line-out jack
7 COM 2 17 Parallel port
8 USB ports, 4 18 Ventilation slots
9 Power switch 19 Expansion slot covers, 4
10 LAN port 2
1
2
6
4
3
5
8
7
9
10
11
12
13
14
15
16
17
18
19

Rockwell Automation Publication 6177R-UM001G-EN-P - February 2014 15
Features Chapter 1
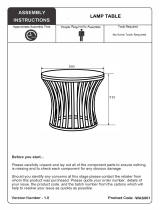
Figure 2 - Rear Panel
Item Component
1Rear cover
2 ODD activity indicator
3 ODD eject button
4 ODD mechanical eject hole
5 HDD 2 bay captive thumbscrews
6HDD 2 bay
7HDD 1 bay
8 HDD 1 bay captive thumbscrews
1
2
6
4
3
5
7
8

16 Rockwell Automation Publication 6177R-UM001G-EN-P - February 2014
Chapter 1 Features
750R Computer
Figure 3 - Front Panel
Item Icon Component
1Front USB ports
2 System health status indicator
3 Disk drive access status indicator
4Power status indicator
5 Reset button
6 ODD mechanical eject hole
7 ODD eject button
8 ODD access indicator
9ODD
10 HDD bay
(1)
(1) HDD bay shipped empty for optional, second HDD.
HDD
(2)
(2) Computers with the Windows Server 2003 operating system ship with two HDDs installed that are
configured for RAID 1 operation.
11 HDD
(2)
1
2
6
4
3
5
8
7
9
10
11

Rockwell Automation Publication 6177R-UM001G-EN-P - February 2014 17
Features Chapter 1
Figure 4 - Rear Panel
Item Icon Component Item Icon Component
1 PCI expansion slot covers, 4 9 Serial COM2 port (aqua)
2 Line-in jack (light blue) 10 Serial COM1 port (light blue)
3 Line-out jack (lime) 11 PS/2 keyboard port (purple)
4 Microphone-in jack (pink) 12 PS/2 mouse port (green)
5 USB ports, 4 13 Functional ground screw
6 Gigabit LAN ports, 2 14 Power switch
7 External VGA port (blue) 15 Power input, AC
8 Parallel port (burgundy)
1
2
6
4
3
5
8
7
9
10
11
13
12
15
14

18 Rockwell Automation Publication 6177R-UM001G-EN-P - February 2014
Chapter 1 Features
1450R Computer
Figure 5 - Front Panel
Figure 6 - Rear Panel
51
2
345 6
2
3
4
78 9101213
1411
With Door Closed With Door Open
Item Icon Component Item Icon Component Item Icon Component
1 Power status indicator 6 Reset button 11 ODD eject button
2 Disk drive access status indicator 7 USB ports, 2 12 ODD mechanical eject hole
3 System health status indicator 8 Power switch 13 HDD bay
(1)
HDD
(2)
4 Door lock 9 ODD 14 HDD
(2)
5 Rack handle 10 ODD access status indicator
(1) Second HDD is optional for computers with operating systems other than Windows Server 2003.
(2) Computers with the Windows Server 2003 operating system ship with two HDDs, both configured for RAID 1 operation.
Item Icon Component Item Icon Component
1Power input, AC 8External VGA port (blue)
2 Functional ground screw 9 Gigabit LAN ports
3 PS/2 mouse port (green) 10 Rear USB ports
4 PS/2 keyboard port (purple) 11 Microphone-in jack (pink)
5 Serial COM1 port (light blue) 12 Line-out jack (lime)
6 Serial COM2 port (aqua) 13 Line-in jack (light blue)
7 Parallel port (burgundy) 14 PCI expansion slot covers, 7
12
3
4
5
678910 11
12
13 14

Rockwell Automation Publication 6177R-UM001G-EN-P - February 2014 19
Features Chapter 1
Status Indicators
There are three status indicators on the front panel of the 750R and 1450R
computers. These indicators aid in issue diagnosis by providing status
information of different system components.
The 650R computer does not have status indicators.
750R-Front Panel
1450R-Front Panel
321
Item Icon Indicator Status Description
1 Power status Green The computer is operating.
Flashing orange The computer is in Standby mode.
Off The computer is off.
2 Disk drive access status Flashing red HDD or ODD activity.
Off No HDD or ODD activity.
3 System health status Red The computer’s temperature threshold has been exceeded.
Off System health is normal.

20 Rockwell Automation Publication 6177R-UM001G-EN-P - February 2014
Chapter 1 Features
System Boards
The illustrations in this section show the system board layouts for the computers.
The 750R and 1450R computers share the same set of system boards except for
the PCI expansion board, which is available only on 1450R computers.
Figure 7 - 650R Motherboard
Item Component Item Component
1 LGA775 processor socket 12 Power switch cable connector
2 Reserved for USB port connector 13 DIMM 1 slot
3 FDD cable connector 14 DIMM 2 slot
4 ATX12V power connector 15 RTC battery socket
5 Heat sink fan connector 16 Clear CMOS jumper
6 System fan connector 17 Parallel port cable connector
7 ODD cable connector 18 PCI 3 expansion slot
8 Keypad cable connector 19 PCI 2 expansion slot
9 SATA 2 cable connector 20 PCI 1 expansion slot
10 SATA 1 cable connector 21 ISA expansion slot
11 ATX power connector
1
2
3
4
8
7
6
5
9
10
11
121314
15
16
17
18
19
20
21
/