Page is loading ...

For assistance with assembly contact:
Southern Enterprises Inc.
Customer Service 1-800-633-5096
www.seidal.com
"SUSSEX BRAID" FIREPLACE
FA8566 - PLANTATION OAK
FA8567 - BROWN MAHOGANY
FA8568 - BLACK
FA8569 - CLASSIC MAHOGANY
Assembly Instructions

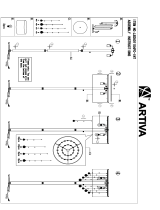
A Quantity
of 17
CAM BOLT
B Quantity
of 14
WOOD DOWEL
C Quantity
of 17
CAM LOCK
D Quantity
of 30
FLAT HEAD LONG SCREW
FIREBOX
SOLD IN A SEPARATE CARTON
"SUSSEX BRAID" FIREPLACE
Parts List
Please review all parts and hardware before disposing of any packaging.
Call Customer Service if missing hardware. Do not return to store/retailer.
Screws shown in actual size. Using a screw that is too long will cause damage.
Before beginning assembly, separate each type of screw. Carefully study the
screw diagrams below (SHOWN ACTUAL SIZE). You may receive extra
hardware with
y
our unit.

(1) Quantity
of 2
SIDE PANEL(R& L)
(2) Quantity
of 2
FRONT PILLAR(R& L)
(3) Quantity
of 1
UPPER FRONT PANEL
(4) Quantity
of 2
FRONT PANEL(R & L)
(5) Quantity
of 1
LOWER FRONT PANEL
(6) Quantity
of 1
BOTTOM FRAME
(7) Quantity
of 1
TOP PANEL
(8) Quantity
of 1
FIREBOX SUPPORT
(9) Quantity
of 2
FIXED WOOD
(10) Quantity
of 1
SUPPORT LEG
Care and Cleaning Instructions:
Before using, wipe with a clean, dry cloth.
Periodically apply furniture wax to renew
the finish . Avoid rubbing or scratching the
surface with rough or abrasive objects.
For replacement parts or questions, please
Call Customer Service at 1-800-633-5096
Do not return product to store, please call
Manufacturer for assistance, questions or
Parts.
Assembly Tool Required
No.2 Phillips Screwdriver (Not Included)
"SUSSEX BRAID" FIREPLACE
Parts List
Please review all parts and hardware before disposing of any packaging.
Call Customer Service if missing hardware. Do not return to store/retailer.
Screws shown in actual size. Using a screw that is too long will cause damage.
Before beginning assembly, separate each type of screw. Carefully study the
screw diagrams below (SHOWN ACTUAL SIZE). You may receive extra
hardware with
y
our unit.

Figure 1
INSERT 4PCS WOOD DOWEL (B) AND 6PCS
CAM BOLT (A) ONTO CORRESPONDING
HOLES OF LEFT AND RIGHT FRONT PILLAR
(2) AND FIT INTO CORRESPONDING HOLES
OF LEFT AND RIGHT SIDE PANEL (2),THEN
INSERT 6PCS CAM-LOCK (C) INTO BIG
HOLES ON EDGES OF SIDE PANELS (1)
WITH SLOT FOR SCREWDRIVER FACING
OUTWARD,ROTATE CAM-LOCK CLOCKWISE
TO SESURE CAM BOLT AS FIGURE 1
SHOWN.
Figure 2
INSERT 2PCS WOOD DOWELS (B) AND 2PCS
CAM BOLT (A) INTO PREDRILLED HOLES ON
END OF LEFT AND RIGHT FRONT PANELS (4)
AND FIT INTO CORRESPONDING HOLES OF
LOWER FRONT PANEL (5),THEN INSERT
2PCS CAM-LOCK (C) INTO BIG HOLES ON
EDGES OF BELOW FRONT PANEL(5) WITH
SLOT FOR SCREWDRIVER FACING
OUTWARD,ROTATE CAM-LOCK CLOCKWISE
TO SESURE CAM BOLT AS FIGURE 2
SHOWN.
Figure 3
INSERT 2PCS WOOD DOWEL (B) AND 2PCS
CAM BOLT (A) INTO PREDRILLED HOLES ON
END OF UPPER FRONT PANEL (3) AND FIT
INTO CORRESPONDING HOLES OF FRONT
PANEL (L&R)(4), THEN INSERT 2PCS
CAM-LOCK (C) INTO BIG HOLES ON EDGES
OF FRONT PANELS (L&R)(4) WITH SLOT FOR
SCREWDRIVER FACING OUTWARD,ROTATE
CAM-LOCK CLOCKWISE TO SESURE CAM
BOLT..AS FIGURE 3 SHOWN.
"SUSSEX BRAID" FIREPLACE
Assembly Instructions

Figure 4
USE 10PCS FLAT HEAD LONG
SCREW (D) TO CONNECY THE
ASSEMBLED UNIT THAT
FINISHED AT FIGURE1 AND
FIGURE3 AS FIGURE4 SHOWN.
Figure 5
PUT TOP PANEL (1) ONTO THE
ASSEMBLED UNIT, AND INSERT 8
PCS FLAT HEAD LONG SCREW (D)
INTO CORRESPONDING HOLES
TO ASSEMBLE TOP PANEL.
INSERT 4PCS WOOD DOWEL (B)
AND 7PCS CAM BOLT (A) ONTO
PREDRILLED HOLES OF BOTTOM
FRAME (6) AND FIX INTO
CORRESPONDING HOLE,THEN
INSERT 7PCS CAM LOCK (C) INTO
BIG HOLES ON EDGES OF SIDE
PANEL, FRONT PANELS AND
LOWER FRONT PANEL (1,4&5)
WITH SLOT FOR SCREWDRIVER
FACING OUTWARD,ROTATE
CAM-LOCK CLOCKWISE TO
SESURE CAM BOLT AS FIGURE 5
SHOWN.
"SUSSEX BRAID" FIREPLACE
Assembly Instructions
D
D
D
D
D
D
D
D
D
D
(4)R
(4)L
D
D
D
D
D
D
D
(7)
A
A
A
A
A
A
C
C
C

Figure 6
INSTALL SUPPORT LEG (10) ONTO
FIREBOX SUPPORT (8) BY 2PCS
FLAT HEAD LONG SCREW (D),
INSERT 2PCS WOOD DOWEL (B)
ONTO LOWER FRONT PANEL (5),
AND PUSH FIREBOX SUPPORT(8)
ONTO CORRESPONDING
FRAME,THEN USE 6PCS FLAT
HEAD LONG SCREW(D) TO FIX IT
AS FIGURE6 SHOWN.
Figure 7
INSERT FIREBOX FROM THE BACK
OF FIREPLACE. MAKE SURE
FIREBOX IS PRESSED TIGHTLY
AGAINST THE ASSEMBLED UNIT.
ATTACH FIXED WOOD (9) ON THE
SIDES OF FIREBOX. INSERT 4PCS
FLAT HEAD LONG SCREWS (D)
THROUGH PREDRILLED HOLES
ON FIXED WOOD (9) AND
TIGHTEN INTO CORRESPONDING
HOLES ON BACK OF LEFT AND
RIGHT FRONT PANELS (4) AS
FIGURE 7 SHOWN.
We'd love to hear from you! Email us photos of our products in your home at [email protected]
and we might feature it on our site or use it to model one of our inspirational photos.
"SUSSEX BRAID" FIREPLACE
Assembly Instructions
D
B
B
(9)
D
D
D

Customer Service 1-800-633-5096
Southern Enterprises, Inc.
2915 Merrell Road
Dallas, Texas 75229
Missing or damaged hardware and/or parts will be replaced free of charge. We do not sell parts. Southern
Enterprises Inc. will provide replacement parts for only those items purchased within the last 9 months. If
this product has not been purchased from our retail affiliates (within 9 months), we are under no obligation
to provide parts or replacement merchandise. Parts will not be available for items arriving fully assembled.
Parts will be sent if available from SEI. The fireplace mantel will fit both gel fuel and electric firebox inserts.
Depending on the insert ordered only one insert will be included.
WARNING: positioning anything on top of your fireplace mantel poses a degree of risk especially in the case
of electronic appliances or equipment. If you elect to display a television we recommend that it be a slim
profile flat-screen and that it be positioned away from the front edge of the mantel where there is a degree
of heat generated from the firebox. You may also want to tether your flat screen tv to the wall behind it for
added safety and security. Manufacturer assumes no responsibility for items placed on top of a fireplace
mantel.
Customer Information
Name
Address
City/State/Zip Code
Phone Number
Please indicate where you purchased this item: Store/Website/Catalog
Please indicate color/size/style number:
Style No Parts Letter Parts Description Quantity Needed
FA8566/67/68
/
6900TX - Parts Replacement Form
/