Page is loading ...

Thank you for choosing Digital Foci.
Please use this Quick Start Guide to get started with your
Picture Porter.
For more detailed explanations and examples about how
to use Picture Porter, refer to the included User's Guide.
Let Digital Foci help Optimize your Digital Living.
At Digital Foci, our mission is to enhance your life by smart
usage of digital technology.
We promise to provide you:
Easy-to-use products to help you manage and enjoy
your digital content
Attractive products to accentuate your unique style
Education and support to help you understand the
quickly changing digital technology
We aim to provide you a level of customer satisfaction
that exceeds your expectations.
Package Contents:
Picture Porter USB cable Resource Disc
Li-Ion battery Earphones User’s Guide
Video/audio cables AC adapter Quick Start Guide
Remote control Carrying case Warranty Card
Supported File Formats:
Image formats: JPEG, TIFF, BMP, RAW
Video formats: MPEG-1, MPEG-4, MJPEG, DivX 5.x
Audio formats: MP3, WMA, AAC, WAV
Supported Memory Card Formats:
CompactFlash I/II, MicroDrive, Smart Media, MultiMedia Card,
RS-MMC, Secure Digital, miniSD, Memory Stick, MS PRO,
MS Duo, MS PRO Duo
Congratulations on purchasing your Picture Porter -
handheld picture viewer with hard drive & card reader.
With Picture Porter you can:
Enjoy pictures, videos, and music anytime, anywhere
Save precious vacation pictures directly from digital
camera memory card so you can keep snapping away
Show pictures on TV to share with your family and friends
Back up important files from your computer
Carry your personal library of photos, music, and videos
with you to easily share with your friends
For more information about Picture Porter and other
products from Digital Foci, please visit our website at:
www.digitalfoci.com
www.digitalfoci.com
3111 Via Mondo
Rancho Domingues, CA 90221
USA
Picture Porter
Handheld Picture Viewer with
Hard Drive and Memory Card Reader
Quick Start Guide

Viewing Photos on Picture Porter
To view photos on full screen:
1. Navigate to the picture you want to view and
press Enter to display it.
2. To see the next photo, press Down
.
3. To see the previous photo, press Up
.
4. To rotate the photo by 90
o
, press Enter.
5. To zoom a photo, press the Zoom In button.
6. Once zooming, you can use the directional
arrows to pan to a specific part of the photo.
Press Esc to return to normal view.
To play a photo slideshow:
1. Select and display the first photo of the
slideshow you want to play.
2. Press Mnu and select Slide Show
.
3. Use Left
and Right buttons to adjust the time
interval between each photo display.
4. Press Esc to end the slideshow.
Powering Picture Porter
Charging the battery
Charge Picture Porter for at least 6 hours with
the AC adapter before first use.
Power On/Off
To turn on Picture Porter, press and hold the
On/Off button for 3 seconds. The power
indicator LED will light up green
.
To turn off the device, press and hold the
On/Off button for 5 seconds.
Low Battery Warning
The green portion of the battery icon on the
screen indicates the battery life remaining.
When Picture Porter is low on battery, the
battery icon will turn red and continue to
decrease. A full red battery indicates that
the battery is almost completely empty.
Using Picture Porter on Your Computer
Connect Picture Porter to your computer to
import photos and music to Picture Porter,
back up important files from you computer,
and use as a memory card reader.
Compatible operating systems
Picture Porter is compatible with:
Windows XP Home/Pro, ME, 2000*, 98/SE*
Macintosh OS10.0.x or later, OS 9.x, OS 8.6*
Linux OS kernel versions 2.4.x or later
* If you are using Win 2000 (SP2 or earlier),
Win 98/SE, or Mac 8.6, you need to install the
device driver from the Resource Disc. Refer to
Section 7 Driver Installation in the User’s Guide.
Connecting Picture Porter to computer
1. Connect Picture Porter to your computer via
the included USB cable.
Note: It is recommended that you plug in the
AC adapter when connecting Picture Porter to
your computer to ensure stable power supply.
2. Once connected, your computer will recognize
Picture Porter and show five devices:
- 1 hard drive and 4 removable devices
Viewing Videos on Picture Porter
1. Navigate to the video you want to play and
press Enter
.
2. To adjust volume, use the Volume Select button.
3. Press Enter to toggle between pause and play.
4. Press the Up/Down buttons to fast forward/
rewind the video. Press Enter to resume playing.
5. Press and hold the Right/Left buttons to scan
forward/scan rewind the video. The video will
resume playing when you release the button.
6. Press Esc to stop the video.
Playing Music on Picture Porter
1. Plug in the earphones into one of the ‘Audio’
jacks on Picture Porter.
2. Navigate to the song you want to play and
press Enter
.
3. To adjust volume, use the Volume Select button.
4. Press Enter to toggle between pause and play.
5. Press the Up/Down buttons to play the
previous/next song.
6. Press and hold the Right/Left buttons to fast
forward/rewind the song. Music will resume
playing when you release the button.
7. Press Mnu to access playback options. You can:
Show current playlist and select song to play
Toggle between Shuffle On and Shuffle Off
Toggle between Repeat Single and Repeat All
Select equalizer mode
Play music in the background while using
other functions on Picture Porter.
8. Press Esc to stop playing the song.
The devices will be listed in this sequence:
(Exact drive letters assignments and hard
drive labels may vary.)
(E:) CompactFlash memory card slot
(F:) SmartMedia memory card slot
(G:) MMC/SD memory card slot
(H:) Memory Stick memory card slot
(I:) Picture Porter hard drive
You can access these devices just as you would
any device on your computer.
/ BACKUP / CF - 00002
Compact Flash Format 3rd folder of this format
Version 1.6
Read the User’s Guide to learn about more about using
your Picture Porter, such as how to copy and delete
files, play music in the background, create on-the-fly
playlist, change system settings, and more.
Copying Memory Card Data
1. Insert the memory card into its designated
slot. For all cards except SmartMedia, insert
the card facing down. For SmartMedia, insert
it with the gold connector side facing
up.
2. Once the icon for the inserted memory card
appears on the screen, navigate to and
highlight the memory card icon.
3. Press Mnu to access the menu options.
Select Full Backup to copy the entire
memory card contents to Picture Porter.
Select Photo Backup to copy only the
photo and video files from the card to
Picture Porter.
4. Select Yes to confirm the folder that will be
created. This starts the copy progress.
5. The created folder and copied contents will
be located in the Backup directory of
Picture Porter.
6. Each 8-character folder name is made up
of 2 pieces of information:
a) The first few characters are letters that
indicate the type of memory card used:
MS = Memory Stick, MS Duo
MSPRO = MS PRO, MS PRO Duo
SM = SmartMedia
SD = Secure Digital
MMC = MultiMedia Card
CF = CompactFlash, MicroDrive
b) The next few characters are sequential
numbers, starting from ‘0,’ that indicate
the order in which the folder was created.
For example:
On Windows, it will look like this:
Disconnecting Picture Porter from computer
To properly remove Picture Porter from your
computer, disable the device before unplugging it.
For Windows XP, click on the Safely Remove
Hardware icon in the icon tray and select the
USB Mass Storage Device corresponding to
Picture Porter
to disable it.
Viewing Photos & Slideshows on TV
1. Connect the audio connectors (colored white
and red) to the audio input jacks of the TV.
Connect the other end of the cable into one
of the ‘Audio’ jacks on Picture Porter.
2. Connect one end of the video cable (colored
yellow) to the video input jack of the TV, and the
other end into the ‘Video’ jack on Picture Porter.
3. Set the TV to the proper video mode for the
input that Picture Porter is using.
4. To operate Picture Porter, use either its control
panel or the included remote control.
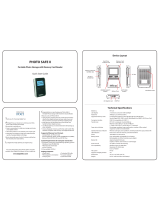
Device Layout
Side View
SMC MS/SD/MMC
AC Adapter
Jack
USB Port
Remote control
Sensor
Memory Stick/
SD Card/MMC Slot
SmartMedia
Card Slot
Video Audio 1Audio 2
CF/MD
Video
Jack
Audio
Jack (x2)
CompactFlash/
MicroDrive Slot
Top View
Power
Indicator LED
Stop/Back/
Escape
Display
Menu
Power On/Off
Color LCD
Screen
Enter/Select/
Play/Pause
Zoom/Volume
Select
Selector/
Directional
Keypad
/