Page is loading ...

Picture Porter 35
3.5” DIGITAL PHOTO MANAGER
User’s Guide

Note
Digital Foci, Inc. reserves the right to make improvements and/or changes to the
products and programs described in this User’s Guide at any time without notice.
Please read the entire User’s Guide before operating the device.
Digital Foci, Inc. assumes no responsibility for errors or omissions in this User’s
Guide. Nor does Digital Foci, Inc. make any commitment to update the information
contained herein.
Trademarks
Picture Porter 35, PhotoMemo, and Digital Foci are trademarks of Digital Foci, Inc.
All names and products mentioned within this document are registered trademarks
of their respective companies.
©2009 Digital Foci, Inc. All rights reserved. This publication is intended for sole use
by the owner of the associated device. Neither this publication nor any part of this
publication may be printed and distributed, electronically distributed, reproduced,
translated, or reduced to any other electronic medium or machine readable form
without the prior written permission of Digital Foci, Inc.
Digital Foci, Inc., 3111 E. Via Mondo, E. Rancho Dominguez, CA 90221 USA
Recycling
Digital Foci is committed to designing and manufacturing products with a sense of
environmental awareness that minimizes the overall environmental impact of our
products. Our product designs minimize material usage and waste, encourage
longer product lifecycles, and utilize recyclable components and material wherever
possible. We comply with global and local guidelines and restrictions on hazardous
substances usage.
For assistance with disposal and recycling of any Digital Foci product, please email
us at recycle@digitalfoci.com or call (310) 763-9100. More information about our
policies on recycling and environmental stewardship can be found at the Company
page of our website at www.digitalfoci.com.

Warranty Policy
As the original owner of this product, you receive these warranties from Digital Foci.
Your Picture Porter 35 (hereafter referred to as “Device”) will be free from defects in
material and workmanship and will perform in substantial compliance with your user
documentation accompanying the Device for 1 year from the purchase date
providing proper use of the Device.
Your warranty rights will be honored so long as you read and follow your user
documentation for all aspects of operating the Device. Any unauthorized or
improper use of the Device may cause your warranty to become void.
If there is a problem or defect with your Device, please contact Digital Foci, Inc.
See Section 17 Troubleshooting and Technical Support for more details and
contact information.
Disclaimer
This limited warranty is the only warranty Digital Foci, Inc. makes for the Device. To
the extent allowed by Law, no other warranty applies, whether expressed, implied,
or statutory, including any warranty of merchantability, of fitness for a particular
purpose, or of non-infringement. This warranty does not cover accidental damage,
wear and tear, or consequential or incidental loss. Under no conditions is Digital
Foci, Inc. liable for loss of or damage to, a computer; nor loss of, or damage to,
programs, records, or data; nor any consequential or incidental damages, even if
Digital Foci, Inc. has been informed of their possibility.
Additional Rights
Some states or countries do not allow exclusion or limitation of incidental or
consequential damages, or limitations on the length of an implied warranty. Under
these circumstances, the above limitations or exclusions may not apply.
This warranty includes specific legal rights, and other rights may be available from
state to state or country to country.
Safety and Regulatory Compliance
This device and it’s accessories have been tested to comply with relevant safety
and regulatory standards including, but not limited to, FCC Part 15 Class B (15.107,
15.109), CE for EMC/ITE (EN55022, EN55024), CE for EMC/AV (EN55013,
EN55020), C-Tick (AS/NZS CISPR 22), and VCCI.

Caring for Your Picture Porter 35
To keep Picture Porter 35 in good condition and working properly,
follow these basic guidelines:
• Keep Picture Porter 35 in its carrying case for safe transport and
storage.
• When cleaning Picture Porter 35, do not use abrasive cloths or
harsh chemicals.
• Do not drop, jar, bump, shock or expose Picture Porter 35 to
severe vibration.
• Do not handle or shake Picture Porter 35 while data is being
transferred.
• Do not operate or store Picture Porter 35 in dusty environments.
• Do not leave Picture Porter 35 under direct sunlight, in a parked
car, or in other situations where the temperature may be above
140°F (60°C).
• To prevent risk of short circuit and damage, do not expose Picture
Porter 35 to liquids, precipitation or moisture.
• To avoid bodily injury or damage to internal components, do not
take apart Picture Porter 35.
• Never force the USB cable if it does not plug in smoothly. Instead,
examine the head of the cable to mak sure that the plug
orientation is correct.
• Never force insertion of the memory card if it does not insert
smoothly. Instead, examine to see if the memory card is facing the
correct direction and the memory card slot is correct.
• Run file management tools such as Scan Disk, Disk
Defragmentation, and other similar tools on the Picture Porter 35
hard drive periodically for optimal performance.
• Do not attach or remove memory cards or the USB cable while
Picture Porter 35 is accessing data.

Picture Porter 35
User’s Guide
Page iv
Revision 1.1.1-1
Table of Contents
1. Welcome! ..........................................................................................................................1
1.1. Ways to Use Picture Porter 35 ......................................................................................1
1.2. System Requirements .....................................................................................................3
1.3. Supported Memory Card Formats................................................................................3
1.4. Supported File Formats ..................................................................................................4
1.5. Package Contents.............................................................................................................4
1.6. Latest Firmware ................................................................................................................4
2. Understanding the Basics................................................................................................5
2.1. Picture Porter 35 Data Flow Overview.........................................................................5
2.2. Device Layout....................................................................................................................6
2.3. Battery and Power Management...................................................................................7
2.4. Home Screen Layout .....................................................................................................10
2.5. Navigation Basics...........................................................................................................11
2.6. Screen Flow Diagram.....................................................................................................12
2.7. Hard Drive Default Folder Structure..........................................................................13
3. Setting Up Picture Porter 35..........................................................................................14
3.1. Setting Playback Options.............................................................................................15
3.2. Setting System Settings ...............................................................................................18
3.3. Viewing Technical Information....................................................................................20
4. Copying Memory Card to Picture Porter 35 .................................................................21
4.1. Connecting Memory Cards or USB Flash Drive.....................................................21
4.2. Copying from Memory Card or USB Flash Drive to Picture Porter 35 .............22
4.3. Understanding Default Backup Folder Name Assignments................................25
4.4. Copying Selected Folders or Files.............................................................................26
4.5. Accessing Your Copied Photos on Picture Porter 35...........................................26
5. Basic Operations............................................................................................................27
5.1. Navigating Folder View.................................................................................................27

Picture Porter 35
User’s Guide
Page v
Revision 1.1.1-1
5.2. Selecting Items................................................................................................................28
5.3. Sorting in Folder View or Preview Mode..................................................................29
5.4. Using the On-screen Keyboard...................................................................................29
6. Enjoying Slideshow with Photos, Video, Music............................................................30
6.1. Accessing Files in Folder View...................................................................................30
6.2. Viewing Photos, Video, Music in Preview Mode.....................................................32
6.3. Playing Slideshow..........................................................................................................34
6.4. Changing Slideshow Options......................................................................................36
6.5. Changing View Mode.....................................................................................................38
6.6. Pausing Slideshow, Scrolling Manually, Zooming & Panning............................39
6.7. Rotating Photos ..............................................................................................................41
6.8. 42
6.9. Playing PhotoMemo
TM
...................................................................................................42
7. Enjoying Video...............................................................................................................43
8. Enjoying Music..............................................................................................................46
9. Folder View – File Management Options.....................................................................48
9.1. Renaming a File or Folder............................................................................................48
9.2. Creating a New Folder...................................................................................................48
9.3. Copying and Pasting Files and/or Folders ..............................................................49
9.4. Moving Files or Folders ................................................................................................49
9.5. Deleting Files and/or Folders ......................................................................................50
10. Recording and Playing PhotoMemo
TM
.........................................................................51
10.1. MemoRec Menu Options..........................................................................................52
10.2. Recording PhotoMemo.............................................................................................52
10.3. Playing Back PhotoMemo........................................................................................53
11. Exporting Selection to Export Folder...........................................................................54
11.1. Copying Files to the Export Folder............................................................................54
11.2. Understanding Default Export Folder Name Assignments..................................56
Viewing IPTC Metadata..................................................................................................

Picture Porter 35
User’s Guide
Page vi
Revision 1.1.1-1
11.3. Access Files in Export Folder on Picture Porter 35..............................................56
12. Managing Playlists.........................................................................................................57
12.1. Playlist Manager Screen...........................................................................................58
12.2. Playlist Manager Menu Options..............................................................................59
12.3. Playlist (contents) Screen........................................................................................61
12.4. Playlist (contents) Menu Options...........................................................................62
12.5. Changing the File Sequence of a Playlist............................................................62
12.6. Adding Entries to a Playlist.....................................................................................63
12.7. Understanding the Playlist File...............................................................................64
13. Using Picture Porter 35 with Your Computer...............................................................65
13.1. Connecting Picture Porter 35 to Your Computer...............................................65
13.2. Accessing Picture Porter 35 Data on Your Computer ......................................66
13.3. Disconnecting Picture Porter 35 From Your Computer ...................................67
14. Using Picture Porter 35 with Other Devices.................................................................69
14.1. Using Picture Porter 35 with A/V Devices............................................................69
14.2. Using Picture Porter 35 with Another Picture Porter 35..................................70
14.3. Using Picture Porter 35 with an USB Flash Drive..............................................71
14.4. Using Picture Porter 35 with an External Hard Drive........................................72
15. Using Additional Features.............................................................................................73
15.1. Updating Firmware.....................................................................................................73
15.2. Checking Remaining Hard Drive Space ...............................................................73
15.3. Resetting Picture Porter 35......................................................................................74
15.4. Reformatting Picture Porter 35...............................................................................74
15.5. Creating Multiple Partitions Picture Porter 35....................................................75
16. Frequently Asked Questions..........................................................................................77
17. Troubleshooting and Technical Support.......................................................................83
18. Appendix: Technical Specifications ..............................................................................87
19. Appendix: RAW Formats Supported.............................................................................89

Picture Porter 35
User’s Guide
Page vii
Revision 1.1.1-1

Picture Porter 35
User’s Guide
Page 1
Revision 1.1.1-1
1. Welcome!
Congratulations on purchasing your Picture Porter 35 – 3.5” Digital
Photo Manager.
1.1. Ways to Use Picture Porter 35
Bring Picture Porter 35 with you anywhere you go to enjoy, share,
back up, and manage your photos, videos, music, and other data
in many different ways.
• View and review photos on the 3.5” color LCD display:
o Display photos on the full screen or in thumbnail view
with 3x2, 5x4, and List display settings.
o Use PhotoMemo
TM
recording feature to make notes for
individual photos while the thoughts are fresh in your
mind or add personal messages to introduce each
photo in a slideshow.
o See detailed views of your photos (including RAW
photos) by using zoom, pan, and rotate functions.
o View EXIF information and histograms of your photos.
o View photo IPTC details and show photo IPTC
comments of the photos in full screen display mode.
o Play your photos in an automatic slideshow or control
the slideshow manually.
o Add music to play in the background along with the
photo slideshow.
• Securely back up your precious digital photos:
o Copy and store photos directly from digital camera
memory cards to Picture Porter 35 so you can free up
memory card space and keep shooting more photos.
o USB-host capability lets you create a second backup
from Picture Porter 35 to USB flash drive or external
hard drive for extra security.

Picture Porter 35
User’s Guide
Page 2
Revision 1.1.1-1
• Manage your photos:
o Copy, move, delete, and rename files and folders.
o Create new folders.
o Sort files by name, date, file size, file type, and random
shuffle.
o Review and export selected photos and other files to a
designated Export folder for quick and easy retrieval.
o Create, sequence, and playback Playlist items directly
on the device.
o Export Playlists to a designated Export folder or
another Picture Porter 35.
• View videos and play music on Picture Porter 35:
o Play MPEG-4/Simple Profile, MPEG-1, MJPEG videos.
o Play MP3, WMA, AAC music files.
• Output Picture Porter 35 display to TV or projector:
o Connect to TV or projector via the audio/video output
to enjoy and share photos and videos on a big screen.
• Record and Playback PhotoMemo
TM
:
o Make PhotoMemo voice recordings as you review
each photo.
o Play slideshow with PhotoMemo introduction of each
photo or choose to play PhotoMemo on cue.
• Back up, transport, and archive data:
o Use Picture Porter 35 as a portable hard drive for
backing up important files from your computer.
o Move data between computers with different operating
systems (Windows, Mac, Linux) by using the USB
connection as a common bridge.
o Organize and archive your photos, video, and music
library on Picture Porter 35.

Picture Porter 35
User’s Guide
Page 3
Revision 1.1.1-1
• Access and transfer memory card and USB flash drive data:
o Use Picture Porter 35 as a multi-format memory card
reader for your computer to access data from memory
cards used by your digital camera, music player,
mobile phone, and PDA.
o Copy files directly from memory cards and USB flash
drives to Picture Porter 35, and vice versa, without
needing a computer.
1.2. System Requirements
1) Computer running any of the following operating systems:
o Windows – 7, Vista, XP
o Macintosh – OS 10.6, 10.5, 10.4
o Linux – OS kernel versions 2.4.x & later
2) One available USB Port
1.3. Supported Memory Card Formats
Picture Porter 35 has been tested to support the following memory
card formats:
Directly without adapter
:
CompactFlash (CF)
Memory Stick (MS), MS PRO, MS Duo, MS PRO Duo
Secure Digital Card (SD), SDHC
MultiMedia Card (MMC)
miniSD, RS-MMC
xD-Picture card
With appropriate adapter*
:
MicroSD, TransFlash
MMCmicro, MMCmobile
M2
* Adapters are typically sold with these memory cards or are
separately available for purchase.

Picture Porter 35
User’s Guide
Page 4
Revision 1.1.1-1
1.4. Supported File Formats
Picture Porter 35 supports the following file formats:
Image formats
: JPEG, TIFF, BMP, GIF, RAW*
Video formats
: MPEG-4/Simple Profile, MPEG-1, MJPEG
Audio format
: MP3, WMA, AAC
* Refer to Section 19. Appendix – RAW Formats Supported
for
details.
1.5. Package Contents
Before using your Picture Porter 35, check that your package
contains the following items:
Picture Porter 35
Rechargeable Polymer Li-Ion battery
AC power adapter
USB cable (to computer)
USB-OTG cable (to USB Mass Storage Device)
RCA cable for audio/video output
Earphones
Custom carrying case
Wrist strap
User’s Guide
Quick Start Guide
1.6. Latest Firmware
New versions of the Picture Porter 35 firmware are periodically
released with new features and format support to enhance your
user experience.
Check the Digital Foci website (http://www.digitalfoci.com/support
)
for the latest available firmware updates and instructions.

Picture Porter 35
User’s Guide
Page 5
Revision 1.1.1-1
2. Understanding the Basics
2.1. Picture Porter 35 Data Flow Overview
Here is an overview of the Picture Porter 35 data flow:
Input Source Picture Porter 35 Connection
Memory card Memory card slots
Computer USB port
USB flash drive USB port with USB-OTG cable
Voice Built-in microphone
Output Type Picture Porter 35 Output Method
Photo and video Color LCD screen
Mono sound Built-in speaker
Stereo sound Earphones or RCA audio out
Memory cards Memory card slots
TV or projector RCA audio and video out
USB flash drive USB port with USB-OTG cable
USB external HDD* USB port with USB-OTG cable
Data transfer to computer USB port
Photo printing to photo kiosk USB port
* Some external hard drives may not be compatible.

Picture Porter 35
User’s Guide
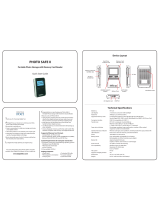
2.2. Device Layout
Page 6
Revision 1.1.1-1
Power Jack
Wrist Strap Ancho
r
Top
Bottom
Right
Left
Power Button
A
udio/Video Out Jac
k
Mic
Power LED
HDD LED
USB
Battery Doo
r
ESC
MENU
VAL +/-
Memory Card
Slot Doors
JOG DIAL
Front
Speake
r

Picture Porter 35
User’s Guide
Page 7
Revision 1.1.1-1
2.3. Battery and Power Management
On a full charge, Picture Porter 35 is capable of up to 4 hours of
continuous video playback and up to 3 hours of non-stop memory
card copy.
2.3.1. Installing the Battery
1. Locate the battery door at the right bottom of Picture Porter
35. Press down the battery door latch to release it and swing
it open in a counter-clockwise rotation.
2. Insert the included Polymer Li-Ion Battery into the battery
compartment. Make sure that the Battery Tab* of the battery
is at the top opening of the battery compartment.
3. Close the battery door until you hear a solid click and the
latch is locked.
* The Battery Tab is used as a finger latch to remove the battery.
d
c
Opening Battery Door:
(1) With your index finger, press down
and release the latch as shown.
(2) With your thumb, catch the bottom
edge of the battery door to rotate out.
Inserting Battery:
When inserting the battery,
make sure the tab of the battery
is at the top opening as shown
in the circle above.
Batter
y
Tab

Picture Porter 35
User’s Guide
Page 8
Revision 1.1.1-1
2.3.2. Charging the Battery via AC power adapter
For best battery performance, charge the new battery to full
before first use.
With the battery installed in Picture Porter 35, connect the AC
power adapter to charge the battery.
It takes approximately 3 hours to fully charge an empty battery.
2.3.3. Charging the Battery via USB Port
You can also charge the Picture Porter 35 battery through the
USB port by connecting it to a computer or USB charging device.
USB power charges at a slower rate than the AC power adapter.
When charging through the USB port, make sure that the Picture
Porter 35 is turned off for faster charging.
Note
: Most computers must be turned on for the USB port to
supply power. Check the documentation for your computer to see
if the USB port can provide power while the computer is off.
2.3.4. Power Indicator LED
The power indicator (left) LED shows the power status.
Green
: Picture Porter 35 is turned on and using battery power.
Red
: Picture Porter 35 is turned off and the battery is charging.
When the battery is fully charged, the LED will turn OFF.
Orange
: Picture Porter 35 is turned on and charging. The
onscreen battery indicator will flash to show that the battery is
charging.
2.3.5. Powering On/Off
To turn on Picture Porter 35, press the Power Button. The Power
indicator LED will turn green (or orange if the battery is charging)
and the operating system will start up. When the Home Screen is
displayed after the Startup Screen, it will take a few seconds for
the hard drive to spin up. The HD1
icon will appear on the Home
Screen after the hard drive is mounted and becomes accessible.
To turn off the device, press and hold the Power Button for 3
seconds. Picture Porter 35 will indicate that it is shutting down at
the bottom of the screen and the power indicator LED will turn off
(or become red if the battery is charging).

Picture Porter 35
User’s Guide
Page 9
Revision 1.1.1-1
2.3.6. On-screen Battery Indicator
The battery status is shown at the lower-right corner of the screen.
Flashing battery
¨
: Charging
Solid full battery
: Full charge
Solid partial battery
: Remaining charge
Red almost empty battery
: Low battery
Empty battery
: Power will run out soon
Picture Porter 35 will soon force a shut
down*. Quickly finish any uncompleted
tasks and safely turn off the device or
connect to AC power immediately.
* In the event that you are in the middle of a copy task when the
Picture Porter 35 shuts down, the Picture Porter 35 will safely
stop your copy in the middle of the task before shutting down.
Note that in this case the copy task will be incomplete and
contain only part of the entire set of files that were supposed to
be copied. To avoid accidental data loss, remember to do the
copy task again after you have sufficient power.
Under Setup
> TECHNICAL INFORMATION > Battery, the
remaining battery life will be indicated as a percentage.
2.3.7. Battery Saving Features
There are two power saving features to help maximize battery life.
1. Screen Saver Timer
: If no button has been pressed and
there is no activity for 30 seconds (default setting), Picture
Porter 35 will turn off the LCD screen. Pressing any button
will turn the screen back on.
2. Auto Shutdown Timer
: If no button has been pressed and
there is no activity for 10 minutes (default setting), Picture
Porter 35 will automatically shut down. Picture Porter 35 will
resume operation with the most recently accessed
navigation screen when turned on again.
You can adjust the above power saving features to best match
your needs by accessing Setup
. Refer to Section 3 Setting up
Picture Porter 35 for detailed instructions.

Picture Porter 35
User’s Guide
Page 10
Revision 1.1.1-1
2.4. Home Screen Layout
The Home Screen on Picture Porter 35 allows you to navigate the
icons and select your desired function.
The following diagram gives an overview of the available selections.
Press ENTER on the JOG DIAL to select the desired icon.
Note
: The Memory Source icons will only appear when the
associated memory device is connected.
Hard Disk Access:
View and access contents of the Picture Porter 35 hard drive
.
Memory Source Access:
View and access the contents of inserted
memory cards or connected USB flash drive.
* N
o
t
a
ll i
co
n
s
a
r
e
s
h
o
wn h
e
r
e
.
Shortcuts:
View and access contents of
related folders on the hard drive.
System Setup:
Enter setup options for Playback
Settings, System Settings, and
Technical Information.
PhotoMemo
TM
Voice Memo Tool:
Record and playback voice memos
using the PhotoMemo feature.
Playlist:
Manage and select Playlists for playback.

Picture Porter 35
User’s Guide
Page 11
2.5. Navigation Basics
Picture Porter 35 is operated by 7 inputs all located on the right
side for easy operation. The JOG DIAL and VAL + / - buttons
have different functions for different screens as described in the
diagram below.
ESC:
Stop current operation.
Go back to previous screen/function.
Cancel zoom.
(
Zoom Mode
)
MENU:
Open and cancel onscreen menu.
JOG DIAL:
Roll – Move cursor. Change value selection.
Change slideshow time interval. (Playback)
Pan zoom area. (Zoom Mode)
Push – Enter. Select/de-select item.
Play/pause slideshow. (Playback)
Change axis direction of pan. (Zoom Mode)
Start Slideshow. (Playlist)
VAL +:
Jump cursor to HD1. (Home Screen)
Navigate down 1 folder level. (Folder View / MemoRec)
Skip to previous page. (Preview Mode / Playlist Manager)
Move photo sequence up one space. (Playlist)
Increase volume. (Playback)
Start/increase zoom. (Paused photo slideshow)
Navigate to next tab. (Setup / IPTC details)
VAL -
:
Jump cursor to Setup. (Home Screen)
Navigate up 1 folder level. (Folder View / MemoRec)
Skip to next page. (Preview Mode / Playlist Manager)
Move photo sequence down one space. (Playlist)
Decrease volume. (Playback)
Decrease zoom. (Paused photo slideshow)
Navigate to previous tab. (Setup / IPTC details)
Revision 1.1.1-1

Picture Porter 35
User’s Guide
Page 12
Revision 1.1.1-1
2.6. Screen Flow Diagram
The following diagram shows an overview of the Picture Porter 35
screen flow originating from the Home Screen.
Home Screen
Playlist Manager / Playlist - Play
Setup
MemoRec
Folder View / Preview Mode - Play
/