Page is loading ...

System Requirements for Computer Connection
1) Computer running any of the following operating systems:
Windows Vista, XP Home/Pro, ME, 2000
Macintosh OS 9.0 & later
2) One available USB Port
Thank you for choosing Digital Foci.
Let Digital Foci help Optimize your Digital Living.
At Digital Foci, our mission is to enhance your life by
smart usage of digital technology.
We promise to provide you:
Easy-to-use products to help you manage and enjoy
your digital content
Attractive products to accentuate your unique style
Education and support to help you understand the
quickly changing digital technology
We aim to provide you a level of customer satisfaction
that exceeds your expectations.
Congratulations on purchasing your Photo Safe -
Portable Picture Storage with Hard Drive & Card Reader.
Ways you can use Photo Safe:
Save precious vacation pictures directly from digital
camera memory cards so you can free up memory card
space and keep shooting
Easily get your set of photos from your friends’ and
family members’ digital cameras
Use Photo Safe as an external hard drive for backing
upyour computer
Access all popular memory card formats: CF, MD,
MMC, SD/HC, MS, MS PRO, xD
Transfer files between computers and memory card
supported devices
For more information about Photo Safe and other
products from Digital Foci, please visit our website at:
www.digitalfoci.com
PHOTO SAFE
Portable Photo Storage with Memory Card Reader
User’s Guide
Supported Memory Card Formats
CompactFlash, MicroDrive,
Secure Digital (SD), SDHC, MultiMedia Card (MMC),
Memory Stick, MS PRO, xD-Picture Card
(miniSD, RS-MMC, MS Duo, MS PRO Duo with standard adapter)
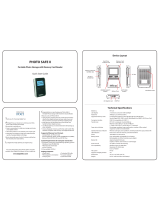
Device Layout
Technical Specifications
Front View Right Side View
Left Side View
Hard Drive
Indicator LED
[ENTER] Button
Memory Card
Indicator LED
[POWER/SELECT]
Button
Battery
Compartment
Battery Door Button
Model no. PSF-250
LCD display 1.9” text/icon LCD screen with backlight
Hard drive 5400rpm 2.5” hard drive
Supported memory cards CompactFlash, MicroDrive, Memory Stick, MS PRO,
Secure Digital (SD), SDHC, MultiMedia Card (MMC), xD-Picture Card
(MS Duo, MS PRO Duo, miniSD, and RS-MMC with standard adapter)
Computer interface USB 2.0 (compatible with USB 1.1)
Transfer rate PSF-250 to computer: Up to 480 Mb/sec
Memory card to PSF-250: Up to 4.8 MB/sec*
(* Copies a full 1GB CF card in about 3.5 minutes)
Copy status indicator Percentage completed, copy confirmation, number of files copied,
sequence number of created folder
Operational status indicator Memory card type, active partition, remaining hard drive capacity, battery life
LED indicators Data access status for memory card and hard drive
External power 100-240V AC to 5V/1A DC
Battery power 3.6V 900mAh user-removable rechargeable Li-Ion battery
Rechargeable via USB or external power adapter
Battery life Approximately 1.5 hours
(Copies a 512MB card 18 times on a full charge)
Auto shut-off Yes (after 30 seconds of inactivity)
OS compatibility Windows Vista, XP Home/Pro, 2000
Macintosh OS 9.0 & later
File system FAT32
Supports multiple partition Yes
Dimensions 4.6" (L) x 3.0" (W) x 0.8" (H)
Weight 0.6 lb. (with hard drive and battery)
Photo Safe USB cable
Rechargeable Li-Ion battery AC power adapter
Carrying case User’s Guide
Package Contents:
AC Adapter Jack
USB Port
HDD
CARD
Memory Stick/
SD Card/MMC/xD Slot
CompactFlash/
MicroDrive Slot
CF / MicroDrive
SD / MMC / MS / XD

Version 3.32-1
Accessing your Copied Files on Your Computer
Locating your Copied Files on Your Computer
For each copy, Photo Safe creates a unique folder name
indicating memory card type and copy sequence number
for each card type to help you easily locate your files.
The created folder and copied contents will be located within
the default FILES folder on the Photo Safe hard drive.
Each 7-character folder name is made up of 2 parts:
(a) The first 2 characters are letters that indicate the
type of memory card copied:
CF = CompactFlash, MicroDrive SD = Secure Digital
MS = Memory Stick formats MC = MultiMedia Card
xD = xD-Picture Card
(b) The next 5 characters are sequential numbers,
starting from ‘00001’, that indicate the order of the
folder created for the specific card format copied.
MS/SD/MMC/xD
CF/MicroDrive
4. Once the memory card is inserted, Photo Safe will display
the memory card type and amount of data on the card.
The {COPY} icon will flash, indicating that Photo Safe is
ready for backup.
5. Press the [ENTER / ] button to start the copy task. The Card
LED will blink to indicate that the memory card is being
accessed and copy is in progress. Photo Safe will display the
percentage of the total copy task completed as it progresses.
6. When copy is completed, you will see copy confirmation {OK}
and {100%}, indicating that data on the card has been copied.
7. By pressing and holding the [ENTER / ] button, the screen
will toggle between:
(a) the total number of files copied, and
(b) the folder number created to which the files are copied.
8. You may remove the memory card and turn off the device
by pressing the [POWER] button for 3 seconds until the
LCD turns off. Photo Safe also has a battery saving feature
that turns off automatically after 30 seconds of inactivity.
NOTE: In the unlikely event that the data backup fails, the copy
operation will stop and the {ERROR} icon will be displayed.
You may choose to repeat the operation.
3. Insert the memory card into its designated slot with the
label side of the card facing up.
Note: Adapters required for miniSD, RS-MMC, MS Duo/PRO Duo.
2. To see the available hard drive space on Photo Safe,
press the [ENTER / ] button.
Copying Photos from Memory Card to Photo Safe
Powering Photo Safe
NOTE: Photo Safe ships with battery pre-installed for your
convenience.
Charging the Battery
For best battery performance, charge the new battery
for 6 hours with the included AC power adapter.
The on-screen battery icon will flash to indicate that the
battery is charging. When the battery is fully charged,
the battery icon will stop flashing and show 3 full bars.
NOTE: If the battery does not charge automatically (i.e. battery
icon is not flashing) when connected to the AC adapter,
press the [POWER] button to start the charging operation.
NOTE: To ensure stable power supply, always use AC power
when your Photo Safe is connected to your computer by USB.
Power On/Off
To turn on Photo Safe, press and hold the [POWER] button for
3 seconds. The LCD will turn on.
To turn off Photo Safe, press and hold the [POWER] button for
3 seconds. As a battery saving feature, Photo Safe turns off
automatically after 30 seconds of inactivity.
Installing New Battery
1. Remove the battery cover on Photo Safe by pressing down
the battery door button and pushing the door outward.
2. Remove the transparent film wrap from the Li-Ion battery.
3. Insert the Li-Ion battery into the battery compartment by
matching the gold connectors at the top.
4. Replace the battery door and make sure it is closed firmly.
SD
HD
%
BATT
COPY
SD
HD
BATT
FILE COPIED
COPY
BATT
INSERT
CARD
HD
GB
BATT
FREE
SD
%
BATT
OK
COPY
SD
BATT
FOLDER
COPY
1. Power on Photo Safe by pressing the [POWER] button for
3 seconds. The LCD will turn on, and the {INSERT CARD}
icon will flash, prompting you to insert a memory card.
For example:
Additional Features
Deleting Memory Card Contents with Photo Safe
You can use Photo Safe to delete all the data on your memory card.
1. Insert the memory card in its designated slot. Note that the delete
feature will not be available if 2 cards are inserted at the same time.
2. Press the [POWER/SELECT] button
to switch to DELETE mode. The
{DEL} icon will flash , indicating that
Photo Safe is ready to delete the card.
3. Press and hold the [ENTER / ]
button for 3 seconds to execute
the delete operation.
4. When deletion is completed, you will see the screen
confirmation - {OK} and {100%}.
NOTE: You cannot delete files stored on the Photo Safe hard drive
directly. To delete files from the hard drive, connect Photo Safe to
your computer.
Copying from MS/SD/MMC/xD Card to CF Card
You can use Photo Safe to copy card content from a Memory
Stick, SD, MMC or xD-Picture Card onto a CompactFlash card.
Important Note about Formatting Photo Safe
Please note that the Photo Safe hard drive has to be
formatted in FAT32 format for Windows (or MS-DOS
file system for Mac), in order for the card copy function
to work. It will not work under NTFS format. Please
contact [email protected] if you need assistance.
Also note that formatting Photo Safe will delete all data
on your Photo Safe hard drive.
Utilizing Multiple Partitions on Photo Safe
Photo Safe supports multiple partitions on its hard drive.
You can use this feature to help organize your copy tasks.
Before each copy task, you can select to which specific
partition to copy your memory card content.
1. Create multiple partitions on the Photo Safe hard drive
with a partition software. Make sure that the partitions
are formatted with FAT32 as primary partitions.
2. Turn on Photo Safe. Press the [ENTER / ] button once,
and Photo Safe will show you the first partition and its
remaining hard drive space.
3. Press the [POWER/SELECT] button to select a different
partition. Photo Safe will show the active partition and
its free space. Press the [POWER/SELECT] button until
you see the desired partition for your copy task.
4. Insert your memory card into Photo Safe. Start the copy
task by pressing the [ENTER / ] button. Your card content
will be copied to the specific partition you selected.
Technical Support
If you have any questions about using your Photo Safe, please
contact Digital Foci technical support at: [email protected]
or call toll-free 1-888-669-3624
FAQs & Firmware Update
Check the Digital Foci website (www.digitalfoci.com/support) for
Frequently Asked Questions and any available firmware updates.
SD
HD
MB
BATT
USED
X
DEL
MS / SD / MMC / xD CF / MicroDrive
1. First, insert the card (Memory Stick, SD, MMC, or xD) with
the files you want to copy.
2. Next, insert the CF card to which you’d like to copy the files.
3. Press the [POWER/SELECT] button to switch the designated
copy location from HD to CF. Photo
Safe will show the CF indicator and
the free space on the CF card.
4. Press the [ENTER / ] button to start
copy. Data on your MS/SD/MMC/xD
card will be copied onto the CF card.
SD
CF
MB
BATT
FREE
COPY
SD
HD
MB
BATT
USED
COPY
(Photo Safe Hard Disk): \ FILES \ CF00003\
CompactFlash
Format
3rd folder of
CF card format copied
Connecting Photo Safe to Your Computer
Connect Photo Safe to your computer with the included USB cable.
To ensure stable power supply, always use AC power adapter
when connecting Photo Safe to your computer by USB. When
connected, Photo Safe will display an USB icon on its screen.
Your computer will automatically recognize Photo Safe and
show 1 hard drive and 2 removable devices.
The 3 devices will be listed in this sequence: (Drive letters may vary)
(g:) CF/MD card slot (shown as a Removable Disk)
(h:) SD/MMC/MS/xD card slot (shown as a Removable Disk)
(i:) Photo Safe hard drive (labeled ‘HARDDISK’)
Once connected to your computer, Photo Safe becomes an
external hard drive and multi-format memory card reader/writer.
You can access files on Photo Safe and inserted memory cards
with your computer, and you can transfer files between Photo
Safe, inserted memory cards, and your computer.
/