Page is loading ...

vHub & WiFi Module Operation Manual 1
Rev 1.2.0 APRIL 2022
vHub & WiFi Module
Operation Manual
1. Overview
zappi’s and eddi’s with a ‘H’ in their Model Number are supplied with a built-in Ethernet port (RJ45 socket) and WiFi
to connect to the local network (LAN). They also come with built-in Hub functionality (vHub) which means you don’t
need a separate hub to link your myenergi devices to the internet / use the myenergi app.
Before you proceed you will first need to decide whether you will be connecting to your home router through wired
Ethernet or WiFi. If you are using Ethernet start at section 2, if connecting via WiFi skip ahead to section 3.
2. Setting your ‘Master’ Device and in-built vHub
There are two likely scenarios here. Either this is your first myenergi device or you are adding this device to an existing
myenergi home eco-system.
When you boot up your device you will see the below screen asking if this is “1st device installed” or whether you are
integrating into an existing system (“Additional device”).
If you select “1st Device Installed” this sets the Master and vHub to ON at start up.
If you are integrating into a system that already has a ‘Hub’ or a myenergi device that is already set to ‘master’ select
“Additional Device” and this will then set the Master and vHub on your new device to OFF.
NOTE: If you have 1 existing standalone myenergi device E.g. an eddi only, you may need to select “1st device installed”
– you will need to do this if your first device is not connected to the internet.
NOTE: If vHub is turned on it will appear in ‘Devices’ list (as shown below) displaying the same serial number as your
zappi/eddi device.
3. Wired Ethernet
To use the wired Ethernet (RJ45 port) simply plug an Ethernet cable into the port inside the zappi / eddi and connect
the other end into your router.
• IMPORTANT: This must be connected before turning the device on
• If Ethernet cable is connected the WiFi setting will be forced to ‘off’. Please note if you later decide to connect
using WiFi you will need to unplug your Ethernet cable and manually turn the WiFi back on in settings.

2 vHub & WiFi Module Operation Manual
Rev 1.2.0 APRIL 2022
D3400
4. WiFi Module
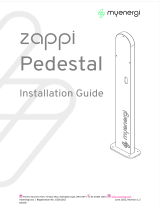
4.1 WiFi Set-up Procedure with WPS (Single zappi / eddi)
If your router has WPS capability and you wish to use this for quicker set-up follow the below instructions. If not, jump
to section 4.2.
1. On your zappi menu Navigate to ‘Other Settings’ > ‘Internet’ >’WiFi’>’WiFi Config’
2. If it is showing as ‘Off’, select ‘WiFi’ and press ‘+’ to set to ON. If it will not change from OFF to ON it is
because an Ethernet cable is plugged in.
3. Select ‘WPS Activate’. Then follow the on screen instructions.
NOTE: Not all WPS buttons look the same. Below are some examples but it may appear differently on your router.
4. Finally, ensure WiFi screen of zappi is showing as “Connected”. This could take up to two minutes to
complete so be patient!
4.2 WiFi Set-up Procedure (Single zappi / eddi)
If you have already set up using WPS then skip this section.
The latest versions of zappi and eddi 1have an integrated WiFi module which enables connection to a router where a
hardwired Ethernet connection is not possible.
Your zappi / eddi will only use WiFi if you do not have an Ethernet cable plugged in. The WiFi module is switched on
by factory default when the device is first installed.
If you have trouble setting up the WiFi module or this is not a first time installation from the factory, check that the
WiFi is turned on:
1. Navigate to ‘Other Settings’ > ‘Internet’ >’WiFi’ > ‘WiFi Config…’
2. If it is showing as ‘Off’, select ‘WiFi’ and press ‘+’ to set to ON. If it will not change from OFF to ON it is because
an Ethernet cable is plugged in.
3. Scroll down to ‘Access Point’, this should be set to ON by default
4. If it is showing as ‘Off’, select ‘Access Point’ and press ‘+’ to set to ON
1 The WiFi enabled device with built-in hub can be identified by the letter “H” in the product code, e.g. ZAPPI2H02-TW or EDDI-
16A1PH02H

vHub & WiFi Module Operation Manual
Rev 1.2.0 APRIL 2022 3
Tip: It may be worth making a note of the SSID and Password information or taking a
photograph to assist you with the next steps.
5. Connect your smartphone or computer to the myenergi access point:
a. Go to your smartphone or computer WiFi Settings.
b. You will see the network displayed with the same name as the SSID you noted down above. Here are
some examples from a phone and computer.
6. You will be prompted for the WiFi password. This is the password given in the zappi/eddi menu you noted
down above.
7. You will now be prompted to create a new password to protect the WiFi
settings from being changed by anyone else. This must be at least 8
characters long, consisting of a combination of lowercase and uppercase
letters, and digits. Make a note of the password as you will need it if you
ever need to change the WiFi settings.
8. Wait 5 seconds for your password to change and the webpage to reload.
9. Once connected, you will be directed to the webpage as shown below where you will need to select your home
WiFi Network from the list in the “Detected Networks” box and type in
your WiFi password to connect to your router.
NOTE: In most cases you should leave the “Show IP Settings” option
unticked. However, if you want to give your zappi/eddi a fixed IP address
then tick the ‘Show IP Settings’ box and fill in the extra information
needed.

4 vHub & WiFi Module Operation Manual
Rev 1.2.0 APRIL 2022
D3400
10. Please wait 15 seconds for the connection to take place.
11. Finally, make sure that the WiFi is connected. You can check this by either:
a. Looking on the settings web page, where you should see “Connected” is showing as “True” or
b. On the WiFi screen on the zappi, where it should show as “Connected”
NOTE: If the screen above does not appear check your phone or computer is still connected to the
myenergi access point.
12. Once connected, your ‘Access Point’ will turn itself OFF as it’s only needed to set up the WiFi connection. If no
connection is established your ‘Access Point’ will remain ON for 60 minutes before turning itself OFF. Turning
it off prevents anyone else connecting to the zappi/eddi WiFi.
5. Technical Support
If you experience any issues during or post set-up, please contact our technical support team by scanning the QR Code
below.
https://myenergi.com/manual-support/
Please contact us directly for the quickest solution.
/