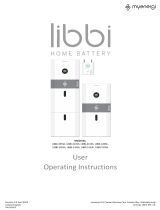
Revision 1.1, November 2022 D3510
United Kingdom
Step 5: You will now be able to see the RCD board
in the top left corner. This sits on top of the main circuit
board. The existing board is held in place by 2 clips on
the bottom edge. Simply, push both clips down towards
the bottom of the zappi, the board will release, then pull
the board away.
Step 6: Pull the board downwards and out of the
socket on the top edge.
Step 7: Holding by its edges, refit the new RCD board
in the same way, pushing it back down until it clicks into
place and sits flush, as before. Make sure both clips are
fully engaged.
Step 8: Before closing the zappi check that none of
the surrounding cables or connections have been loosened or disconnected.
Step 9: Refit the front cover, ensuring the ribbon is securely pushed back in
before screwing the cover back by securing the 8 screws. Tighten to 1.2N m.
Step 10: Refit the coloured fascia.
Step 1: Restore the supply to the zappi and carry out a full range of RCD tests
using suitable test equipment.
Step 2: Before leaving site, you must always check the customer’s EV will
charge.
If you experience any issues, during or post installation, please contact our
technical support team by scanning the QR Code below
Please contact us directly for the quickest solution.