Page is loading ...

Revision 5.0 April 2023 myenergi Ltd. Pioneer Business Park, Faraday Way, Stallingborough
United Kingdom Grimsby, DN41 8FF, UK
PM-00003
Model No.
LIBBI-305Sh, LIBBI-310Sh, LIBBI-315Sh, LIBBI-320Sh,
LIBBI-505Sh, LIBBI-510Sh, LIBBI-515Sh, LIBBI-520Sh
User
Operating Instructions

2
Copyright
Copyright of these instructions remains with the
manufacturer. Text and images correspond to the technical
level at the time of going to press. We reserve the right to
make changes. The content of the operating instructions shall
not give rise to any claims on the part of the purchaser. We are
grateful for any suggestions for improvement and notices of
errors in the operating instructions,
myenergi libbi, myenergi zappi, myenergi eddi, myenergi harvi
and myenergi hub are registered trademarks of myenergi ltd.
Liability Limitation
myenergi do not accept any direct or indirect liability for
product damage or property loss caused by the following
conditions:
• Product modified, design changed or parts replaced
without authorisation
• Changes, repair attempts and erasing of serial numbers or
seals by an unauthorised person
• System design and installation were not in compliance
with standards and regulations; failure to comply with the
local safety regulations
• Transport damage (including scratches to enclosure
caused by rubbing of packing during shipping)
• Failure to follow any and/or all user manuals, installation
guides and maintenance regulations
• Improper use or misuse of the device
• Force majeure (stormy weather, lightning overvoltage,
fire etc.)
• Damage from external factors

3
Contents
1. Introduction .................................................................................. 4
1.1 Safety .............................................................................. 4
2. Product Description ...................................................................... 5
2.1 Product Introduction .............................................................. 5
3. Product Registration ..................................................................... 5
3.1 First Time User? Register for an Account ............................... 5
3.2 Existing Users.......................................................................... 5
4. myenergi app ................................................................................ 5
4.1 Choose green or grid .............................................................. 5
4.2 Input Electricity Tariff ............................................................. 6
4.3 Setting Priorities ..................................................................... 6
5. libbi and zappi .............................................................................. 8
6. libbi and eddi ................................................................................ 8
7. System Appearance ...................................................................... 9
7.1 Battery and Inverter ............................................................... 9
7.2 Controller ............................................................................. 10
7.3 Controller Status Screens ..................................................... 10
8. Firmware Updates ...................................................................... 11
9. Operation After Power Failure ................................................... 11
10. Fault Codes ............................................................................... 11
11. Routine Maintenance & Cleaning ............................................ 13
11.1 Emergency Power Down Procedure .................................. 13
11.2 Battery Reboot ................................................................... 13
12. Warranty .................................................................................. 14
13. Installer Portal .......................................................................... 14
14. Technical Support ..................................................................... 14
15. Our Products ............................................................................ 14

4
1. Introduction
1.1 Safety
Read all the safety instructions. Failure to operate the libbi in
accordance with these instructions may cause injury or death,
damage to the unit or inefficient operation and invalidate the
manufacturer’s warranty.
The libbi utilises warning signs which contain important
information for the system to be operated safely. Ensure
these remain undamaged and clear to read. If damaged,
warning signs must be replaced immediately.
Manual Keeping
This manual contains important information about operating
the system. Before operating, please read it very carefully.
The system should be operated in strict accordance with the
instructions in this manual. This manual should be kept for
future maintenance and reparation for the duration of the
products lifecycle.
DANGER
Danger to life due to high voltages of the PV array, battery and
electric shock. When exposed to sunlight, the PV array
generates a dangerous DC voltage which will be present in the
DC conductors and the live components of the inverter.
Touching the DC conductors or the live components can lead
to lethal electric shocks. If you disconnect the DC connectors
from the system under load, an electric arc may occur leading
to electric shock and burns. Therefore, for safety reasons,
safe isolation must be carried out with a properly calibrated
voltage tester before an installer works on the equipment.
• The inverter can keep a life-threatening voltage even
after disconnecting it from the DC and/or AC side
• Do not touch uninsulated cable ends
• Do not touch the DC conductors
• Do not open the inverter and battery
• Do not wipe the system with a wet cloth
• Have the system installed and commissioned by
qualified personnel with the appropriate skills only
Prior to performing any work on the inverter or the battery
pack, disconnect the inverter from all voltage sources, as
described in this document.
The emergency power down procedure can be found in this
document on page 13.
WARNING
Risk of chemical burns from electrolyte or toxic gases. During
normal operation, no electrolyte shall leak from the battery
pack and no toxic gases shall form. Despite careful
construction, if the battery pack is damaged or a fault occurs,
it is possible that electrolyte may be leaked or toxic gases
formed.
• Do not touch the system with wet hands
• Do not put any heavy objects on top of the system
• Do not damage the system with sharp objects
• Do not operate the system in potentially explosive
atmospheres or areas of high humidity
• If moisture has penetrated the system (e.g. due to a
damaged enclosure), do not operate the system
• The libbi is not to be used by persons (including children)
with reduced physical, sensory, or mental capabilities, or
lack of experience and knowledge, unless they are
supervised or have been given instruction concerning use
of the device by a person responsible for their safety
• The transportation of libbi system must be arranged by
the manufacturer or instructed personnel, including the
Installer. These instructions shall be recorded and
repeated
• In case of contact with electrolyte, rinse the affected
areas immediately with water and consult a doctor
without delay
• Avoid any maintenance to this equipment in adverse
weather conditions, when located outdoors
Battery Safety Information
This product is a Lithium Iron Phosphate Battery with certified
compliance under the UN Recommendations on Transport of
Dangerous Goods, Manual of Tests and Criteria, Part III,
subsection 38.3. For battery cell, chemical materials are
stored in a hermetically sealed metal case, designed to
withstand temperatures and pressures encountered during
normal use. As a result, during normal use, there is no physical
danger of ignition or explosion and chemical danger of
hazardous materials’ leakage. However, if the product is
exposed to fire, mechanical shocks or electric stress by
misuse, the gas release vent will be opened. The battery cell
case will be breached at the extreme. Hazardous materials
may be released. Moreover, if heated strongly by the
surrounding fire, acid or harmful fumes may be emitted.
Product Information Sheet
For detailed information please refer to the Product
Information Sheet which can be found on the myenergi
website.
www.myenergi.com/installers-centre/download-centre/
Disposal
In accordance with European Directive 2012/19/EU on waste
electrical and electronic equipment and its implementation in
national law, used electrical devices must be collected
separately and recycled in an environmentally responsible
manner. Ensure that you return your used device to myenergi
or obtain information regarding a local, authorised collection
and disposal system. Failure to comply with this EU Directive
may result in a negative impact on the environment.
Operation after power failure
The battery system is part of the energy storage system which
stores life-threatening high voltage current (even when the
DC side is turned off). Touching the battery outlets is strictly
prohibited. The inverter can keep a life-threatening voltage
even after disconnecting it from the DC and /or AC side.
Therefore, for safety reasons, it must be tested with a properly
calibrated voltage tester before an installer works on the
equipment.
Indicates a hazardous situation which, if not
avoided, could result in death or serious injury.
Indicates a notice or ‘tip’ to guide you.

5
2. Product Description
2.1 Product Introduction
Thank you for choosing libbi. These instructions will help you
to familiarise yourself with the libbi energy storage system.
These instructions will help you familiarise yourself with the
product, and ensure you get the maximum benefit from your
new eco-smart device.
libbi is an energy storage system that enables surplus energy
produced by a PV array, or other renewable generation, to be
stored for a home’s future use, instead of being exported back
out to the grid. It can also be installed in homes where no
generation is installed, to maximise the benefits of off-peak
Time of Use Tariff prices.
libbi can be installed as a standalone product but will work in
conjunction with other myenergi products: zappi, eddi, harvi,
for a super ‘eco-smart’ home.
libbi is NOT compatible with zappi V1
3. Product Registration
3.1 First Time User? Register for an Account
If this is your first myenergi device your installer will talk
you through the following simple steps to get your account
up and running.
Step 1: Download the myenergi app
Android users can download the myenergi app on Google Play
Apple users can download the myenergi app in the App Store
1. Open the app and click, ‘Register for an account’.
2. Enter an email address and create a password, when
prompted.
3. Select your contact preferences then click ‘next’.
4. Check the email you registered with for a verification
code.
5. Enter the code into the app, where requested and
press ‘next’
Step 2: Set your location and add your first device
1. In the app click the green ‘+’ symbol to add your first
location.
2. When asked if you have a ‘hub’ select, ‘No’ as this is
your first device which already has a built-in virtual
hub (vHub).
3. Enter the ‘Reg S/N’ and ‘Reg code’ (These can be
found in your libbi or vHub enabled device settings;
menu > Information > Page 2.).
4. Once complete, your device will now display in your
myenergi account and app.
Step 3: Customer Details
1. Visit myaccount.myenergi.com from a web browser.
2. Log in with the same credentials used to register for
the app.
3. Click on ‘My Dashboard’.
4. In the section titled ‘Finish setting up your account’,
click ‘Add account details’.
5. Click ‘Edit personal info’ and complete the form with
the required information.
6. Click, ‘Submit’.
Congratulations! You’re all set. You can now use the myenergi
app and myaccount to monitor your energy consumption in
real time, wherever you are in the world.
3.2 Existing Users
Already have a myenergi device and registered account?
1. Your installer will pair your new device to your
existing system.
2. You will see your new device is automatically added
to your myenergi account and app.
4. myenergi app
The myenergi app allows you to control
and monitor your myenergi devices, in
real-time, from anywhere in the world.
4.1 Choose green or grid
You choose whether you want your libbi
to charge using energy generated from
your solar or wind generation (Green
energy) or a mixture of generation and
grid. There is a simple tick box in the myenergi app for you to
set this option. You can change this at any time.
4.1.1 Green only charging
To use only the energy generated by your solar or wind
generation, click the battery symbol on the home screen of
your myenergi app, then untick the box labelled “Enable
charging from the grid”. When unticked libbi will never pull any
energy from the grid.
4.1.2 Green and Grid charging
If you would like to utilise a time of use tariff, where prices are
typically cheaper overnight, simply click on the battery
symbol on the home screen of the myenergi app, then tick the
box labelled “Enable charging from the grid” under “Charging
Preferences”
libbi will always store your generated energy first before
pulling anything from the grid. If you are on a dual rate tariff
you will need to enter your tariff details into the myenergi app
to enable charging from the grid. This way libbi knows when it

6
is cheaper for you to use energy and it will only pull from the
grid at these cheapest times.
4.1.3 Grid only charging
For customers with no solar or wind generation, you can still
have a myenergi libbi. If no generation is present at the
property, the box labelled “Enable charging from the grid” will
need to be ticked, as the grid will be the only source of energy
for your libbi.
You will need to input your electricity tariff details into the app
before you can start to charge, so libbi knows when it is
cheapest for you and will choose to take and store energy at
these cheaper times of the day.
4.2 Input Electricity Tariff
If you have chosen to allow libbi to charge from the grid you
must input your Electricity Tariff. This is so libbi knows when
energy is cheapest for you and will only consume from the grid
at those times.
You will be prompted to enter your tariff information in the
app;
• When the app detects a libbi – If you are an existing
myenergi customer with existing products and are already
registered with the app, you will receive a pop-up
message prompting you to set your tariff information as
soon as libbi is detected i.e. when the app notices a libbi
has been paired with your existing devices.
• If you tick the box to enable charging from grid – You
have chosen to allow charging from the grid, you will
receive a pop-up message prompting you to input your
tariff details.
Step 1: Select your energy supplier and
tariff. The drop down tariff selection
options are, Single Rate, Dual Rate or
Dynamic Rate.
Step 2: Once you have selected your
energy supplier and tariff, click “Set
my rates”
Step 3: Assign rates to times of the day
on the next screen. If you have multiple
rates throughout the day, you can add
more by clicking “Add price period”.
Step 4: If you have different prices for different days of the
week, select “Add tariff scheme” to input the full detailed
breakdown of day, time and rate.
Step 5: Once you have input your tariff details, select “Save”
at the bottom of the screen.
You can amend and change your tariff details at any
time by following the same instructions so, if you
change supplier or tariff, just remember to hop on
over to your app and update your energy tariff details.
If you selected a Single Rate Tariff at Step 2, it will not
take you through to the next screen to enter your
schedule of rates. As your rate is always the same,
libbi does not need to know when it is ‘cheaper’ for you
and will not charge from the grid.
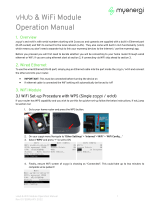
4.3 Setting Priorities
If you have multiple myenergi devices you can control how
energy is distributed to each of them in your app and it
couldn’t be simpler.
Using your finger, simply select the device you want to move
and drag it to the priority position you want it to take.

7
The higher up towards the house icon, the higher the priority
for surplus energy. The lower down and further away from the
house icon the lesser the priority for surplus energy.
If you have a myenergi eddi and/or zappi, regardless of the
settings you have selected, libbi can only provide energy to
the zappi and/or eddi if they are above them in priority.
i.e. Anything below the house icon receives surplus energy in
the order of priority, going downwards. Going upwards libbi
will only provide energy to anything shown above it in priority.
Screen 1, above, shows eddi as the highest priority and libbi as
the lowest priority. So, eddi will receive any surplus energy
first, followed by zappi and lastly followed by libbi. As libbi is
below both zappi and eddi, libbi can supply energy to them
both (depending on the settings you have selected for your
zappi and eddi devices).
Screen 2, eddi has been dragged to the bottom which means
eddi is now the lowest priority to receive surplus energy. libbi
has been moved to the ‘same’ priority as zappi. Because they
are the same priority, they will both receive surplus energy
equally.
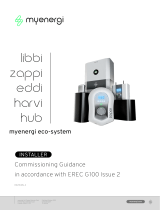
4.3.1 Priorities Explained
Example 1
For surplus generation
energy, eddi is the highest
priority, followed by the zappi,
then followed by the libbi.
This means eddi will receive
any surplus energy first
before it is offered to the
zappi and lastly it will be given
to the libbi, providing eddi and
zappi aren’t in requirement of
it.
libbi is below both zappi and eddi meaning it can provide
energy to both devices (depending on the preference you’ve
selected either in your myenergi app or on the eddi/zappi
device itself)
Example 2
For surplus generation
energy, eddi and libbi are of
equal highest priority so they
will receive any surplus
energy, equally, first. Surplus
energy will lastly be offered to
zappi which is lowest priority.
libbi will not provide energy to
devices on the same or lower
priority than it.
Example 3
For surplus generation
energy, libbi and eddi are of
equal highest priority so they
will receive any surplus
energy equally first. Surplus
energy will lastly be offered to
zappi which is lowest priority.
libbi will not provide energy to
devices on the same or lower
priority than it.
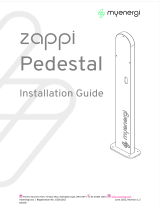
Example 4
For surplus generation
energy, libbi is the highest
priority, followed by the eddi,
then followed by the zappi.
This means libbi will receive
any surplus energy first
before it is offered to the eddi
and lastly it will be offered to
the zappi, providing eddi and
libbi aren’t in requirement of
it. libbi is above both zappi
and eddi meaning it cannot provide energy to either device.
However, libbi can still provide energy to the home.
Example 5
This myenergi eco-system
consists of two libbis and an
eddi. We will refer to the
highest libbi as libbi 1 and the
lowest libbi as libbi 2, for this
example.
For surplus generation
energy, libbi 1 is the highest
priority, followed by the eddi,
then followed by libbi 2. This
means libbi 1 will receive any surplus energy first before it is
offered to the eddi and lastly it will be given to the libbi 2,
providing eddi and libbi 1 aren’t in requirement of it.
libbi 1 is above eddi, meaning it cannot provide energy to it but
it can still provide energy to the home. libbi 2 is positioned
below eddi, meaning libbi 2 can provide energy to eddi as well
as to the home.

8
5. libbi and zappi
For customers with a myenergi libbi and zappi, as well as being
able to prioritise your devices, as spoken about in the previous
section, you can also decide whether you want zappi to charge
using your libbi or not.
5.1 Compatibility
libbi is not compatible with zappi V1 but is compatible with all
later models.
When libbi is installed into an existing myenergi eco-system
your installer must ensure all existing compatible devices are
on the most current firmware in order for them to work with
the libbi.
5.2 myenergi app (libbi and zappi)
In your myenergi app, there is the option to select whether or
not you want zappi to consume from your libbi and it is a
simple tick box.
Go to your app home screen and click the battery symbol. On
the next page, scroll down to “Powered Devices”. If you would
like libbi to provide energy to zappi then tick the box. If you
would prefer libbi to never provide energy to zappi, leave this
box unticked.
If you have more than one zappi, libbi will provide
power equally to all devices, when plugged in at the
same time, depending on your priority settings.
5.3 zappi Device Settings
A new menu item has been added
to our zappi devices which allows
you to select whether you want
zappi to drain libbi to charge your
car or not. Select “YES” if you
would like it to use energy stored in
libbi or select “NO” if you do not
want zappi to use energy from libbi.
This option can be found by in your zappi device, navigating
to: “Other Settings” > “Advanced” > “Supply Grid” >
“Device”
5.4 zappi – FAST Mode
If using zappi in FAST mode, zappi will not use energy from
libbi. zappi will always charge from the grid or availble
generation when in FAST Mode.
Refer to section 4.3 to understand how your priority
settings may override the decisions you’ve selected in
the above section.
6. libbi and eddi
For customers with a myenergi libbi and eddi, as well as being
able to prioritise your devices, as spoken about in the previous
section, you can also decide whether you want eddi to use
energy from your libbi or not.
6.1 Compatibility
libbi is compatible with all eddi models.
When libbi is installed into an existing myenergi eco-system,
your installer must ensure all existing compatible devices are
on the most current firmware in order for them to work with
the libbi.
6.2 myenergi app (libbi and eddi)
In your myenergi app, there is the option to select whether or
not you want eddi to consume from your libbi and it is a simple
tick box.
Go to your app home screen and click the battery symbol. On
the next page, scroll down to “Powered Devices”. If you would
like libbi to provide energy to eddi then tick the box. If you
would prefer libbi to never provide energy to eddi, leave this
box unticked.
If you have more than one eddi, libbi will provide
power equally to all devices, when plugged in at the
same time, depending on your priority settings.
6.3 eddi Device Settings
A new menu item has been added to
our eddi devices which allows you to
select whether you want libbi to
discharge to eddi or not. Select
“YES” if you would like it to use
energy stored in libbi or select “NO”
if you do not want eddi to use energy from libbi.
This option can be found by in your eddi device, navigating to:
“Device Settings” > “Advanced” > “Supply Grid” > “Device”
6.4 eddi and Boost / Timed Boost
Regardless of all selected settings, eddi will never use energy
from libbi when in Boost or Timed Boost Mode.
Refer to section 4.3 to understand how your priority
settings may override the decisions you’ve selected in
the above section.

9
7. System Appearance
7.1 Battery and Inverter
Inverter On Board Display and Light Indicators
You will be controlling your system using the libbi controller
and the myenergi app so it isn’t necessary to go into the
inverter on board display menu.
However, we describe below what you can expect to see on
your inverter’s display and what those light indicators mean.
The display itself will continuously run through information
screens whilst the unit is on. The screens you can expect to
see are below:
Battery Light Indicators
1.
Capacity Indicator – Each green light represents 25%
of battery capacity. If solid green this indicates this
section is full. If flashing green this indicates this
section is currently charging. i.e. two solid green lights
with a third flashing green light indicates 50% capacity
is full and 51-75% is currently charging.
2.
Fault Indicator – Lights up red to indicate a fault with
the system. See controller display for further
information.
Note: When switching the system on and off this light
will show as red momentarily and then turn off.
3.
Running Light – A solid green light indicates the
system is on. This will become a flashing green light
when the battery is charging and discharging.
4. Reset Button – For resetting the battery.
1.
Hybrid Inverter LIBBI-HS3680/HS5000
2.
On Board Display
3.
Cable Box (connected to inverter)
4.
Battery Capacity Indicator
5.
5.1kWh Battery Cell (Battery 1)
Icon
LED
What does it mean?
Green A solid green light Indicates libbi is on
and there is a grid connection.
Green
(Flashing)
A flashing green light Indicates libbi is in
standby.
Green A solid green light indicates there is an
off-grid connection.
Red
A solid red light indicates there is a
system fault. See libbi controller display
for fault code.
1
2
3
4
5
1
2
3
4

10
7.2 Controller
7.3 Controller Status Screens
1.
Import/Export Power: The power imported/exported
from the grid (kW). The arrow direction indicates if
importing (left) or exporting (right).
2.
House Load Power: Power the property is currently
using (kW). This option requires a generation CT or PV
to be connected directly into libbi.
3.
Operating Mode: Current operating mode (status) of
the libbi.
4.
Generation Power: Power being generated by solar or
wind generation, if applicable. To measure this a CT
must be connected to generation
or PV directly
connected into libbi.
5.
Date & Time: Current date and time.
6.
libbi Controller Icon
7.
libbi Battery Icon: Indicates the current charge state
of the battery.
8.
Current Battery State of Charge (SoC): Indicates the
percentage of charge within the battery.
7.4 Common Status Screens
This section gives you a brief overview of some of the common
status screens you can expect to see on your libbi controller
display and what they mean.
Starting Up
Seen briefly at start up when libbi first powers on.
Charging
libbi battery is being charged.
Idle
Appears when libbi is not charging or discharging.
Libbi Lost
libbi controller has lost communication with the
libbi inverter and battery.
Discharging
libbi battery is discharging.
1.
Display
Graphical LCD display with LED backlight
2.
Control
Buttons
Four tactile buttons to navigate the menus
and alter settings:
Enter menu (from main screen) |
Exit current menu
Move up a menu item | Increase
value
Move down a menu item |
Decrease value
Select item | Confirm value and
move to next setting
1
2

11
Power On
Appears after the ‘starting up’ screen and shows libbi
controller is powering on.
Battery Full
The battery is fully charged.
Battery Empty
libbi battery is fully drained.
Master Lost
libbi is a slave device and has lost communication with the
master device.
8. Firmware Updates
Updating the firmware on your devices is very important to
ensure they continue to work as they should and they remain
secure.
To check for available firmware updates, on your controller
menu, navigate to;
Device Settings > Firmware Update
Firmware updates will automatically download in the
background as and when available. Downloaded firmware can
be installed by navigating to this screen and selecting "install".
If any updates are available they will be listed here.
9. Operation After Power Failure
In the event of a power cut libbi will automatically reboot itself
once connection the grid has been re-established.
If you have back-up connected your libbi will switch over to
the back-up circuit using energy stored in libbi to power it.
Once grid connection has been re-established, libbi will
automatically switch from back up mode back to grid mode.
10. Fault Codes
Code 58: Generation CT Polarity
Polarity of the gen CT is the wrong way around.
1) Contact installer.
2) If problem persists contact myenergi Tech Support.
Code 101: Battery Empty
Status only - The minimum state of charge has been met.
Code 102: Battery Full
Status only - The maximum state of charge has been met
Code 106: Grid CT Lost
Grid readings have been lost, device has stopped to be safe.
1) Contact installer.
2) If problem persists, contact myenergi Tech Support.
Code 107: Local Comms Lost
Load control device has been lost, device has stopped to be
safe.
1) Ensure master device is powered on.
2) Check pairing of all devices and re-pair, if necessary.
3) Check all devices are on the same channel.
4) If issue cannot be resolved, call myenergi Tech Support.
Code 151: Inverter Undervoltage
The inverter reports low grid voltage.
1) Contact installer
2) If issue persists, contact myenergi Tech Support.
Code 152: Inverter Overvoltage
The inverter reports high grid voltage.
1) Contact myenergi Tech Support.
Code 153: Inverter Under Frequency
The inverter reports low grid frequency.
1) Contact myenergi Tech Support.
Code 154: Inverter Over Frequency
The inverter reports high grid frequency.
1) Contact myenergi Tech Support.
Code 156: Battery Lost
Communications between the battery and inverter have
failed.
1) Check battery is turned on.
2) Contact installer.
3) Contact myenergi Tech Support.
Code 157: Battery Undervoltage
Battery voltage is under threshold.
1) Reboot Battery.
2) If issue persists, contact myenergi Tech Support.
Code 158: Battery Voltage Low
Reporting low battery voltage.
1) Reboot battery.
2) If issue persists, contact myenergi Tech Support.

12
Code 159: Battery Voltage High
Reporting high battery voltage.
1) Reboot battery.
2) If issue persists, contact myenergi Tech Support.
Code 160: Overload
Inverter circuit overloaded. Occurs when the demand is more
than the inverter can deliver, when in backup mode.
1) Turn off loads powered by the backup circuit.
2) If problem persists, contact myenergi Tech Support
Code 161: GFCI Over Threshold
Inverter internal protection triggered due to internal fault in
inverter.
1) Contact myenergi Tech Support.
Code 163: Fan Fault
Inverter fan fault detected.
1) Contact myenergi Tech Support.
Code 164: Bat Under Capacity
Battery power is insufficient to discharge.
1) Contact myenergi Tech Support.
Code 165: BMS Discharge Over Current
1) Reboot battery.
2) If issue persists, contact myenergi Tech Support.
Code 166: BMS Charge Over Current
1) Reboot battery.
2) If issue persists, contact myenergi Tech Support.
Code 167: BMS Over Voltage
1) Reboot battery.
2) If issue persists, contact myenergi Tech Support.
Code 168: BMS Over Temperature
1) Check ambient temperature at install site.
2) Contact myenergi Tech Support.
Code 169: BMS Discharge Temperature Low
1) Check ambient temperature at install site.
2) Contact myenergi Tech Support.
Code 170: Battery Voltage Imbalance
1) Reboot battery.
2) If issue persists, contact myenergi Tech Support.
Code 171: BMS Communications Fault
1) Reboot battery.
2) Contact installer.
3) If issue persists call Tech Support.
Code 172: BMS Under Voltage
1) Reboot battery.
2) Contact installer.
3) If issue persists, contact myenergi Tech Support.
Code 173: BMS Charge Temperature Low
1) Check ambient temperature at install site.
2) Contact Tech Support.
Code 174: BMS Voltage High
1) Reboot battery.
2) If issue persists, contact myenergi Tech Support.
Code 175: BMS Temperature High
1) Check ambient temperature at install site.
2) Contact myenergi Tech Support.
Code 179: Grid CT Polarity
Grid CT may be the wrong way around.
1) Contact installer.
2) If issue persists, contact myenergi Tech Support.
Code 183: Inv Comms Lost
1) Check inverter and controller are turned on.
2) Contact installer.
3) If problem persists contact myenergi Tech Support
Code 184: Controller Undervoltage
1) Contact DNO (Distributed Network Operator).
2) If issue persists, contact myenergi Tech Support.
Code 185: Controller Overvoltage
1) Contact DNO (Distributed Network Operator).
2) If issue persists, contact myenergi Tech Support.
Code 186: Controller Under Frequency
1) Contact DNO (Distributed Network Operator).
2) If issue persists, contact myenergi Tech Support.
Code 187: Controller Over Frequency
1) Contact DNO (Distributed Network Operator).
2) If issue persists, contact myenergi Tech Support.
Code 201: Soft Timeout
1) Power down following the power down procedure.
2) If issue persists, contact myenergi Tech Support.
Code 202: Internal Voltage Short
1) Power down following the power down procedure.
2) If issue persists, contact myenergi Tech Support.
Code 203: GFCI Sensor Fault
1) Power down following the power down procedure.
2) If issue persists, contact myenergi Tech Support.
Code 205: Bus Low Fault
1) Power down following the power down procedure.
2) If issue persists, contact myenergi Tech Support.
Code 206: Bus High Fault
1) Power down following the power down procedure.
2) If issue persists, contact myenergi Tech Support.
Code 207: Bus Short Fault
1) Power down following the power down procedure.
2) If issue persists, contact myenergi Tech Support.
Code 208: PV ISO Under
1) Power down following the power down procedure.
2) Contact installer.
3) If issue persists, contact myenergi Tech Support.
Code 209: PV Input Short Circuit
1) Disconnect PV safely using the DC isolator.
2) Power down following the power down procedure.
3) Contact installer.
4) If issue persists, contact myenergi Tech Support.
Code 210: Bypass Relay Fault
1) Disconnect PV safely using the DC isolator.

13
2) Power down following the power down procedure.
3) Contact installer.
4) If issue persists, contact myenergi Tech Support.
Code 211: Inverter Overcurrent
1) Wait 5 minutes for inverter to restart.
2) If issue persists, power down following the power down
procedure.
3) Contact installer.
4) If problem still persists contact myenergi Tech Support.
Code 212: Inverter DC Over
1) Power down following the power down procedure.
2) If issue persists, contact myenergi Tech Support
Code 213: Ambient Over Temperature
1) Check ambient temperature at install site.
2) Power down following the power down procedure.
3) Power up libbi following the power up procedure.
4) If problem persists, contact myenergi Tech Support.
Code 214: Sink Over Temperature
1) Check ambient temperature at install site.
2) Power down following the power down procedure.
3) Power up libbi following the power up procedure.
4) If problem persists, contact myenergi Tech Support.
Code 215: Grid Relay Fault
1) Disconnect PV safely using the DC isolator.
2) Power down following the power down procedure.
3) Power up libbi following the power up procedure.
4) Reconnect PV.
5) Contact installer.
6) If issue persists, contact myenergi Tech Support.
Code 216: Discharge Overcurrent
1) Wait 1 minute for inverter to restart.
2) Power down following the power down procedure.
3) Power up libbi following the power up procedure.
4) If problem persists, contact myenergi Tech Support.
Code 217: Charge Overcurrent
1) Contact installer.
2) If issue persists, contact myenergi Tech Support.
Code 219: Inverter Abnormal
1) Power down following the power down procedure.
2) Power up libbi following the power up procedure.
3) If issue persists, contact myenergi Tech Support.
Code 220: EPS Relay Fault
1) Disconnect PV safely using the DC isolator.
2) Power down following the power down procedure.
3) Power up libbi following the power up procedure.
4) Reconnect PV.
5) Contact installer.
6) If issue persists, contact myenergi Tech Support.
Code 232: SCI Fault
1) Power down following the power down procedure.
2) Power up libbi following the power up procedure.
3) If issue persists, contact myenergi Tech Support.
Code 233: SoC Recovery
Status only - Libbi is charging to keep its SoC above a safety
threshold
Code 234: Calibration Charge
Status only - Libbi is performing its calibration charge on
first install
Code 251: Upgrading DSP
Status only - DSP upgrade on inverter has started - Will clear
when upgrade is complete.
Code 252: Upgrading ARM
Status only - ARM upgrade on inverter has started - Will clear
when upgrade is complete.
11. Routine Maintenance & Cleaning
We recommend a routine observation of the libbi every 6
months. This should be carried out by a competent person and
its main aim is to look for any signs of damage and
abnormalities. This is a visual inspection only and should not
entail removing the cable box cover or dismantling the libbi in
any way.
A full maintenance inspection is recommended to be carried
out by a qualified person every 6-12 months. This is to check
cables and terminals. Please speak to your installer to arrange
this.
11.1 Emergency Power Down Procedure
If you are ever advised by myenergi Tech Support or by the
fault code instruction to power down the libbi, follow the below
procedure to do this safely.
1) Remove the cable box cover and set aside.
2) Unscrew the two thumb screws to access the switch box
and open the switch box cover.
3) Turn off the battery switch.
4) Turn off the isolation switch on side of the battery or all
batteries if the system has more than one. The switch is
located beneath the side panel, which must first be
unscrewed and removed.
5) Press and hold the power button on the front of the
battery module until all the lights go out. Repeat this step
for each battery module.
6) Turn off the backup/load isolation switch/breaker (if
backup is connected).
7) Turn off AC Isolator.
8) Turn off the PV isolator, if applicable.
11.2 Battery Reboot
1) Remove the cable box cover and set aside.
2) Unscrew the two thumb screws to access the switch box
and open the switch box cover.
3) Turn off battery switch.
4) Turn off the isolation switch on side of the battery or all
batteries if the system has more than one. The switch is
located beneath the side panel, which must first be
unscrewed and removed.
5) Press and hold the power button on the front of the
battery module until all the lights go out. Repeat this step
for each battery module.
6) Leave for 30 seconds.

14
7) Turn on the isolation switch on the side of battery, or all
batteries if the system has more than one.
8) Turn on the battery switch in the wiring box.
9) If issues persist, contact myenergi Tech Support.
12. Warranty
Full details of the myenergi libbi product warranty are
available on our website or by scanning the QR code below.
https://www.myenergi.com/terms-and-conditions/myenergi-libbi-
system-warranty/
13. Installer Portal
As part of the install, you, as the approved installer, are
required to input the serial numbers of the inverter,
battery(ies) and controller into the myenergi Installer Portal.
This allows us to know when the customer’s Warranty period
begins.
If at any point in the future, the customer decides to upgrade
their system by adding an extra battery, this will allow us to
know when the Warranty period begins for the part added at a
later date.
14. Technical Support
If you experience any issues with libbi during or post
installation, please contact our technical support team by
scanning the QR Code below:
https://myenergi.com/manual-support/
Please contact us directly for the quickest solution.
15. Our Products
For more information about other myenergi products, please visit
https://myenergi.com/zappi
https://myenergi.com/eddi
https://myenergi.com/harvi
/