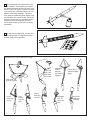
Apogee Apprentice 5039 is a beginner-friendly model rocket kit that offers an easy and enjoyable introduction to the world of rocketry. With its durable construction, customizable design, and ability to fly to impressive heights, this kit is perfect for aspiring rocketeers of all ages.
Apogee Apprentice 5039 is a beginner-friendly model rocket kit that offers an easy and enjoyable introduction to the world of rocketry. With its durable construction, customizable design, and ability to fly to impressive heights, this kit is perfect for aspiring rocketeers of all ages.


-
 1
1
-
 2
2
-
 3
3
-
 4
4
-
 5
5
-
 6
6


Apogee Apprentice 5039 is a beginner-friendly model rocket kit that offers an easy and enjoyable introduction to the world of rocketry. With its durable construction, customizable design, and ability to fly to impressive heights, this kit is perfect for aspiring rocketeers of all ages.
Ask a question and I''ll find the answer in the document
Finding information in a document is now easier with AI
Related papers
-
Apogee V-2 Conversion Kit Operating instructions
-
-
Apogee 05059 User manual
-
-
Apogee TTV User manual
-
-
-
-
-
Other documents
-
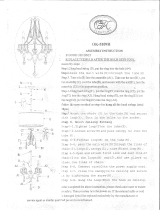 ORE International K-5109HB Installation guide
-
Estes 2161 Operating instructions
-
Victor M521 Installation guide
-
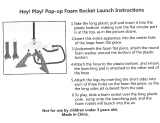 Hey! Play! M420022 User manual
-
Aerotech Mustang Assembly And Operation Instructions Manual
-
Kestrel 05063 User manual
-
 HomeSullivan 40OK-5109H Installation guide
-
Polaris ISPBS350 User guide
-
-


