Page is loading ...

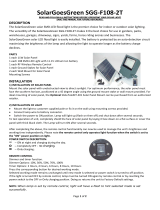
SolarGoesGreen SGG-Coach-99-C Lamp
READ AND FOLLOW ALL INSTRUCTIONS BEFORE OPERATING YOUR SOLAR LIGHT.
DESCRIPTION
The SGG-Coach-99-C solar lamp post light is the industry’s cutting edge technology for your gas lamp lantern replacement or for
new installations. The lamp is completely solar powered and must be installed in position where the solar panel will receive the
maximum sun per day. The lamp will automatically illuminate at dusk and turn off at dawn.
The light has 10 super bright LED’s, and Li-ion rechargeable battery which is replaceable.
PARTS
1 Complete LED lamp with integrated solar panel, 2- Li-ion Battery, and 1 mount with hardware. *Optional Flat Mount, Optional Pole
Mount, and Optional Wall Mount Kits can be ordered by contacting your retailer to purchase optional or replacement mounting kits.
ATTENTION BEFORE INSTALLATION
In selecting lamp installation, choose a location where the unit will receive 8-10 hours of unobstructed sunlight during the day.
Any cover, tree canopy, awning or similar that shades the panel will affect the charging of the battery resulting in a shorter run
time at night. Note: locations for Wall mounted lamps should avoid roof overhangs, eaves, and North facing locations.
Avoid locations near a night time light source like a porch light or street light. If the panel receives ambient light on it at any time,
it will not allow the automatic day/night sensor to turn the light on.
The solar light needs at least 8 hours direct sun light charge for first time use.
INSTALLATION
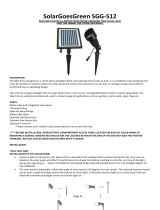
Three-way switch: II (50% Power for winter use) - O (OFF) - I (100% Power for summer use).
When installing the unit, please turn switch to II or I and cover the solar panel head by hand very closely. Please note the delay of 15
seconds for the light to turn on. Then you can start to install the light as follows.
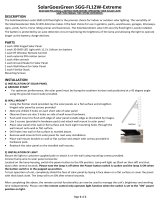
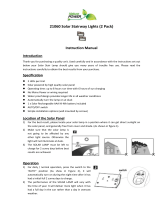
SGG-COACH-99-C-W SGG-COACH-99-C-P SGG-99-COACH-C-F
Wall Mount Flat Post Mount 3” OD Pole Mount
Solar Wall Mount Light- SGG-COACH-99-C-W
Drill 2 holes on the wall using the wall mount as a template to determine hole location and insert the plastic anchors.
Attach the LED lamp onto the bracket by spinning threaded stem clockwise into wall mount.
Attach the bracket on the wall with provided screws.
Solar Flat Mount Light- SGG-COACH-99-C-P
Drill 2 holes on any flat surface using the flat mount as a template to determine hole location and insert the plastic anchors.
Attach flat mount to LED by spinning onto threaded stem turning clockwise until seated firmly.
Fix the LED lamp to the surface by using provided screws firmly.

Solar Pole Mount Light - SGG-COACH-99-C-F
Note: The original package does not include pole. When you purchase pole, please select 3" O.D
.
Invert LED lamp placing solar top on flat surface. Remove nut from threaded stem.
Slip 3”pole mount over threaded stem being sure to orientate the larger 3” opening pointing away from lamp base so it will fit
over your existing 3” pole. Using pliers and or a deep socket (not provided) thread nut back onto stem until seated firmly in base
of 3” cup.
Place LED lamp onto pole and firmly drive the three screws ensuring it attaches to the pole safely. Caution must be used to not
over tighten screws.
NOTES AND TROUBLESHOOTING
If there is not enough sunlight on the solar panel daily, the unit may not charge. Please ensure that the unit is placed in a
position where there is at least 8-10 hours of sunlight a day.
If there is too much ambient light interference, the unit will not activate as it will assume that it is not dark enough.
Please keep the solar panel clean by wiping it once every few months with a damp cloth or paper towel. Don’t use strong
detergents or acid based cleaners.
Rainy and cloudy conditions over continuous days will also affect the charging ability of the light.
Please note the unit only charges in the II or I position.
If the light will not illuminate after 2 sunny days, turn on the switch and charge the battery at day time and turn off the switch to
O position to let the lamp not light. For next day, turn the switch on again. Repeat this step for 3 SUNNY days to ensure battery
is fully charged. On 4
th
morning, return switch to II or I position for normal operation. If the lamp does not illuminate then, the
battery needs to be replaced. NOTE- Lamp does not charge in the O off position.
BATTERY REPLACEMENT
The battery is 3.7V 2000 mAh Li-ion rechargeable battery which is easily replaceable.
If the battery begins to illuminate dimly or for short durations of time and you know that it has had sufficient sunlight on the panel, you
should replace the battery in the following way:
1. Take off the solar panel cover by removing 2 screws on the solar top.
2. Take off the LED plate by removing 4 screws on the plate without damaging cables.
3. Unscrew the black box at the back of LED plate and change with two new 3.7v 2000 mAh Li-ion batteries.
WARNING – Polarity is important. Wrong polarity is dangerous and will destroy the unit.
UPC 850901003569
www.solargoesgreen.com
/