Midmark Integra™ Operatory Cabinetry - Side Cabinetry Installation guide

Category
Sanitary ware
Type
Installation guide

Midmark Integra™ Operatory Cabinetry - Side Cabinetry offers versatile storage solutions for medical facilities. Its adjustable shelves, swing-out tub, and pull-out shelf provide customizable storage options for various supplies. The sink/storage unit includes a faucet and soap dispenser, allowing for convenient handwashing. The cabinetry's durable construction and adjustable leveling screws ensure stability and longevity.

Midmark Integra™ Operatory Cabinetry - Side Cabinetry offers versatile storage solutions for medical facilities. Its adjustable shelves, swing-out tub, and pull-out shelf provide customizable storage options for various supplies. The sink/storage unit includes a faucet and soap dispenser, allowing for convenient handwashing. The cabinetry's durable construction and adjustable leveling screws ensure stability and longevity.

1
© 2008 Midmark Corp. | 60 Vista Drive Versailles, OH 45380 USA | 1-800-643-6275 | 1-937-526-3662 |
54”, 63” Round Sink / Storage Unit Installation
Applies to Models:
OSC054R, OSC063R
Special Tools:
Level
1/4” deep well socket
Caulking Gun
Belt Sander
OSC054R-R (54” RH Round Sink / Storage Unit)
OSC054R-L (54” LH Round Sink / Storage Unit)
OSC063R-R (63” RH Round Sink / Storage Unit)
OSC063R-L (63” LH Round Sink / Storage Unit)
OSC054R-L (Shown)
DA2172i
003-1934-00 Rev. B (1/12)
NextNext
BackBack
Style A
midmark.com
2
© 2008 Midmark Corp. | 60 Vista Drive Versailles, OH 45380 USA | 1-800-643-6275 | 1-937-526-3662 |
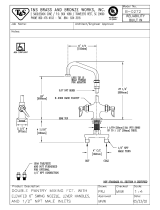
LEFT SINK CABINET DIMENSIONS
DA2227i
COLD
3/4" (1.9cm) Hole
1/2" NPT Water Pipe
Stub out 1-3/4" (4.5cm) Min.
3-3/4" (9.5cm) Max from finished wall
surface.
Use 1/2" male NPT fittings on end of stubs
for connections to shut-off valves.
Install 1/2" inlet x 3/8" OD outlet
angle shut-off valves.
Waste drain
2" (5.1cm)
hole
1-1/2" drain
pipe
3"
(7.6 cm)
16-1/4" (41.3 cm)
13-1/4" (35.6 cm)
WALL MOUNT SERVICE
FLOOR
HOT
3/4" (1.9cm) Hole
1/2" NPT Water Pipe
Stub out 1" (2.5cm) Min.
2-1/2" (6.4cm) Max from finished floor
surface.
Use 1/2" male NPT fittings on end of stubs
for connections to shut-off valves.
Install 1/2" inlet x 3/8" OD outlet
angle shut-off valves.
Waste drain
2" (5.1cm)
hole
1-1/2" drain
pipe
3"
(7.6 cm)
8.3/4"
(22.2 cm)
FLOOR MOUNT SERVICE
WALL
COLD
HOT
Note
All plumbing must be made by a licensed plumbing contractor and
conform to local, city, and national codes pertaining to the installation.
NextNext
BackBack
Style A
midmark.com
3
© 2008 Midmark Corp. | 60 Vista Drive Versailles, OH 45380 USA | 1-800-643-6275 | 1-937-526-3662 |
DA2228i
COLD
3/4" (1.9cm) Hole
1/2" NPT Water Pipe
Stub out 1-3/4" (4.5cm) Min.
3-3/4" (9.5cm) Max from finished wall
surface.
Use 1/2" male NPT fittings on end of stubs
for connections to shut-off valves.
Install 1/2" inlet x 3/8" OD outlet
angle shut-off valves.
Waste drain
2" (5.1cm)
hole
1-1/2" drain
pipe
3"
(7.6 cm)
16-1/4" (41.3 cm)
13-1/4" (35.6 cm)
WALL MOUNT SERVICE
FLOOR
HOT
3/4" (1.9cm) Hole
1/2" NPT Water Pipe
Stub out 1" (2.5cm) Min.
2-1/2" (6.4cm) Max from finished floor
surface.
Use 1/2" male NPT fittings on end of stubs
for connections to shut-off valves.
Install 1/2" inlet x 3/8" OD outlet
angle shut-off valves.
Waste drain
2" (5.1cm)
hole
1-1/2" drain
pipe
3"
(7.6 cm)
8.3/4"
(22.2 cm)
FLOOR MOUNT SERVICE
WALL
COLD
HOT
RIGHT SINKCABINET DIMENSIONS
Note
All plumbing must be made by a licensed plumbing contractor and
conform to local, city, and national codes pertaining to the installation.
NextNext
BackBack
Style A
midmark.com
4
© 2008 Midmark Corp. | 60 Vista Drive Versailles, OH 45380 USA | 1-800-643-6275 | 1-937-526-3662 |
DA2174i
Step 1: Lift or push down release
levers (one per side) and
slide out drawer assembly.
Step 1: Pull drawer outward
until it hits stop.
Step 2: Pull sides of drawer outward
while lifting to free back of
drawer from hooks and remove.
2” Metal Frame Drawers
or
Writing Surface Assembly
All Molded Drawers
DRAWER REMOVAL
(If Required for Access)
NextNext
BackBack
Style A
midmark.com
5
© 2008 Midmark Corp. | 60 Vista Drive Versailles, OH 45380 USA | 1-800-643-6275 | 1-937-526-3662 |
DA2175i
DESIRED POSITION OF EDGE OF UNI
T
LOWER
CABINET
1 1/2" (max.)
(3.8 cm)
RAISE
CABINET
SINK / STORAGE UNIT INSTALLATION
Step 1: Remove bottom
access panels.
Step 2: Adjust leveling screws
to fully lowered position
and move cabinet to
desired position.
Step 3: Level cabinet with
leveling screws.
Equipment Alert
Do not adjust leveling screws more than
1 1/2” (3.8 cm) to prevent loss of stability.
NextNext
BackBack
Style A
midmark.com
6
© 2008 Midmark Corp. | 60 Vista Drive Versailles, OH 45380 USA | 1-800-643-6275 | 1-937-526-3662 |
DA2176i
SINK INSTALLATION &
PLUMBING CONNECTIONS
Equipment Alert
When installing a sink, Midmark
recommends securing cabinet to wall.
Failure to comply may result in damage
to plumbing connections.
Step 1: Install faucet and soap
dispenser using instructions
included with those items.
Step 2: Install bottom access panel,
feeding any lines thru access
hole, before connecting
Tapmaster™ lines.
Step 3: Refer to the instructions with
Tapmaster™ faucet controller
for installation procedure.
LAMINATE TOP SHOWN
NextNext
BackBack
Style A
midmark.com
7
© 2008 Midmark Corp. | 60 Vista Drive Versailles, OH 45380 USA | 1-800-643-6275 | 1-937-526-3662 |
DA2177i
DOOR HINGE ADJUSTMENT
Vertical Adjustment
A) Loosen both screws.
B) Move up or down.
C) Retighten screws.
Horizontal Adjustment
A) Turn cam screw to move
panel side to side.
Depth Adjustment
A) Turn cam screw to move
panel front to back.
Note
Doors should be adjusted for the
gap specified on the illustration.
NextNext
BackBack
Style A
midmark.com
8
© 2008 Midmark Corp. | 60 Vista Drive Versailles, OH 45380 USA | 1-800-643-6275 | 1-937-526-3662 |
DA2223i
Adjusting Shelf
Remove shelf (not shown) and relocate
shelf brackets at desired position.
Relocating Pull-Out Shelf
Remove six screws from shelf slides and
relocate pull-out shelf in desired position.
Adjustments and Relocating
Accessories
Relocating Swing-Out
Tub and/or Shelf
A) Loosen screw so the shelf or tub is loose.
B) Move shelf forward and out to remove. Remove
screw, then re-install at desired location (do not
tighten). Position shelf, then tighten screw.
NextNext
BackBack
Style A
midmark.com
  • Page 1 1
  • Page 2 2
  • Page 3 3
  • Page 4 4
  • Page 5 5
  • Page 6 6
  • Page 7 7
  • Page 8 8

Midmark Integra™ Operatory Cabinetry - Side Cabinetry Installation guide

Category
Sanitary ware
Type
Installation guide

Midmark Integra™ Operatory Cabinetry - Side Cabinetry offers versatile storage solutions for medical facilities. Its adjustable shelves, swing-out tub, and pull-out shelf provide customizable storage options for various supplies. The sink/storage unit includes a faucet and soap dispenser, allowing for convenient handwashing. The cabinetry's durable construction and adjustable leveling screws ensure stability and longevity.

Ask a question and I''ll find the answer in the document

Finding information in a document is now easier with AI