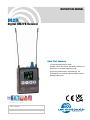
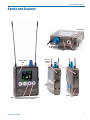
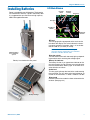
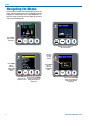
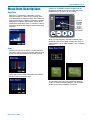
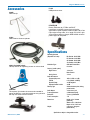
Lectrosonics M2R is a compact digital IEM/IFB receiver that provides studio-grade sound quality for performers and professionals needing to monitor audio wirelessly. It employs advanced antenna diversity switching for seamless audio and covers UHF frequencies from 470.100 to 614.375 MHz. The M2R features a high-resolution color LCD, intuitive interface, and 250 mW headphone amplifier. With SmartTune, it automatically scans and selects the clearest frequency, reducing setup time. The FlexList mode stores up to 16 mixes for quick access and troubleshooting.
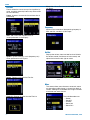
Lectrosonics M2R is a compact digital IEM/IFB receiver that provides studio-grade sound quality for performers and professionals needing to monitor audio wirelessly. It employs advanced antenna diversity switching for seamless audio and covers UHF frequencies from 470.100 to 614.375 MHz. The M2R features a high-resolution color LCD, intuitive interface, and 250 mW headphone amplifier. With SmartTune, it automatically scans and selects the clearest frequency, reducing setup time. The FlexList mode stores up to 16 mixes for quick access and troubleshooting.


-
 1
1
-
 2
2
-
 3
3
-
 4
4
-
 5
5
-
 6
6
-
 7
7
-
 8
8
-
 9
9
-
 10
10
-
 11
11
-
 12
12
-
 13
13
-
 14
14
-
 15
15
-
 16
16
-
 17
17
-
 18
18
-
 19
19
-
 20
20


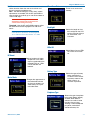
Lectrosonics M2R is a compact digital IEM/IFB receiver that provides studio-grade sound quality for performers and professionals needing to monitor audio wirelessly. It employs advanced antenna diversity switching for seamless audio and covers UHF frequencies from 470.100 to 614.375 MHz. The M2R features a high-resolution color LCD, intuitive interface, and 250 mW headphone amplifier. With SmartTune, it automatically scans and selects the clearest frequency, reducing setup time. The FlexList mode stores up to 16 mixes for quick access and troubleshooting.
Ask a question and I''ll find the answer in the document
Finding information in a document is now easier with AI
Related papers
Other documents
-
ZEBRONICS Zeb-Thunder User guide
-
 IFBLUE IFBR1C UHF Multi Frequency BeltPack IFB Receiver User manual
-
 Lectroso M4R User manual
-
DA DCHT-4000 User guide
-
RODE Microphones WGOIIRX User guide
-
BFT Alcor N Owner's manual
-
 Leadshine iEM Series User manual
-
Garland M2R User manual
-
AEM 30-2231 Operating instructions
-
WisyCom MPR50-IEM User manual


