INSTALLATION INSTRUCTIONS:
PREPARE MACHINE
1. Beginbyturningthevehicleo.Locateandremove
thebatterycompartmentcoveronthepassengerside,
behindtherearbench(Figure 1).
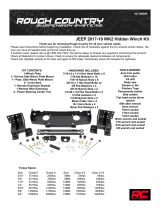
Part #: 101230
Hardware Kit:HK-129, HK-031
Contents:
1x 101231-WinchMount
1x 101236-SupportChannel
Hardware Kit:
4x 3/8”-16x1-1/4”HexFlangeBolt
2x 3/8”-16x1”HexFlangeBolt
6x 3/8”-16HexFlangedNylockNut
1x 22-18GAMaleInsulatedTerminal
1x HK-031(UTVMini-RockerHardware)
Page 1 of 6Copyright ©2014 - Kappers Fabricating, Inc. B - 12/1/2014
2. Removeboththefront&rearskidplatesunderthe
vehicle,andthefronthoodpanel.Figure 12shows
bothskidplatesremoved.
**Note, you you have a 2018 or newer model, you
do not need to remove the skid plates.
3. Removethefrontbumperbyunfasteningboltsshown
inFigure 2atlocations(A)onbothsidesofframe,
andthreeboltsatlocation(B).
Figure - 2
A
B
INSTALL WINCH MOUNT TO FRAME
4. Position the winch mount plate against the frame
accordingtoFigure A & Figure 3.First,looselyinstall
two 3/8” x 1-1/4” Bolts with 3/8” Nylock Nuts at
location(C1),thentwo3/8”x1”BoltswithNutsat
location(C2). Donotfullytightenhardwareatthis
time.
IMPORTANT: Installation of this winch mount
requires KFI Part# UTV-WEK.
Figure - 1
Cover
Latch
Figure - 3
D
C2
C1
Use shorter 3/8” x 1”
Bolts at (C2)
KawasakiMuleProFXT
WinchMount
Figure - B
Winch assembly view.
Figure - A Use short bolts
on bottom holes.
General assembly diagram.
Support Channel

Page 2 of 6Copyright ©2014 - Kappers Fabricating, Inc. B - 12/1/2014
Passtwo3/8”x1-1/4”Boltsthroughholes(D)inthe
winchmountplate,themachineframe,andSupport
Channel according to assembly Figure A. Loosely
axtwo3/8”NylockNuts.
6. Fullytightenallwinchmounthardwareevenly.
INSTALL WINCH TO WINCH MOUNT
7. Assemble your winch, fairlead bracket, and roller
fairlead or hawse fairlead to the winch mount as
shown in Figure B using hardware included with
yourwinch.
Note: If your winch did not come with a roller fairlead or
fairlead bracket, you can purchase either separately. See
www.kproducts.com or contact your local dealer.
8. Replace front bumper, using hardware removed in
Step 3.
WIRING INSTRUCTIONS:
OVERVIEW
Installation requires the use of KFI #UTV-WEK (Extended
Wiring Kit). All wiring will rst be routed from the hood
compartment where the Contactor Block is mounted through a
small wiring outlet (E), then either to the battery or the winch.
Leave all ends loose until instructed to connect them. You will
then work your way back to the front while securing wires to the
frame and pulling slack into the hood compartment.
INSTALL CONTACTOR
9. Position and install the Contactor Block to the
preferredlocationasshowninFigure 5.Itmustbe
placedasinthephototoavoidradiatorhosesdirectly
below the plastic. Use the dotted lines as a guide
andvisuallycentertheContactorBlockasshownin
Figure 5.Installusinghardwareincludedwithyour
winch, or alternatively, short drywall/multi-purpose
screws.
ROUTE WINCH WIRES
10. Feed the shortest wires included with your
winch (usually RED & BLACK) from the hood
compartment,throughawireoutlet (E)asshownin
Figure 5.
11. Run the winch wires down through the oulet, over
top the passenger side shock support, and toward
the Winch Motor end following the dashed path in
Figure 6.
12. Looselysecurewinchwirestotheframewithzipties,
butdonotfullytightenthemtoallowadjustment.
13. Per the ALTERNATE WINCH WIRING
DIAGRAM (pg 5),connecttheBLACKwiretothe
NEG(-)BLUEwinchpost;connecttheREDwireto
POS(+)YELLOWwinchpost.
14. Working your way back to the outlet (E), secure
winchwires tight to theframe and push slackback
intothehoodcompartment.DONOTCONNECTto
ContactorBlockatthistime.
5. Position the Support Channel behind and below
the front radiator guard according to Figure A and
Figure 4, sandwiching the winch mount plate and
machine frame at bolt locations (D) in Figure 3.
SUPPORT
CHANNEL
Figure - 4
Viewed from
passenger side,
front end.
Guard
Figure - 6
View from passenger
side, front end.
Wire passing
thru outlet (E)
Fan
Shock
Radiator
E
RECOMMENDED WIRE PATH TO WINCH (Dashed)
Inset: View of winch motor end.
Fig 6 - INSET
Winch
Motor
Figure - 5: Hood Compartment
Passenger Side
E
E
Fig 5 - INSET
Winch Wires
Battery:
UTV-WEK
Contactor
Block
(Fuse Panel)
Note:
Mount Contator
Block 1st.
KFI
#UTV-WEK
REQUIRED!

Page 3 of 6Copyright ©2014 - Kappers Fabricating, Inc. B - 12/1/2014
INSTALL SWITCH
15. Use included Mini-Rocker Switch Hardware Kit
(HK-031)tofastenahandlebarmountedmini-rocker
switchtothedashoranydesiredlocation.
a. Remove handlebar
mount hardware from
the switch.
b. Locate desired
mounting location.
c. Mark & drill 2 switch
holes thru dash using
switch housing as a
template.
d. Drill a 3rd hole for
switch wiring.
e. Assemble per
Figure 7.
16. ConnecttheredignitionfedwireforaMini-Rocker
Switchorothercontrollertothe orange terminal of
theauxilliarywiringharness that is pre-installedon
the passenger side in the front hood compartment.
See Figure 8. Attach using the supplied 22-18GA
Male Insulated Terminal. Wire to Contactor per
yourwinchmanual.Securewiresasneeded.
ROUTE BATTERY WIRES
**For 2018- current models, skip to step 29
You will route the wires from UTV-WEK to the battery along
the same path as the parking brake wire bundle. (See Fig 11)
17. This vehicle requires extended 11FT battery
wires included with the Wire Extension Kit
(KFI#: UTV-WEK, sold separately). Use only the
BLUE & YELLOW color coded wires found in
UTV-WEKtoconnectthebattery.
18. Feedthewiresfrom#UTV-WEKthroughoutlet(E)
in the hood compartment shown in Figure 5, then
downbehindthefan,goingfromthepassengerside
strutsupporttoward thedriversideandtheparking
brakewirebundleasshowninFigure 9.
20. Locateawirebundle(Figure 10)andfollowitspath
underthevehicle.RoutetheUTV-WEKwiresalong
this cable bundle(asshowninFigure 11)towardsthe
rearofthevehicletothebatterycompartment.Using
zipties,loosely securetheUTV-WEKwiresto the
wire bundle and pass it through the following key
junctionpoints:
21. Point F - Passing under the front dierential (see
Figure 10).
Figure - 7
19. Before moving on to the next steps, tape o the
YELLOW wire end left in the hood compartment
withelectricaltapeforsafety.Youwillbeconnecting
these wires to the battery once they are routed
properly,andthispreventsarcing.
Figure - 8
Aux Hot Wire
(Orange)
E
FRONT
Driver
Side
Figure - 9
E
Radiator + Fan
UTV-WEK
Wires
Wire Bundle
FRONT
F
Figure - 10
Wire Bundle
Front
Dierential
Figure - 11 View from below vehicle w/
skid plates removed.
WIRE
BUNDLE
PATH
FRONT
Driver
Side
Passenger
Side
L
J
H
G
F
K

Page 4 of 6Copyright ©2014 - Kappers Fabricating, Inc. B - 12/1/2014
23. Point H - Across and on top of a tube support
(seeFigure 13).
24. Point J-Throughahanger(seeFigure 14).
25. Point K-SpecialNote:KFIrecommendsusinga12”
WireLoomontheUTV-WEKwiresinthe location
wherethewirescrosspathswiththeradiatorlinesat
point(K).
26. Point L-Intothebatterycompartment;feedbothends
ofthewiresfromUTV-WEK,fromunderthevehicle,
upthroughaholefoundatlocation(L)directlyabove
thewirebundleasshowninFigure 15.
27.PertheALTERNATE WINCH WIRING DIAGRAM,
attachtheYELLOWwiretothescrewonthePOS(+)
battery post.Attach the BLUE wire to the NEG(-)
batterypost.
28. Working your way back to the front hood
compartment,pullwirestaughtandtakeoutanyslack
asyougo.Secure them withadditionalziptiesand
tightenlooselyplacedziptiesfromearliersteps.
Note: Keep battery wires tight & secure against the
wire bundle! DO NOT let them come in contact
with any heat source or moving components!
ROUTE BATTERY WIRES (2018-Current Models)
29. Thisvehiclerequiresextended11FTbat-
terywiresincludedwiththeWireExtensionKit
(KFI#: UTV-WEK,soldseparately).Useonlythe
BLUE&YELLOWcolorcoded wiresfoundin
UTV-WEKtoconnectthebattery.
30.Beforemovingontothenextsteps,tape
o the YELLOW wire endleftinthehood
compartmentwithelectricaltapeforsafety.Youwill
beconnectingthesewirestothebatteryoncethey
areroutedproperly,andthispreventsarcing.
31.Removethecapsfromtheloomandfeedthewires
from#UTV-WEKthroughthewireloominthe
hoodcompartmentshowninFigure 16.
*Note: Itmaybeeasiesttotapetheendsofthe2wires
togethersotheydonotgethungupwhilegoing
throughtheloom.
32.Fromthebatterycompartment,youshouldbeableto
seetheendofthewireloom,asshowninFigure 17.
33.PertheALTERNATE WINCH WIRING DIA-
GRAM,attachtheYELLOWwiretothescrewon
thePOS(+)batterypost.AttachtheBLUEwireto
theNEG(-)batterypost.
22. Point G - Through a wire hole in the plastic
(seeFigure 12).
Figure - 15 Neg (-)
Pos (+)
(Remove Boot)
L
Figure - 12
G
Figure - 13
H
TUBE
SUPPORT
Figure - 14
Hanger
J
K

Page 5 of 6Copyright ©2014 - Kappers Fabricating, Inc. B - 12/1/2014
COMPLETING INSTALLATION
34. Inthehoodcompartment,nallyconnectthewinch
and battery wires to the Contactor Block per the
ALTERNATE WINCH WIRING DIAGRAM
shownonPage 5.
Note: Remove the electrical tape from the YELLOW
wire end applied in Step 19 before making
connections!
• Wire Winch NEG (BLACK WIRE) to BLUE Contactor
post.
• Wire Winch POS (RED WIRE) to YELLOW Contactor
post.
• Wire Battery NEG (BLUE WIRE) to BLACK Contactor
post.
• Wire Battery POS (YELLOW WIRE) to RED Contactor
post.
35. Ifapplicable,connectthesmallGREEN&BLACK
wiresfromaMini-Rockerswitchorsimilartothe
standard Contactor Block. Consult your Winch
manualforspecicwiringinstructions.
36. Finish securing wires in the hood compartment,
bundleupslack,andziptieasneeded.Replacethe
hoodpanel.
37. Replaceskidplatesremovedinprevioussteps.
38. Replacebatterycompartmentcover.
Figure - 16
Figure - 17

Page 6 of 6Copyright ©2014 - Kappers Fabricating, Inc. B - 12/1/2014
Note: Battery shown in this diagram represents a battery fed source. Depending on your vehicle conguration,
power leads may attach to a primary/secondary battery or starter solenoid. Follow all vehicle specic installation
instructions.
Figure - 18
/