Page is loading ...

Instruction
Manual
Rotating Torque Sensor
Type 4501A…
Version Q/QA
(with standard square
connections)
Version R
(with shaft ends)
Version H/HA
(with standard
hexagon connections)
4501A_002-406e-10.18

Foreword
4501A_002-406e-10.18 Page 1
Foreword
This manual applies to the rotating torque sensor Type
4501A… .
The instruction manual must be kept on hand for future
use, and must be available at the site of implementation of
the NC joining system, as needed.
The specifications in this manual can change at any time
without prior notification. Kistler reserves the right to
improve and to change the product for the purpose of
technical progress without the obligation to inform persons
and organizations as the result of such changes.
Original language of these operating instructions: German
© 2000 … 2018 Kistler Group. All rights reserved.
Kistler Group
Eulachstrasse 22
8408 Winterthur
Switzerland
Phone +41 52-224 11 11
Fax +41 52-224 14 14
www.kistler.com

Rotating Torque Sensor, Type 4501A…
Page 2 4501A_002-406e-10.18
Content
1.Introduction ................................................................................................................................... 3
2.Important Information .................................................................................................................... 4
2.1Disposal Instructions for Electrical and Electronic Equipment ................................................ 4
2.2Symbols Used ....................................................................................................................... 4
3.Application and Key Features ......................................................................................................... 5
4.Description ..................................................................................................................................... 6
4.1Mechanical Design ............................................................................................................... 6
4.2Electrical Design ................................................................................................................... 7
4.3Rotation Angle Measuring System (Version QA and HA only) ............................................. 8
4.4Adjustment for Angle-pulse Output (version QA only) ........................................................ 9
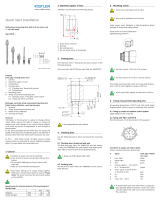
5.Electrical Connections .................................................................................................................. 10
5.1Description of Interfaces ..................................................................................................... 11
5.1.1Versions Q/R/H .................................................................................................... 11
5.1.2Connection Cable Q/R/H ...................................................................................... 11
5.1.2.1Cable Diagram with Plugs on Both Sides Mat. No.: 18008930, Type
KSM071860-5, Versions Q/R/H ............................................................ 11
5.1.2.2Cable Diagram, Plug (Transducer), Open Ends Mat. No.: 18008939, Type
KSM103820-5, Versions Q/R/H ............................................................ 12
5.1.3Versions QA/HA ................................................................................................... 12
5.1.4Connection Cables QA, HA ................................................................................... 13
5.1.4.1Cable Diagram with Plugs on Both Sides, Mat. No.: 18008955, Type
KSM170690-5, Version QA and HA ...................................................... 13
5.1.4.2Cable Diagram, Plug (Transducer), Open Ends, Mat. No.: 18008958,
Type KSM183150-5, Version QA and HA.............................................. 14
5.1.5Plug Series MIL, CA-Bayonet ................................................................................. 14
5.1.6Cable Diagram, Plug, Open Ends Mat. No.: 18025415, Type KSM007331, MIL/CA-
Bayonet ................................................................................................................. 15
5.2Installing the Signal Lead .................................................................................................... 16
6.Using the Torque Sensor .............................................................................................................. 17
6.1Versions Q, QA, H, HA ...................................................................................................... 17
6.2Version R ............................................................................................................................ 18
7.Static Calibration.......................................................................................................................... 19
7.1Making a Simple Calibration Device ................................................................................... 19
7.2Calculation Example for Lever Arm Length ......................................................................... 20
8.Maintenance ................................................................................................................................ 21
9.Repairs ......................................................................................................................................... 22
10.Ordering Key ................................................................................................................................ 23
11.Index ............................................................................................................................................ 24
Total Pages 26

Introduction
4501A_002-406e-10.18 Seite 3
1. Introduction
Please take the time to thoroughly read this instruction
manual. It will help you with the installation, maintenance,
and use of this product.
To the extent permitted by law Kistler does not accept any
liability if this instruction manual is not followed or
products other than those listed under Accessories are
used.
Kistler offers a wide range of products for use in measuring
technology:
Piezoelectric sensors for measuring force, torque, strain,
pressure, acceleration, shock, vibration and acoustic-
emission
Strain gage sensor systems for measuring force and
torque
Piezoresistive pressure sensors and transmitters
Signal conditioners, indicators and calibrators
Electronic control and monitoring systems as well as
software for specific measurement applications
Data transmission modules (telemetry)
Electromechanical NC joining modules and force-
displacement monitors
Test bed systems for electric motors and gear units for
laboratory, manufacturing, and quality assurance
Kistler also develops and produces measuring solutions for
the application fields engines, vehicles, manufacturing,
plastics and biomechanics sectors.
Our product and application brochures will provide you
with an overview of our product range. Detailed data
sheets are available for almost all products.
If you need additional help beyond what can be found
either online or in this manual, please contact Kistler's
extensive support organization.

Rotating Torque Sensor, Type 4501A…
Page 4 4501A_002-406e-10.18
2. Important Information
2.1 Disposal Instructions for Electrical and Electronic Equipment
Do not discard old electronic instruments in municipal
trash. For disposal at end of life, please return this
product to an authorized local electronic waste disposal
service or contact the nearest Kistler Instrument sales
office for return instructions.
2.2 Symbols Used
NOTE
This symbol indicates instructions that enable more
effective and more economic use of the NC joining
module.

Application and Key Features
4501A_002-406e-10.18 Seite 5
3. Application and Key Features
Torque sensor with strain gages
Signal transfer by slip rings
Measurement of constant and variable torque
Measurement of torque from the rotating shaft
Integrated system for rotation angle measurement (only
version QA)
Suitable for laboratory use and quality control
Ideal for use with power tools
Primarily suitable for low speed ranges
Suitable for momentary measurement of torque (inter-
mittent duty)
Fig. 1: Rotating torque sensor
Tor
q
ue
Rotation angle
11 ... 26 V
Measuring electronics
Strain gage
measuring shaft

Rotating Torque Sensor, Type 4501A…
Page 6 4501A_002-406e-10.18
4. Description
4.1 Mechanical Design
Torque sensors Type 4501A… comprise a rotating shaft
mounted on bearings inside a housing. The shaft has a
necked section - called the torsion zone - to which strain
gages are attached and connected in a full bridge circuit.
Slip rings and brushes provide the link between rotor and
housing with two slip rings carrying the electric power
supply to the strain gages on the rotating shaft. Two other
slip rings serve to transfer the measuring signals from the
rotating shaft to the stationary housing. The full bridge
circuit is connected directly through the slip rings and
brushes to the lead connector which is mounted on the
housing of the torque sensor.
In version QA torque sensors an optical rotation angle
measurement system is integrated. It consists of a pulse
disk on the rotating shaft with 360 light-dark stripes. Two
light barriers are installed into the stator. Inside the torque
sensor there is a small electronics for processing of the
angle pulses.
Fig. 2: Mechanical design rotating torque sensor
Type 4501A...
Bearing
Brushes
Lead connector
Shaf
t
Bearing
Slip rings
Torsion zone
Strain gages
Square socket
(version Q)
or hexagon socket
(version H)
or shaft end with
feather key slots
(version R)
Square end
(version Q)
or hexagon end
(version H)
or shaft end with
feather key slots
(version R)
Housing
Rotation angle
measuring system
(only version QA/HA)

Description
4501A_002-406e-10.18 Seite 7
4.2 Electrical Design
Fig. 3: Electrical design
R1 ... R4 = Gages for measuring mechanical strain
S1 ... S4 = Slip rings with brushes
Version Q/R/H:
Version QA:
Version H (special):

Rotating Torque Sensor, Type 4501A…
Page 8 4501A_002-406e-10.18
4.3 Rotation Angle Measuring System (Version QA and HA only)
Fig. 4: Diagram showing the design of the rotation
angle measuring system
1 Rotating shaft
2 Pulse disk
3 Forked light barrier with LED and photo diode
4 Operation amplifier
Features
360 light-dark stripes on the pulse disk
Two forked light barriers shifted by phase angle 90°
Pulse number proportional to the rotation angle

Description
4501A_002-406e-10.18 Seite 9
4.4 Adjustment for Angle-pulse Output (version QA only)
With drive on quare socket sense of rotation right
Fig. 5: Adjustment for angle-pulse output
Out
p
ut Pin H
Out
p
ut Pin G
Sense of rotation
W
Label M for
measuring side.
Side with bearings
Size Q/QA Size R
Drive side

Rotating Torque Sensor, Type 4501A…
Page 10 4501A_002-406e-10.18
5. Electrical Connections
Fig. 6: Electrical connections
Shielded lead of 0,25 mm²
(version X: 0,14 mm2) cross section
Factory-calibrated with 5 m of lead.
A change in lead of 2,5 m will cause an error of
approximately 1 %
Shielded lead
Lead connecto
r
To
p
ower su
pp
ly unit and dis
p
lay
Torque sensor (all versions)

Electrical Connections
4501A_002-406e-10.18 Seite 11
white Supplyvoltage‐6Vwhite
brown Supplyvoltage+6Vbrown
yellow Measuring+yellow
grey Measuring‐ grey
green Ext.Control green
4 4
5 5
6 6
1 1
2 2
3 3
Standardlength5m
Plugbox6pin
Art.No.:KSM000823
Controlcableflexible
LIYCY5x0,25transparent
Art.‐No.:KSM002148
ColorcodetoDIN47100
Plug6pin
Art.No.:KSM000822
(
(
(
(
(
(
Sensor
Electronic
5.1 Description of Interfaces
5.1.1 Versions Q/R/H
Function PIN Description Top view built-in plug
− Power supply 1 e.g. 6 VDC
+ Power supply 2 e.g. 6 VDC
Shield 3 Not connected
+ Measuring signal 4 2 mV/V approx. 350 Ω*
− Measuring signal 5 2 mV/V approx. 350 Ω*
− Power supply
(Calibration voltage) 6 100 % calibration,
causes 100 % signal
* Customized, see calibration certificate
5.1.2 Connection Cable Q/R/H
5.1.2.1 Cable Diagram with Plugs on Both Sides Mat. No.: 18008930, Type KSM071860-5, Versions
Q/R/H
Fig. 7: Cable diagram connection cable

Rotating Torque Sensor, Type 4501A…
Page 12 4501A_002-406e-10.18
white Supplyvoltage‐6Vwhite
brown Supplyvoltage+6Vbrown
yellow Measuring+ yellow
grey Measuring‐ grey
green Ext.Control green
5
6
3
4
Openends,
tinned
1
2
Standardlength5m
Plug6pin
Art.No.:KSM000822
Controlcableflexible
LIYCY5x0,25transparent
Art.‐No.:KSM002148
ColorcodetoDIN47100
(
(
(
(
(
(
Sensor
Electronic
5.1.2.2 Cable Diagram, Plug (Transducer), Open Ends Mat. No.: 18008939, Type KSM103820-5,
Versions Q/R/H
Fig. 8: Cable diagram, plug (transducer), open ends
5.1.3 Versions QA/HA
Function PIN Description Top view built-in plug
− Power supply A Strain gage full bridge
+ Power supply B
+ Measuring signal output C
− Measuring signal output D
Angle 0 V E Rotation angle pulses
Angle +5 V ±10 % F
Pulse l, leading, TTL G
Pulse r, lagging, TTL H 0 V
Power supply
(Calibration voltage) K 100 % calibration, causes
100 % signal
Shield N Not connected

Electrical Connections
4501A_002-406e-10.18 Seite 13
pink Supplyvoltagetorque‐ pink
black Supplyvoltagetorque+black
red Signaloutputtorque+red
blue Signaloutputtorque‐ blue
violet 0VAngleofrotation violet
brown 0VAngleofrotation brown
yellow +5VAngleofrotation yellow
white
/
green Angleimpulse1leading white
/
green
white
/
brown Angleimpulse2lagging white
/
brown
white Control white
green 0VAngle green
grey 0VAngle grey
black Shield black
Case
H H
K K
J J
F F
G G
C C
D D
E E
A A
B B
Controlcableflexible
LIYCY12x0,14transparent
Art.‐No.:KSM002148
Plugbox12pin
Art.No.:KSM000703
Plug12pin
Art.No.:KSM000704
Standardlength5m
M M
Case
(
(
(
(
(
Sensor
(
(
(
(
(
(
Electronic
5.1.4 Connection Cables QA, HA
5.1.4.1 Cable Diagram with Plugs on Both Sides, Mat. No.: 18008955, Type KSM170690-5, Version
QA and HA
Fig. 9: Cable diagram connection cable

Rotating Torque Sensor, Type 4501A…
Page 14 4501A_002-406e-10.18
pink Supplyvoltagetorque‐ pink
black Supplyvoltagetorque+black
red Signaloutputtorque+red
blue Signaloutputtorque‐ blue
violet 0VAngleofrotation violet
brown 0VAngleofrotation brown
yellow +5VAngleofrotation yellow
white
/
green Angleimpulse1leading white
/
green
white
/
brown Angleimpulse2lagging white
/
brown
white Control white
green 0VAngle green
grey 0VAngle grey
black Shield black
Case
M
J
H
K
F
G
E
C
D
B
Standardlength5m
Plugbox12pin
Art.No.:KSM000703
Controlcableflexible
LIYCY12x0,14transparent
Art.‐No.:KSM002146
Openends,
tinned
A
(
(
(
(
(
Sensor
(
(
(
(
(
(
Electronic
5.1.4.2 Cable Diagram, Plug (Transducer), Open Ends, Mat. No.: 18008958, Type KSM183150-5,
Version QA and HA
Fig. 10: Cable diagram, plug (transducer), open ends
5.1.5 Plug Series MIL, CA-Bayonet
Function PIN Description Top view built-in plug
+ Power supply A z.B. +6 VDC
− Power supply B z.B. −6 VDC
− Output (measuring signal) C z.B. 2 mV/V ca. 350 Ω*
+ Output (measuring signal) D z.B. 2 mV/V ca. 350 Ω*
Shield E Im Sensor nicht belegt
− 100 % control (supply)
(Calibration voltage) F 100 % Kalibrierung,
d.h. 100 % Messsignal
* Customized, see calibration certificate

Electrical Connections
4501A_002-406e-10.18 Seite 15
white Supplyvoltage+6Vwhite
B brown Supplyvoltage‐6Vbrown
yellow Output‐ yellow
grey Output+grey
green 100%Control green
free
E
D
F
C
Openends,
tinned
A
Standardlength5m
Plugbox6pin
Art.No.:KSM002265
Controlcableflexible
LIYCY5x0,25transparent
Art.‐No.:KSM002148
Farbcoden.DIN47100
(
(
(
(
(
Sensor
Electronic
(
5.1.6 Cable Diagram, Plug, Open Ends Mat. No.: 18025415, Type KSM007331,
MIL/CA-Bayonet
Fig. 11: Cable diagram, plug, open ends

Rotating Torque Sensor, Type 4501A…
Page 16 4501A_002-406e-10.18
5.2 Installing the Signal Lead
Do not run the lead parallel to power cables or control
circuits.
Do not place the lead close to equipment producing
strong electromagnetic fields, e.g. transformers, wel-
ders, contactors, electric motors, etc.
If such situations cannot be avoided, run the lead inside
earthed steel conduit.
Excess lengths should be prevented. If it isn’t possible to
avoid, then do not lay excess lengths in closed loops.
Fig. 12: Laying of the measuring cable
Risk to couple in EMC noises into the
measuring sensor cable
To reduce the inductive areas it’s
recommended to laying the measuring
sensor cable in bifilar form
Measuring cable
!
Cable tunnel Measuring cable Cable tunnel

Using the Torque Sensor
4501A_002-406e-10.18 Seite 17
6. Using the Torque Sensor
6.1 Versions Q, QA, H, HA
Torque sensors of version Q and QA have square
connections for plug-in tools acc. to DIN 3121
Torque sensor of version H have hexagon connections
acc. to DIN 3126, form E/F
The torque sensors are plugged on to the drive spindle
as shown below
Application examples:
Fig. 13: Application examples versions Q/QA and
H/HA
Version
Q/QA Version
H/HA
Motor/
el. or
pneum.
wrench
Tor
q
uemete
r
model SD
Lead
connector
Socket s
p
anner/bi
t
Lead
connector

Rotating Torque Sensor, Type 4501A…
Page 18 4501A_002-406e-10.18
6.2 Version R
The tor
q
ue sensor is ada
p
ted to the measuring a
pp
li-
cation by couplings.
For a free floating installation we recommend two
torsionally rigid half couplings.
Application example:
Fig. 14: Application example version R
Tes
t
S
p
ecimen Engine Tor
q
ue Senso
r

Static Calibration
4501A_002-406e-10.18 Seite 19
7. Static Calibration
This
p
rocedure re
q
uires the use of a calibration device
with a lever arm and weights for producing specific
values of torque.
The calibration procedure is as follows
Apply the rated value of torque to the torque sensor
and then remove it again
Adjust the zero reading accurately
Apply a known value of torque to the torque sensor.
Adjust the displayed reading to the corresponding value
Plotting a calibration curve
Calibrate the torque sensor as described above.
Apply torque in 1/10 steps up to the full rated value
and then remove it again in the same way.
A delay of at least 30 seconds must be allowed
between the individual 1/10 steps so that each reading
can stabilize before it is recorded
7.1 Making a Simple Calibration Device
Fig. 15: Calibration device
Weigh
t
(calibrated)
Tor
q
ue Senso
r
Lever arm Lever arm
Cou
p
ling Cou
p
ling
Counter bearing Lever arm bearing
(duplex)
Lever arm bearing
Cou
p
ling = Loose hal
f
-cou
p
lings Ty
p
e 2301A… or Ty
p
e 2302A…
or Type 2303A…
/