Page is loading ...

1131 VIA CALLEJON, SAN CLEMENTE, CA 92673
R
Updated 13/DEC/01 BRH
2002 Energy Suspension. All rights reserved.2002 Energy Suspension. All rights reserved.
CC
May not be reproduced, in any form, or by any means,
without the written consent of Energy Suspension.
May not be reproduced, in any form, or by any means,
without the written consent of Energy Suspension.
Due to the many different suppliers of O.E.M. and aftermarket mounts, slight modifications to these inserts may
be necessary. ENERGY SUSPENSION recommends that you fit check each insert, and grind any inconsistencies
away so insert fits completely into O.E.M. Mount cavity.
1-12-01
17318
The pictures are to help depict placement of parts, actual visual resemblances may vary.
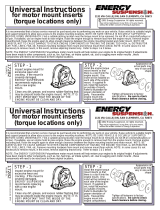
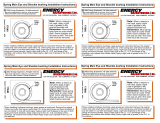
STEP 1
Inspect engine torque mount for excessive wear and
cracking. If the mount is severely damaged, ENERGY
SUSPENSION recommends replacing with a new engine
torque mount. Clean any dirt, grease, and excess rubber
flashing that may be present inside the engine torque mount.
NOTE: IT IS VERY IMPORTANT THAT THE INSIDE OF THE
TORQUE MOUNT BE CLEAN AND FREE OF FLASH.
STEP 2
Install the polyurethane inserts into the torque mount.
One insert will be installed on each side of the torque mount.
If supplied in set, use the nylon retainers. Note: The square
head of nylon tie may need to be trimmed to seat flush
against insert. Refer to illustration for proper orientation of
parts. Reassemble torque mount into engine compartment.
Raise vehicle to suitable height and support properly to allow easy access to the engine mounting locations. NOTE: BE SURE
VEHICLE IS SECURELY SUPPORTED BEFORE GOING UNDERNEATH. Find a suitable jacking location near the torque mount to
be removed. Do not lift on crankshaft pulleys or oil pan. Support the engine enough to remove load from the torque mount(s).
Remove engine mounting bolt. NOTE: BE CAREFUL NOT TO CAUSE DAMAGE TO OTHER ENGINE COMPONENTS BY RAISING
THE ENGINE TOO HIGH, ie, DISTRIBUTOR CAP, FUEL LINES, FAN, etc. Remove torque mount and install the new inserts. NOTE:
In some cases it is not necessary to completely remove torque mount in order to install the inserts. Refer to steps 1 & 2 below and
then tighten all fasteners to factory specifications. Be sure to check hood clearance before closing.
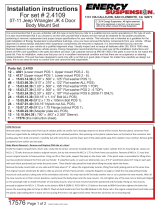
Installation Instructions for Set #16-1106
Front of Car
#1065
#1066
#1067
#1064
#1063
#1068
Front-left side (driver’s side)
Lower Mount Position
Front-right side
(passenger side)
Lower Mount Position
Rear-position
* NOTE -These inserts will only fit into the
two lower torque positions. They are only
accessed from underneath the car! These
inserts will not fit into the two upper positions
which are visible from the top of the car.
(Outer)
(Inner)
(Outer)
(Driver’s Side)
(Passenger Side)
(Inner)
Read this instruction sheet thoroughly before initiating any work!
Updated 4-8-02
/