Page is loading ...

1
ASSEMBLY
AND
SERVICE MANUAL
FOR THE
Era Replica Automobiles
427 ROADSTER
Chassis 758 on
Revision 10m
06/2012
Copyright 2012, Era Replica Automobiles

2
Updates/Addenda
We try to keep the manual current with the state of the kit, but there may be kit changes not already noted. If the
error is significant, please drop me a note. Thanks for your patience.
Significant updates, corrections and supplements to the manual will be sent to you if required. Lesser partial
updates and helpful hints will be posted to our web site at
www.erareplicas.com/427man/
The latest entire manual in PDF format is posted on the web.
Use the e-mail below for the location.
Thanks,
Bob Putnam -ERA-
e-mail: eracars@sbcglobal.net
Please direct your parts inquiries to:
eraparts@sbcglobal.net
The Manual
The text and layout of this manual was done with MSWord XP. Some of the illustrations were hand drawn and
scanned, and some were done in DesignCad 2D and 3D. Images were translated to GIF and JPEG format, and
linked to this file.
The Legal Stuff
Information in this manual is correct to the fullest extent of our abilities. Era Replica Automobiles assumes no
liability for any direct, indirect, incidental or consequential damage resulting from the information within..

3
Contents
This manual is arranged by
assembly sequence, not topic.
For information on a specific
topic - assembly or service, see
the index.
READ ME FIRST...................................5
SECTION A PARTS
NEEDED .....................................6
PICKING UP YOUR KIT.........................7
SPECIAL NOTES ..................................8
ENGINE..............................................9
CLUTCH...........................................11
BELLHOUSING..................................11
ALTERNATOR...................................11
IGNITION NOTES...............................11
TRANSMISSION.................................12
SPEEDOMETER DRIVE GEARS ............15
SHIFT LINKAGE ................................16
REAR DRIVE/SUSPENSION ASSEMBLY
........................................................17
STEERING GEAR...............................17
FRONT ROTORS AND CALIPERS.........18
DRIVE SHAFT...................................18
OIL COOLER SYSTEM .......................18
STEERING COLUMN (UPPER) ............18
STEERING WHEEL ............................18
SEAT BELTS.....................................18
WIPER MOTOR AND COMPONENTS ...19
FRONT SHOCK ABSORBERS ..............19
FRONT COIL SPRINGS:......................19
EXHAUST SYSTEM............................19
WHEELS, BOLT-ON ...........................20
WHEELS, PIN-DRIVE.........................20
TIRES...............................................21
RADIATOR HOSES ............................21
EXPANSION TANK ............................21
JACK, ETC. .......................................21
PART NUMBERS AND SOURCES..........22
SOURCE MASTER LIST.......................28
TOOLS NEEDED ................................29
SHIPPING COMPANIES (PARTIAL LIST)29
SECTION B: PARTS
PREPARATION .....................31
ENGINE/COMPONENTS......................32
ALTERNATOR MOUNTING: ...............33
REAR SUSPENSION, JAGUAR: ............40
REAR SUSPENSION, E.R.A. DESIGN ...44
SHIFT LEVER (FORD)........................48
DRIVE SHAFT...................................50
STEERING GEAR ...............................50
STEERING COLUMN (UPPER) ............50
WIPERS............................................51
DAMPERS AND SPRINGS: ..................54
REAR HUBS, BOLT-ON WHEELS: ......54
SECTION C: CHASSIS
PREPARATION......................55
BODY REMOVAL..............................57
CHASSIS PAINT ................................59
SECTION D:
BODY/CHASSIS ASSEMBLY
......................................................60
FASTENER NOTES.............................61
BODY MOUNTED PRE-MOUNTED ON
CHASSIS OPTION ...............................61
BRAKE AND FUEL LINES....................62
HORNS.............................................62
FLOORS............................................62
FOOT BOXES.....................................62
BODY MOUNTING ............................67
SECTION E BODY
PREPARATION......................70
FITTING THE ROLL BAR.....................71
BODY PREPARATION AND PAINT......71
HOOD ..............................................74
DETAIL UNDERCOATING ..................77
WINDSHIELD WIPERS.......................77
TRUNK LID ......................................78
HOOD GASKET .................................79
FRESH AIR HOSES .............................79
TONNEAU SNAPS ..............................79
WIRING AND ELECTRICAL ................80
WIRING AND ELECTRICAL ................80
REAR HARNESS ................................82
INTERIOR PANELS ............................83
ENGINE AND TRANSMISSION
INSTALLATION..................................83
DRIVE SHAFT...................................84
DOORS.............................................85
ACCELERATOR PEDAL AND LINKAGE87
EXHAUST HEAT SHIELDS...................88
ROLL BAR........................................89
RADIATOR AND FANS.......................89
GRILLE AIR FOIL..............................91
OIL COOLER (OPTIONAL)..................91
FUEL TANK......................................93
FUEL FILLER CAP.............................94
SECTION F: SUSPENSION
ASSEMBLY..............................95
FRONT SUSPENSION .........................97
LOWER STEERING COLUMN..............97
REAR SUSPENSION, JAGUAR-BASED 100
REAR SUSPENSION, E.R.A. DESIGN.103
BRAKE AND CLUTCH PEDAL...........104
SECTION G:
BODY/INTERIOR.................107
WINDSHIELD WASHER ...................108
WINDWINGS AND SUNVISORS .........108
WINDSHIELD..................................109
HEATER/DEFROSTER......................110
DASHBOARD ..................................110
SPEEDOMETER CABLE.................... 111
BATTERY AND CABLES ..................114
STEERING COLUMN AND WHEEL....115
SHIFT LEVER .................................115
TUNNEL.........................................116
CARPETS........................................118
HAND BRAKE LEVER COVER .........125
SHIFT BOOT ...................................126
SEAT BELT/SHOULDER HARNESS.....126
SEAT MOUNTING............................127
DOOR INSTALLATION..................... 128
SEAT BELT/SHOULDER HARNESS.....129
BUMPERS, JACK-PADS.................... 129
FRESH AIR INLET DUCTS................130
FUEL FILLER CAP............................130
LIGHTS ..........................................131
REAR REFLECTOR (BOTTOM)..........132
LICENSE PLATE LIGHT ...................132
BACK-UP LIGHT (OPTIONAL) .........133
MIRRORS.......................................133
TOP SNAPS ....................................134
EMBLEMS ......................................135
LICENSE PLATE(S)..........................135
SIDE PIPES.....................................136
CONVERTIBLE TOP .........................139
SIDE CURTAINS ..............................141
FITTING THE TONNEAU COVER........141
SECTION H FINAL
OPERATIONS.......................142
CLUTCH HYDRAULICS ....................143
BRAKE HYDRAULICS .....................144
BOLT-ON WHEEL NOTES .................144
PIN DRIVE WHEEL NOTES................ 144
INSTALL WIPER ARMS..................... 145
SUSPENSION ADJUSTMENTS ...........145
BRAKE BALANCE ADJUSTMENT.......148
ADD FLUIDS ..................................149
COOLING SYSTEM........................... 150
HEADLIGHT ADJUSTMENT ..............151
YOUR FIRST DRIVE........................151
DRIVING/CONTROLS ......................152
FUSES............................................152
RECOMMENDED PERIODIC SERVICE 153
STARTING A CARBURETOR CAR.......153
MAINTENANCE/PARTS ...................154
INSPECTION AND REGISTRATION ....158
INSURANCE.................................... 160

SECTION A - PARTS NEEDED
4

SECTION A - PARTS NEEDED
5
READ ME FIRST
Congratulations on your selection of the E.R.A. 427SC! We at E.R.A. hope that assembling your kit
will be a pleasant experience. We share your goal of creating a great automobile.
Our objective, when we started on the design and production of this kit was to create a Cobra replica
better than all the rest. To keep quality consistently high, we have designed-in almost everything,
making this kit one of the easiest to build.
Even though the E.R.A. 427SC kit is extremely complete, we realized that it is your labor that puts the
final quality into the product that bears our name.
If you have problems, E.R.A. will help you as much as possible to complete your kit. After all, you are
really an extension of our production line. And please, feel free to offer suggestions that might improve
the end product or the process of construction.
Remember, the E.R.A. 427SC Cobra replica is usually a very good investment! Of course you are free
to make "improvements" to the design but be aware. Changes from the original Cobra concept may not
increase the value of your car, and may even decrease it. E.R.A. has spent many years perfecting the
details of the 427SC.
We would love to hear from you, but.... Please, if you have a problem, use the index first! We have
tried to include all the information necessary for you to complete this project in a timely fashion.
Information on the parts required starts on page 8, parts preparation on page 32, and the actual process of
assembling the kit begins on page 55.
Please insert any addenda before you start.
Some of our electrical equipment may vary, depending upon the supplier. Therefore, the wiring
instructions are included with the wiring harness, not in this manual.
This manual is organized in the assembly sequence that E.R.A. normally uses with
their turnkey cars, not by subject. You may change the sequence to your own
preference - within reason. We prefer to install all the mechanical parts after the car
is painted. That way, the mechanical bits stay clean, and it is easier for the painter to
get any “hidden” areas.
Please use the index to find a specific topic.
Have fun!

SECTION A - PARTS NEEDED
6
SECTION A
PARTS NEEDED
This section describes the components necessary to complete your E.R.A. 427
SC, together with part numbers and sources. Normal wearing parts that may
need replacement after use are also listed on page 154..
Read this section thoroughly before purchasing any parts. Don't waste your
time and money on stuff you don't need or can't use.

SECTION A - PARTS NEEDED
7
PICKING UP YOUR KIT
The kit can be transported from our factory in an enclosed trailer, standard automobile trailer or rampback hauler. Shipping
space for the parts in cartons will also be required, although most will fit inside the kit. We have used several shipping
commercial companies with excellent results. See page 29 for names.
DIMENSIONS AND WEIGHTS
Weight: 800 lb. bare kit + 200 lb. of boxes + 600 lb. for roller
TRAILER REQUIREMENTS
If you didn't buy a "roller" from us, the kit is usually shipped on the dolly wheels that we use for assembly if your trailer is well
sprung. The dolly wheels require a $300 refundable deposit. Many people keep the wheels until their kit is completed - it's very
convenient for the kit to be mobile (and at a comfortable height) during construction.
The track of the Cobra dolly wheels is only about 20". Your trailer may require additional boards to support the dolly wheels.
Without tires or dolly wheels, you can put tires as buffer between the chassis and the trailer. The kit will have to be lifted on and
off the trailer manually. Have 3 strong friends to unload! If you’re coming on a weekend to pick up your kit, please warn us if
you aren’t coming with extra people too. Don’t tie down the dolly wheels to secure the kit. Tie to the chassis or suspension.
In the absence of suspension pieces to tie to, wrap soft tie straps around the front crossmember and the upper mounting bolts for
the rear subframe.
TIE-DOWNS
You or your shipping agent will require ratchet tie-downs, come-alongs and/or strong straps. We recommend either 4 diagonal
connections or 2 longitudinal and 4 lateral ones for a total of 6. Don’t forget that the trailer must have anchor points to tie to.
To avoid scratching the paint on the chassis, use 2" wide loops (or double 1" wide loops) or ratchet straps, 5000 lb. minimum
rating. Make sure that your trailer has places to tie to. If you use chains or a come-along, bring padding or nylon straps for
intermediate connections to the chassis.
INCLEMENT WEATHER:
A plastic cover will quickly shred at highway speeds. A high quality cloth car cover can be used to cover up the plastic, but it
must be held down with rope all over. Looseness will allow any cover to quickly beat itself (and your paint job) to death.

SECTION A -PARTS NEEDED-
8
SPECIAL NOTES
The ERA 427SC chassis and body follow the dimensions of the original Cobra very closely. Therefore, your mechanical
components must conform to similar space limitations as the original car. Some configurations fit together better than others,
and some cannot be done without major surgery.
Be careful when selecting and building your components. The information on the following pages shows the recommended parts
for many possible drive-train combinations.
WHEN YOU BUY PARTS, KEEP THE RECIEPTS!
They are frequently necessary for inspection and/or registration
The following items are critical to the proper assembly of the E.R.A. 427SC. Details for selecting each component
are listed in this section. Any special component preparations are detailed in Section B.
Engine
Engine accessories
Oil cooler system (optional)
Transmission - Ford 4-speed or automatic, Richmond Gear
5-speed
Transmission shift linkage and lever
Drive-shaft
Jaguar XKE or XJ Sedan rear drive/suspension unit
Hand brake lever and cable
Rack and pinion steering gear
Steering wheel, column and hub
Front brake rotors and calipers
Front coil -over shock absorbers
Exhaust system, side or under-car
Speedometer cable
Wheels and tires
Radiator expansion tank and hoses
Windshield wiper motor and drive components
Emblems
Spare tire
Jack and lug wrench (or knock-off hammer)
Remember! The more exotic you get, the more likely you are to have problems.
There is a maxim in engineering practice:
Keep It Simple, Stupid!
PLEASE! READ THE ALL THE INFORMATION THAT FOLLOWS BEFORE YOU PURCHASE
PARTS THAT YOU MIGHT BE UNABLE TO USE.

SECTION A -PARTS NEEDED-
9
ENGINE
Remember! All piston engines have a limited torque spread.
If you decide to build a fire-breathing monster, expect to
suffer at the lower RPMs. Because the E.R.A. 427SC is light,
every hiccup is felt.
Very high octane gasoline is becoming scarce, and octane
boosters can be a pain to deal with. If you're going to do a lot
of street driving, use a conservative compression ratio: E.R.A.
turnkey cars are usually built with 9.5:1 or 10:1, maximum.
COOLING
Always use a thermostat in your system for street use. If the
engine fails to reach normal operating temperature, it may
affect driveability and lubrication. In warm climates, a
165F to 180F thermostat works the best. Use a restrictor
plate for racing conditions only.
The thermostat should be modified as shown on page 38.
EMISSIONS
Requirements vary from state to state. Most states require
that your car meet the specifications of the year of your
engine. Check with your local authorities. Side pipes with
catalytic converters are available but we have no experience
with them.
FORD FE SERIES
CID Bore Stroke BHP Torque
net net lb-ft
390 4.05" 3.78" 320up 427
427 4.23" 3.78" 410 up 480
428 4.13" 3.98 325+ 475
The original Cobra used the 427 CID "Side Oiler" engine in
the first cars intended for competition. The remaining cars
were equipped with a mix of 427s and 428 "Police
Interceptor" engines. Both engines are logical for use in an
"authentic" car. TheE.R.A. was designed around these
engines.
The Ford FE series is not especially heavy, with the all-iron
version weighing only slightly more than 600 lbs. We have
seen complete engines with aluminum heads, intake
manifold (w/ 2 x 4bbl carbs) and water pump scale at 522
lbs. Simply adding an aluminum intake will bring the
weight on a stock 428 to 585 lbs.
The best engine depends on your driving style and your
budget. If you are not experienced in the FE series engine,
be wary of building your own "exotic" engine. The FE
series is a bit quirky and you may make some very
expensive mistakes. Before you buy anything, get a good
Ford engine building book, available from Autobooks, etc.
Ford production of major 427 and 428 parts ceased in the
1980s. Fortunately, most FE engine parts are being
reproduced. You can still find original 428 cores that were
used in many full sized Fords. Using a vintage engine may
have an advantage when registering your car. When you
buy parts, keep the receipts. See Inspection, page 158.

SECTION A -PARTS NEEDED-
10
In general, the 428 is much cheaper and easier to find than
the 427. The later vintage 428 Cobra Jet (CJ) or 428 Super
Cobra Jet (SCJ) engine is fine for all-around street use,
offering from 325HP to 425HP with very good low RPM
response and tractability. Most 428 cores can have their
performance “updated” by the addition of new heads from
Edelbrock and Shelby at reasonable cost. With an
appropriate intake manifold and carburetor, a 428 will put
out over 400 streetable bhp.
The 427 "Side Oiler" is the legendary Cobra engine. Its
cross-bolted main bearings, improved oiling system and
shorter stroke are modifications made for racing. It is more
reliable above 5500 RPMs, with somewhat better high RPM
power than the 428 (and a little less torque at low RPMs.)
Many of our customers have built 427CID engines of more
than 550BHP. We have found that the extra money spent
on a 427CID engine will usually be returned in a higher
resale value for the finished car.
The 427CID Center Oiler is now found mostly in boats. It
lacks the exotic oiling system of the Side Oiler while
retaining its bore and stroke. Since it was never found in the
original Cobra, it lacks some internal authenticity, but it
does look correct. There are a few problems associated with
converting boat engines to car use. Many boat engines
rotated in the reverse direction, with counter- camshafts,
incorrect crankshaft sealing, and oddball distributors, among
other things. Use caution.
A hybrid 454(+)CID engine may be created by the use of a
428 crankshaft in a 427 block, using Chevrolet pistons and
other special efforts. This is not an engine for the
inexperienced to build, but it's great fun to drive, with good
horsepower and flexibility.
Aluminum blocks are available from Carroll Shelby
Enterprises, Genesis, Pond, and Dove Engineering. Shelby,
Edlebrock and Dove make aluminum cylinder heads.
For the more adventurous, E.R.A. has modified footboxes
and steering column to fit the Ford 427 SOHC. With its
huge ports, this engine produces a lot of horsepower, but has
poor low speed flexibility. Because of the width of the
heads, there is a significant loss of foot room. Primary
exhaust pipes must be custom made.
Alternately, you may also build an economical variation to
the 427/428 FE using a 390 block. Externally, this engine is
identical to the 427/428, and it accepts most of the same
performance parts.
FLYWHEEL
The FE flywheel should use a ring gear with 184 teeth, not
153.
INTAKE MANIFOLD:
Low and medium-riser intake manifolds (including the
Edlebrock Performer) can be used on the E.R.A. 427SC
without modification.
The manifold may have to be tapped for the temperature
gage fitting. See notes on page 32.
CARBURETORS
A single 4-barrel Holley carburetor will connect directly to
the linkage supplied with the kit. Since the carburetors are
turned 180° in the dual 4-barrel carburetor installation, you
must either use the factory Ford linkage (which crosses the
intake manifold between the carbs) or fabricate new linkage.
All 4 bbl carburetors can be run without chokes with only
slight driveability limitations. If the choke plate is removed,
the choke housing should also be removed for extra
clearance to the air cleaner. Street hoods (without scoop)
require this extra clearance with some intake manifolds.
Inglese Induction (now part of Total Performance,
Wallingford, Connecticut) has developed a 4 carburetor
Weber 48IDA configuration for the FE block. While this
really looks impressive, it takes a lot of tuning and a
perfectly-set-up linkage for a minimal gain of power – not to
mention being expensive.
FUEL PUMP
We use a heavy-duty mechanical fuel pumps (Carter
M6905) on both 427 and 428 engines with no problems. If
you don't need the extra capacity of an electric pump, avoid
the complication and noise. (Wiring for an electric pump is
built into the standard wiring harness.)
OIL FILTER
Any standard block mounted oil filter equivalent to the
Motorcraft FL1 HP may be used. The same Ford part can
be used on the remote filter supplied with the oil cooler with
remote filter. The optional remote filter mount (usually
integrated with an oil cooler) uses a Transdapt 1015 block
adapter.
OIL PAN
There is a limited distance between the engine and the
ground. Use a pan with a maximum depth of 6.5 inches.
For more oil capacity, there are pans available that are
wider. Canton and Aviaid make good designs. E.R.A.
normally stocks Canton pans both in a high capacity street
design and the Road Race design. Part numbers are on page
24. Some Aviaid pans have two additional fittings at the
right front: A large tube that’s intended to connect to a
breather tank and a smaller tube that can be used for a
dipstick. Plug them with metal if not used.
ALTERNATOR AND PULLEYS
ERA supplies the alternator mounting bracket to shift the
alternator up and in from the original location. An adjusting
bracket (to replace the stock one) is optional.
You may use a single groove pulley system for the crank,
water pump and alternator. Aluminum pulleys from March
Performance work well. For street use, we don’t
recommend underdriving either the alternator or water
pump.

SECTION A -PARTS NEEDED-
11
FORD 289/302/351
Pre-serpentine belt engines are easily adapted to the 427SC,
although primary exhaust pipes must be specially fabricated.
The chassis mounts are the same as for the FE block. You
may retrofit the FE engine without modification, which
comes in handy if you update later. E.R.A. supplies a
special alternator adjusting bracket and clutch slave cylinder
bracket.
Use the alternator as listed for the FE block (page 22).
Install the alternator as shown.
If you have a late engine with a serpentine belt, it may be
converted by changing the lower pulley, water pump and
pump pulley. Preparation is on page 33.
OIL PAN
Maximim oil pan depth with the small block is 8”. The
sump should not extend past the front mounting flange.
OIL FILTER
If you are using an oil cooler and sandwich adapter with
block-mounted filter, you must use a Fram PH16.
“Equivalent” filters may not work. The Fram’s shape is
slightly different.
A 90 degree adapter (Ford M-6880-A50) may allow a larger
filter but we have not had a chance to check fit.
FORD 429/460 CID
E.R.A. has engine mount pedestals, special foot-boxes and a
steering column for the Wedge and Boss engines. This
engine, even with the narrow heads, is considerably wider
and somewhat taller than the FE. Consequently, the foot-
boxes are made narrower, leaving you with reduced leg
room. The primary pipes to fit this engine currently must
be custom made, although we will try to have them for the
Ford Power Products 460 soon. The standard hood scoop
may have to be changed.
Use the lowest intake manifold available to eliminate the
need for an extra-large hood scoop.
The hemi-headed Boss 429 is not recommended, due to its
large size.
CHEVROLET
Engine mounts that fit both small and big block Chevrolet
engines are available. While this seems like low-dollar
horsepower, our experience has been that resale value is
adversely affected. In the long term, this decision is a net
financial loss.
The standard Ford side-pipes will be work, but custom
primary pipes must be custom fabricated.
The 427/454 CID engine requires a special alternator (see
page 22) and bracket which mounts the alternator at the
bottom right of the block..
CLUTCH
No matter what engine, E.R.A. recommends using a clutch
with stock pressure for street use. Because the car is very
light, extra pressure is not necessary. Be careful to match
the bolt pattern of your flywheel to the pressure plate. Ford
has used several variations. E.R.A. has used standard
pressure Brute Power replacements with good luck.
We have found that removing the weights from any
centrifugally-assisted pressure plate prevents release
problems without making the clutch less efficient.
FE Note: Small spline throw-out forks for the Ford FE bell-
housing are no longer available from the dealer. Custom
forks and pivots for all Ford transmissions are available
from E.R.A..
BELLHOUSING
E.R.A. recommends a blow-shield type bell-housing such as
the Lakewood 15210 (Ford FE). We trim the bottom flange
so that is does not extend below the chassis. See page 35.
ALTERNATOR
To keep that original look, most engines in an E.R.A. are
designed to use an old style Ford alternator with an external
voltage regulator. 50-60 amps capacity is adequate. See
page 22 for part numbers.
If you wish to use a later alternator with integral regulator,
you must modify the wiring harness to use a 10 ohm resistor
in a trigger wire from fuse 4.
Generally, a high amperage alternator is not necessary, but if
you use one its output may excede the ammeter’s capacity.
A small shunt wire can be installed to increase the
ammeter’s capacity.
IGNITION NOTES
More details are included in the separate wiring instructions
and at http://www.erareplicas.com/427man/index.htm.
Note! If you are using the reproduction expansion tank, you
must use a small-diameter distributor cap. Both MSD and
Unilite have appropriate setups available.
MSD SYSTEMS
Neither our current Smith tachometer (Caerbont) nor the
Stewart Warner require an adapter, but some other Smith
tachs may. Inquire. See page 80 for special wiring routing
notes and the wiring instructions for hookup instructions.
UNILITE DISTRIBUTOR
Always use a ballast resistor (0.8ohm-1.2 ohm) with the
Unilite system. Also, disconnect and tape the wire at the "I"
terminal of the starter solenoid. Details are with the wiring
instructions.

SECTION A -PARTS NEEDED-
12
When combined with an MSD ignition system, a special
resistor is required. Call Unilite for details.
TRANSMISSION
The original 427 Cobra used the Ford Top Loader
transmission in both NASCAR (close ratio) and street (wide
ratio) configurations. It was (and is) a great transmission,
with excellent strength and good ratios. The disadvantage
with the 4-speeds is that neither offers particularly good
“turnpike cruising”. Because of the high first gears, you are
forced to use a 3:31 or 3:54 differential ratio. In this modern
age, most of us are used to more relaxed cruising.
Fortunately, there are now several other good 5-speed
transmissions that can be used with small block and FE Ford
engines, all of which will fit in an ERA without chassis
changes.
Ford T5: Rated at only 300 lbft, this is only useful with a
mild 302 engine. Overdrive 5th gear.
Tremec 3550, TKO and TKO II: The 3550 is good for
tweaked 302s and mild 351 engines. The TKO can be used
with mild 427s and 428s. Gear spread is very wide, making
it a marginal performance box. The 3550 and TKO have a
deep overdrive 5th gear, the TKO II has a tighter .82:1 5th
gear.
Tremec 500 and 600: This is a new, stouter TKO, with a
gear spread similar to the Richmond Gear 5-speed.
Overdrive 5th gear. The .82:1 5th gear ratio is recommended
for engines that don’t run well below 2000 rpm. See further
notes on page 14 and 34.
Richmond Gear 5-speed: A close gear spread with a 1:1
5th gear that requires a numerically low differential gear.
As a rule of thumb, if you do much stop-and-go driving, 10
MPH/1000 RPM is the longest 1st gear that can be driven
smoothly with a fairly mild engine. This means that a wide
ratio Top Loader will be OK with a 3.31:1 differential ratio,
a close ratio Top Loader requires a 3.54:1 ratio. The
Richmond Gear 5 speed is much more flexible, allowing a
looong 2.88:1 differential. The T-5 and Tremec have an
overdrive 5th and can coexist with a 3.31:1 and numerically
higher ratio.
TRANSMISSION GEARING
(WITH 26” OD TIRE)
4-SPEED TOP LOADER, WIDE RATIO
1st 2nd 3rd 4th
Ratios: 2.78:1 1.93:1 1.36:1 1:1
Dif. Speed@ 1000RPM
3.07 9.1 13.1 18.5 25.2
3.31 8.4 12.1 17.2 23.4
3.54 7.9 11.3 16.1 21.8
4-SPEED TOP LOADER, CLOSE RATIO
1st 2nd 3rd 4th
Ratios: 2.32:1 1.69:1 1.29:1 1:1
Dif. Speed@ 1000RPM
3.07 10.9 14.9 19.5 25.2
3.31 10.1 13.8 18.1 23.4
3.54 9.4 12.9 16.9 21.8
T-5 5-SPEED
Some T-5's are geared like the Tremec 3550
1st 2nd 3rd 4th 5th
Ratios: 2.95:1 1.94:1 1.34:1 1:1 .63:1
Dif. Speed@ 1000RPM
3.31:1 7.9 12.0 17.4 23.4 37.1
3.54:1 7.4 11.3 16.3 21.8 34.7
TREMEC 3550/TKO/500 5-SPEED
1st 2nd 3rd 4th 5th
Ratios: 3.27:1 1.98:1 1.34:1 1:1 .68:1
Dif. Speed@ 1000RPM
3.31:1 7.1 11.8 17.4 23.4 34.4
3.54:1 6.7 11.0 16.3 21.8 32.1
TREMEC TKO II 5-SPEED
1st 2nd 3rd 4th 5th
3.27:1 1.98:1 1.34:1 1:1 .83:1
Dif. Speed @ 1000rpm
3.07:1 7.7 12.7 18.8 25.2 30.4
3.31:1 7.1 11.8 17.4 23.4 28.2
3.54:1 6.7 11.0 16.3 21.8 26.3
TREMEC 600
1st 2nd 3rd 4th 5th Alt 5th
Ratios 2.87 1.89 1.28 1:1 .82:1 .64:1
DIF: Speed@ 1000RPM
3.07:1 8.8 13.3 19.7 25.2 30.7 39.4
3.31:1 8.1 12.4 18.3 23.4 28.5 36.5
3.54:1 7.6 11.6 17.1 21.8 26.6 34.1
RICHMOND GEAR 5-SPEED RATIOS
1st 2nd 3rd 4th 5th
Ratios: 3.27:1 2.13:1 1.57:1 1.23:1 1:1
DIF: Speed@ 1000RPM
2.88:1 8.2 12.6 17.1 21.8 26.9
3.07:1 7.7 11.8 16.0 20.5 25.2
3.31:1 7.1 11.0 14.9 19.0 23.4

SECTION A -PARTS NEEDED-
13

SECTION A -PARTS NEEDED-
14
FOUR SPEED TOP LOADER
Rebuilt transmissions are available. See the list of resources
or ask E.R.A.
Transmissions come in several combinations of long and
short tail-shafts, with large and small splined input and
output shafts. Unless you expect to subject the drive-train to
extremely severe loads (drag racing tires) it is not necessary
to use the large spline input shaft. We recommend a short
tail-shaft case, 24" from the mounting flange to the end of
the tail-shaft housing. This will enable a longer drive shaft.
SPECIFICATIONS AND APPLICATIONS:
Most Ford cars from 1964 to 1973 used the Top-loader.
However, in 1964 and 1965 the transmission had a four-hole
mounting face and a 25-spline output shaft. This early
transmission should be avoided. Drive-shaft parts are
unobtainable.
From mid 1965 to 1973, Ford changed to a universal eight-
hole front mounting pattern. Also during this time, the
output shaft was upgraded to a larger 28-spline output shaft
for the 200 to 390 cubic inch engines and 31-spline shaft for
the 427, 428, and 429 engines. Because the E.R.A. 427SC
is very light, stress on the transmission is low. We have
found that the small input and output shafts are fine for
street use.
Input shafts were also upgraded to 1 1/16" diameter for use
with 200 to 390 cubic inch engines and 1 3/8" diameter for
HD 427, 428, and 429 engines. The larger spline size was
only available with close ratio gears.
The Top-loader gearbox was built in three case lengths
measured from the mounting flange to the end of the tail-
shaft housing: 24", 25.5" and 27". If at all possible use the
short tail-shaft transmission. It allows a longer driveshaft.
If your differential ratio is 3.31:1 or taller, consider the
wide ratio transmission. It will allow easier starts.
SPEEDOMETER DRIVE GEARS
Most Top-loader transmissions come with a right-hand
thread drive gear on the output shaft. The driven gear on the
speedometer cable must match. See page 15 for part
numbers.
CLUTCH THROW-OUT FORK
Part numbers are on page 26.
MOUNTS
There are 3 common bolt-hole configurations for the rear
transmission mount:
Two holes in the transmission, arranged front to
back: Use Ford C8ZZ-6068A or its equivalents, i.e.
Republic or Parts Master 31-2284
Two holes arranged side to side, and having 5 5/8"
between centers. Same mount as above.
Two holes arranged side to side, and with 6 1/4"
center to center distance. This very rare transmission
requires chassis modifications (done on special
order only.) Use Ford C9AZ-6080E, Republic 31-
2250 or equivalent.
FORD C-6 AUTOMATIC
Use the C-6 appropriate to your engine. Because there isn't
a transmission oil cooler built into the radiator, you must fit
an auxiliary one, either in place of the engine oil cooler or in
front of the radiator.
Mount: Ford C9AZ-6068H, Republic 31-2375 or equivalent
RICHMOND GEAR (DOUG NASH) 5 SPEED.
This transmission is loosely based on Chevrolet gears. The
5 speed has a direct (1:1) fifth speed. First and second gears
are shorter than the Ford 4 speed so you may numerically
lower your differential ratio without fear of bogging down in
first gear. See the chart of speed in gears on page 12 for
particulars. The R.G. 6 speed is too big to fit without major
modifications.
There is also a competition version of the 5 speed, using
straight cut gears and no synchromesh. Bulletproof for
competition use, but very noisy for street use.
Rear Mount: GM 3870184, Republic 31-2224
Pressure plate: Standard Ford
Clutch disc: Ram 4148 (11" x 1 1/8-26 spl)
Clutch throw-out bearing, arm:
Same as small spline top-loader
Speedometer drive parts (see page 15 for gear #):
Cable Champ 400020
Gear Holder (Bullet) GM 345215
Retainer 3708148
O Ring GM 10054241
90 deg. adapter AA1052
Gear 39879XX (XX=No. of Teeth)
See driven-gear part numbers on page 15.
FORD MUSTANG T-5
This 5-speed transmission and its Tremec variations can be
used with the smaller Ford engines. Its overdrive 5th gear
gives excellent highway cruising, even with a 3.77:1
differential ratio. Don't expect high top speeds in 5th gear,
however. The small block engine may not have the torque
to exceed 4000RPM in 5th. Because the shift linkage is
integral, the shifter cannot duplicate the original orientation.
A special clutch release system is required.
TREMEC 3550, TKO AND 500/600
Some Tremec transmissions require a Chevy splined driven
disc, some use a Ford spline. The pressure plate can be
standard Ford. A McLeod spacer (8607) between the bell
housing and transmission may be required with FE engines
unless the transmission is equipped with a special short
input shaft (available from Fortes Parts Connection), A
portion of the case must be removed for clearance. See page
34. The TKO mount requires an adapter plate used with a
Chevy mount. See page 26 for part numbers.

SECTION A -PARTS NEEDED-
15
Before you install the speedometer driven gear, check that
its spiral meshes properly with the drive gear.
Transmissions have come through with both the LH and RH
drive gears. See page 15 for calculations and page 15 for
part numbers.
SPEEDOMETER DRIVE GEARS
Ford transmissions used a variety of drive gears. The Mustangs Unlimited catalog is a good reference. The gears are
illustrated and detail specifications listed.
Note! The Ford Top-Loader drive gear may come with right or left hand threads. The driven gear must match.
You can calculate the number of teeth on the speedometer drive gears (part #s on page 26) using the formula:
(Dif. Ratio) x (Tire revs/mile) x (Teeth on drive gear) = (Teeth on driven gear)
(Speedometer revolutions/mile)
A 295-50-15 tire rolls 760 revs per mile. Both the Stewart Warner and Smiths speedometers are usually geared at 1000
revolutions/mile.
Usually the Ford Top-Loader, T-5 use a 7 tooth driving gear requiring a LH driven gear. Teeth = (Dif.Ratio) x 5.3.
Usually the Tremec uses a 7 tooth driving gear requiring a RH driven gear. So: Teeth = (Dif.Ratio) x 5.3.
The Richmond Gear transmission uses an 8 tooth driving gear. So: Teeth = (Dif. Ratio) x 6.06. See page 14 for gear
selection.
DRIVEN GEAR SELECTION AND PART NUMBERS
Ford Top-loader, T-5 and Tremec Richmond Gear 5 Speed
Diff.
Ratio App.
Teeth Toploader/T-5
Left-hand
Tremec
Right-hand
Diff.
Ratio App.
Teeth Part Number
2.88:1 18 3987918 (Brown)
3.07:1 16 Orange tip Burgundy 3.07:1 19 3987919 (White)
17 C2DZ-17271G
(Purple tip) C3DZ-17271C
(White) 3.31:1 20
21
3987920 (Blue)
3987921 (Red)
3.31:1 18 C2DZ-17271K
(Green tip) C0DD-17271B
(Yellow) 3.54:1 22 3987922 (Gray)
3.54:1 19 C4DZ-17271A
Pink tip C0DZ-17271B
(Pink)
3.77:1 20 C2DZ-17271H
Blue tip
C1DZ-17271A
(Black)
C8SZ-17271A
(Orange)
Retainer for all C1DZ-17292A

SECTION A -PARTS NEEDED-
16
SHIFT LINKAGE
All shift linkage (modified Hurst) is available from E.R.A.
TOP LOADER
SHIFT LINKAGE
Both the original Ford 4-speed shift linkage and Hurst linkage
(391-3180) work well. Some modifications to the rod link
lengths will be necessary to move the lever back to the original
position. If your transmission does not have the shifter
mounting bosses in the correct position, adapters are available
from E.R.A. See page 49 for shift lever placement.
LEVER
If you don't want to modify the Mustang lever yourself (see
page 48), E.R.A. manufactures a duplicate the original shift
lever to fit the Top-Loader (with stock or Hurst linkages) or
Richmond gear transmissions with the Long shifter.
TOP-LOADER
Originally, AC modified the 1965-66 Mustang shift lever
by turning the handle about 180 degrees on its mount.
This placed the lever forward. While it looked a bit
strange, it worked quite well.
On the short tail-shaft transmission, the shifter mounting
bracket should be mounted within the last couple of inches
of the tailstock end. This places the shift lever in the same
spot as on the original Cobra. If your transmission locates
the bracket further forward, an E.R.A. adapter plate can be
used to move the shifter back.
RICHMOND GEAR
E.R.A. modifies a Long shifter and rods for the 5 speed,
using the Ford reversed lever for control. The lockout "T"
handle is there, but no longer is functional. Inquire about
available parts.
TREMEC
The lever bolts to the transmission’s stub. Ask about
available “original look” levers.

SECTION A -PARTS NEEDED-
17
REAR DRIVE/SUSPENSION ASSEMBLY
Jaguar-based Suspension Custom ERA Rear Suspension
The E.R.A. 427SC is designed to use either the Jaguar rear
suspension (in an E.R.A. subframe) or a custom E.R.A.
suspension unit with outboard brakes. The E.R.A. unit is
available as a kit with with all our conversion parts ready for
your differential and brake parts, or as a complete assembly.
See page 44 for details.
JAG PARTS SELECTION
See page 24 for application list.
See page 41 for an exploded view of the lower control arm
parts with part numbers.
The Jaguar differential is the same Salisbury unit that was
used in the original Cobra with only some casting changes. It
is adequate for 500+ BHP, and can be made even stronger by
using stub axle parts from Concours West. Gears wear is not
normally a problem even in well-used assemblies, but always
replace seals.
The vintage of the Jaguar differential is punched in the casting
at the lower right corner of the cover. The top number is the
year-of-manufacture, the bottom number is a special code.
(Translation: we don't know what it's used for.). A simple
way to determine whether a post-1980 unit will work is the
presents of inboard brakes. The later (inappropriate)
assemblies have brakes mounted on the hub carriers.
When selecting and buying a used rear end, look for:
Completeness - You don't need the Jag trailing arms,
but you do need everything else.
Limited Slip Differential - Many XJ differentials
were open. A new limited slip may be retrofitted for
about $700.
Brakes - Try to get serviceable hydraulic and
emergency brakes. There were no major changes in
XKE rear brake until 1968 when both the calipers
and rotors were updated. The later units are cheaper
and easier to rebuild than the early units.
Gear ratio - There should be a tag on one of the rear
cover bolts (for example, 43/13 on the tag = 3.31
ratio). If there is no tag, mark the input shaft flange
and the half-shaft or brake disc for reference and
rotate the axles by turning the input shaft. For every
time the axles and brake disc turns over once, the
input flange should rotate approximately 3 1/3 turns
(3.31:1 ratio) or 3 1/2 times (3.54:1 ratio). See the
chart on page 12 for the best ratio for your
engine/transmission combination.
Dampers (coil-over shocks): All E.R.A. rear
suspensions require 4 dampers and coil springs (coil
over shock absorbers). Specifications are the same as
for stock Series II Jaguar XKE. XJ dampers cannot
be used. See page 24 for part numbers and page 54
for length specifications. Dampers with adjustable
spring seats and externally adjustable damping are
available from E.R.A.
USING THE E.R.A./JAG SUBFRAME:
The stock Jaguar XJ control arms and half-shafts will be
exchanged for shortened pieces when you buy the subframe
from us. Series II XKE parts will not have to be modified,
although Series III parts will.
All XKE lower control arm mounting brackets (that bolt to
the sides of the differential) must be exchanged for XJ units.
All mounting bushings and hardware are included with the
E.R.A. subframe.
Do NOT replace the control arm roller and needle bearings
with aftermarket urethane bushings! The net result will be
wheel hop and generally sloppy handling.
The E.R.A. subframe requires XKE style coil-over dampers.
While not necessary, special height and damping-adjustable
units are available from E.R.A. Springs can be changed to
ones of higher rate. See page 54.
STEERING GEAR
Starting with chassis 759, the car requires a Flaming River
gear, FR1502-3x3, with modified tie-rod adapters. This is
similar to a Mustang II unit, but shortened by 3”.
Modifications are shown on page , and complete units are
available from ERA.

SECTION A -PARTS NEEDED-
18
FRONT ROTORS AND CALIPERS
WITH BOLT-ON WHEELS
Most mid-sized GM cars from 1970-1978 used the correct
pieces, with 2 3/8" piston calipers. Station wagons may use
different parts. Chevrolet lists the same rotor and calipers
for all sedans.
Before purchasing the rotors and bearings, measure the size
of the outer wheel bearings. Your rotor and bearings must
be compatible with the smaller (more common) diameter
(.655) at the outer end. The wagons used a .750" diameter
spindle.
WITH PIN DRIVE WHEELS:
The E.R.A. pin-drive wheel conversion includes the hub and
rotor, both compatible with the caliper and bearings listed
above.
OPTIONAL COMPETITION BRAKES
E.R.A. offers a conversion to 12 1/8" (by 1 1/4" wide) rotors and
fixed 4 piston calipers for heavy duty street or track use.
These require modifications to the steering knuckle.
DRIVE SHAFT
E.R.A. has drive-shafts for most applications in stock.
This is a project for a shop specializing in power -
transmission equipment or shafting. See page 50 for design
details.
OIL COOLER SYSTEM
The optional E.R.A. oil cooler and adapter system comes
with or without a remote oil filter. Layouts for both
configurations begin on page 91.
The remote oil filter is a reproduction of the original race
option and mounts on the front of the block through an
intermediate steel bracket (available from ERA). See the
picture on page 92 for mounting on an FE engine.
If you decide to build your own system, the specifications
below may be helpful but should not substitute for good
design practices.
Oil cooler - approximately 13" x 4"h or 6"h with AN
10 male fittings. (The 6"h unit requires a special
aluminum housing (included with the ERA option).)
#10 stainless braided hose -
Oil cooler adapter or block-off plate- bolts to the
block or oil filter housing.
STEERING COLUMN (UPPER)
You may use a Triumph unit (see page 51) as described
below or the custom E.R.A. reproduction column. The
E.R.A. column includes the hub and requires no
preparation.
TRIUMPH COLUMN
The preferred parts are from a Spitfire or GT-6, vintage
1972 to mid 1977. Get the upper column and housing,
upper and lower clamps and both switches.
See page 51 for bushing remove and replacement,
preparation and rebuilding of the Triumph column.
STEERING WHEEL
The original Cobra used a 16" laminated wood rimmed
aluminum-framed steering wheel. We have found that a 15"
wheel allows more knuckle room between the wheel and the
cowl, while still offering reasonable steering effort.
E.R.A. offers both diameters in a reproduction of the
original wheel. A hub center button with either a AC or
Cobra logo is also available.
If you are using a Triumph column, you also need to adapt
the Triumph hub to the reproduction wheel.
SEAT BELTS
E.R.A. offers custom competition belts, identical to the
original cars. Inquire.
Standard seat belts can be installed in the threaded chassis
bosses.
Separate left and right straps are required for dual shoulder
harnesses. The length of an off-the-shelf shoulder harness
strap may need changing.

SECTION A -PARTS NEEDED-
19
WIPER MOTOR AND COMPONENTS
Modified and rebuilt wiper motors and hardware are
available from E.R.A.
The best wiper components are found in the 1969-1976
Triumph Spitfire, GT-6, or TR-6. Get the entire set-up
including: wiper motor, wheel boxes, spacers, gaskets,
chrome bezels, and the connecting tube between the wiper
motor and right wheel box. See the wiper motor
illustrations on page 52 to help you identify the parts.
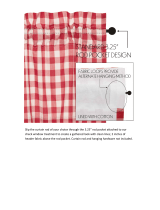
Many times, the wheel-boxes available are not correct.
Measure across the teeth of your gear to the theoretical
center of the cable. (Some of the gears are flat, some are
concave.) If your dimension "A" is 1.45", not 1.25", the
wiper drive must be modified to compensate. See page 52
for details.
a\whlbox
CHECKING THE CABLE/GEAR WHEELBOX
CLEARANCE
Before you install the wheelboxes, it's a good idea to check
that the cable engages the gear properly. Unfortunately, the
quality of the wheelboxes has not been consistent lately.
Make sure that the tubes line up properly with the gear so
that there is no binding, and that the cable is held close to
the gear, but not so close to make excessive drag.
FRONT SHOCK ABSORBERS
E.R.A. offers custom made Spax dampers with springs. Konis
are available on special order. Also available are spring
collar wrenches to adjust your ride height.
The coil-over dampers should be adjustable for ride height.
See the length specifications on page 54 and part numbers
on page 24.
Both Koni and Spax are adjustable for damping. The Spax
is externally adjustable for combined jounce and rebound
damping. The Koni has separate external damping
adjustments for jounce and rebound.
FRONT COIL SPRINGS:
Front Spax and Koni dampers require 12" long by 250
lb/inch or 275 lb/inch springs for most engines. Other
dampers may require a different spring length. Some
spring/shock combinations may require spacers. Check with
us for details.
EXHAUST SYSTEM
SIDE PIPES
Side pipes were used on the original competition cars and
are very popular on the 427SC. However, because we have
lengthened the footboxes for more leg room, exact
duplicates of the primary pipes will not fit. Primary pipes
for the Ford FE engines are available from E.R.A.
Exact reproductions of the original side pipes, and the
appropriate primary pipes are available from E.R.A. in
various coatings and materials, including polished stainless
steel.
UNDER-CAR EXHAUST
The E.R.A. 427SC has provisions for an original style
under-car system. This is a mellower, dual exhaust system
for those wishing to duplicate an original street car. There is
a small horsepower penalty, however. A complete system
for the FE engine is available from E.R.A. The system is
shown on page 138.

SECTION A -PARTS NEEDED-
20
WHEELS, BOLT-ON
Bolt-on wheels require a 4 3/4" bolt circle (Chevrolet
pattern). 7" wide wheels for the front, 8 1/2" or 10" rear with
3 5/16"back spacing will result in the "right look." Using
wider wheels on the rear requires a change in the wheel
offset and may prevent use of the under-car exhaust system.
Custom bolt-on wheels will fit with the same offsets as the
pin-drive wheels shown here. If your wheel and/or tire
widths are significantly different, call us for advice.
Note! The front GM hubs use 7/16"-20 lug nuts, the rear
Jaguar hubs have 1/2"-20 thread.
Definitions:
BACKSPACING - The distance from the inside edge of the
wheel to the mounting face
OFFSET - The distance from the centerline of the wheel to
the mounting face. Positive offset is where the wheel
centerline is outside the mounting face. Negative offset moves
the wheel in toward the center of the car. (Some wheel
companies may define the offset differently. Check!).
WHEELS, PIN-DRIVE
Six-Pin (as original) 15" wheels (7 1/2" and 9 1/2" wide are
available from E.R.A., Vintage Wheels, Trigo and
Halibrand. The front E.R.A. hubs require non-original
backspacing. Several manufacturers (PS Engineering and
Vintage wheels, among others) make 17" wheels that are up
to 9.5" wide front, 11.5" rear.
Front Wheel Offset
Note t hat if you machine the back side of the wheel for fit,
you must maintain the pin hole depth.
Rear Wheel Offset
See page 144 for special notes.
“Five-Pin” pin drive wheels are also available from E.R.A.,
Trigo and Halibrand. These wheels look exact from the
outside, but use bolt-on hubs with adapters and special lug
nuts to drive the wheels.
/