2 ½" POLY GUNITE JET (210-3700)
INSTALLATION INSTRUCTIONS AND PRESSURE TESTING
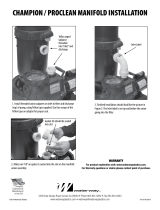
1. Hang Gunite Poly Jet Body with ties through preset holes onto steel rebar.
3. Glue 2 ½" cap onto end of pipe for pressure test being guniting.
5. Make a mark on the 1" PVC pipe flush or even with the end of the 2 ½" pipe.
(instructions continued on back)
7. Wrap Teflon tape on retainer ring if necessary and thread the 1" PVC pipe back into
body with Poly Jet Wrench, making sure of a snug fit.
6. Unscrew 1" PVC pipe from body and cut 3 3⁄8" inward from the mark towards retainer
ring, then glue wallfitting to 1" PVC pipe.
2. Estimate needed length of 2 ½" PVC pipe by thickness of wall. Cut 2 ½" PVC pipe at
least 4" longer than estimated. Then glue 2 ½" PVC pipe to body.
Ties
Steel Rebar
Body (211-3060)
2" Water
Estimated Length
4"
8" min. from back of jet body
2 ½" Cap
4. After pool guniting, scoop around the pipe. Before plastering, cut the 2 ½" PVC pipe inside the wall and glue
on the Gunite Poly Jet Plaster Niche (425-5030) (not included). Cover niche and tape then plaster over niche.
Gunite Wall
Chip out wall
around pipe
2 ½" PVC Pipe
SCH 40
Gunite Poly Jet Niche
(425-5030)
Wall
Mark 1" PVC pipe
ush with wall
Retainer 0-Ring
(805-0215)
Retainer Ring
(219-1060)
3 ⁄"
Make
cut here
Mark line
from step 5
Walltting (215-1070)
Wall
Retainer Ring (219-1060)
Poly Jet Wrench
(218-1770)
Wrap Teon
Tape
Walltting
Assembly
1
5
6
7
2
3
4
8. If installing any of the internals above, use a Poly Jet Wrench to screw internal into
wallfitting. Also available are metal escutcheons to cover plastic wallfittings (see below).
Adjustable
(210-6080)
Wall
Pulsator
(210-6070)
Adjustable Roto
(210-6090)
Whirlpool
(210-9790)
Monster
(210-8750)
Wrench
(218-1770)
8
8.00" min. length
5.989"
4.290"
4.640"
1" SCH 40
PVC Pipe
(not supplied)
Niche
(not supplied)
(425-5030) 2 ½" SCH 40
PVC Pipe
(not supplied)
1 ½" Socket Air 2" Socket Water
810-0023.0618

9. If installing a Deluxe Style internal, simply place into wallfitting and turn clockwise, hand
tightening. When tight, turn counterclockwise to adjust to water flow.
Always use at least one Non-Adjustable internal
per spa to prevent deadheading pump.
Adjustable
Pulsator
210-6060 - White
10 GPM
Adjustable
Pulsator
210-6070 - White
10 GPM
Adjustable
Roto
210-6090 - White
10 GPM
Adjustable
210-6080 - White
10 GPM
Adjustable
Massage (7 Nozzle)
210-6700 - White
10 GPM
Stainless Steel
Trim Escutcheon
916-6000
Wrench
218-1770
Adjustable
Roto
210-6120 - White
10 GPM
Adjustable
210-6100 - White
10 GPM
Adjustable
Massage (7 Nozzle)
210-6710 - White
10 GPM
Whirlpool
210-9790
38 GPM
Monster
210-8750
Four Different
Orifices Included
5⁄16" 10 GPM
3⁄8" 13 GPM
7⁄16" 17 GPM
½" 22 GPM
To prevent personal injury, shock, or property/equipment damage, an Air Spring
Check Valve (2" 600-8160, 1 ½" 600-8140) must be installed on the blower stand
pipe in case of a water backup in the air line.
Note: If a blower is not being used, please direct the air intake toward the ground
using the 2" Sweep Vent Grate Assembly (400-4130) on the Air Inlet Pipe.
Wall
Deluxe Style
Poly Jet Internal
Controller Blower
Water Flow Water Flow
Air
Flow UL Listed
Check Valve
Air Intake
Sweep Vent Grate Assembly
(400-4130)
Air
Flow
Air Inlet Pipe
POLY JET INTERNALS AND ACCESSORIES
STANDARD INTERNALS
NON-ADJUSTABLE
DELUXE SERIES
ACCESSORIES
Handheld Jet
210-3200
10 GPM
9
WARRANTY
For product registration visit: www.waterwayplastics.com.
For Warranty questions or claims please contact point of purchase.
810-0023.0618
©2018 Waterway Plastics
2200 East Sturgis Road, Oxnard CA 93030 • Phone 805.981.0262 • Fax 805.981.9403
www.waterwayplastics.com • [email protected]
Designed,
Engineered &
Manufactured
in the USA.
/