Page is loading ...

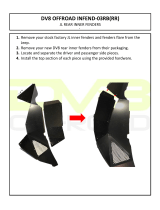
……………………………………………………………………………………………………………………………………………………………………………
1. Remove your stock factory JL fenders and all clips.
2. Once removed, clean the fender of any debris and dirt.
3. With the provided rivnuts, install them into the holes on the front fenders
as shown below. Make sure when installing the rivnuts, that you do not
over tighten them, this prevents spinning when the fender and bolts are
installed.
4. Hold up the front fender to ensure all of the hardware aligns. Work from
the back and begin to loosely install bolts into each hole.
5. Once all bolts are hand tight, begin to alternate front and back when
tightening the bolts down. Do not over tighten the bolts to prevent any
fender warping from occurring.
DV8 OFFROAD FDJL-01
JL ARMOR FENDER INSTRUCTIONS
In

…..0……………………………………000000000000000000000000000000000000000000000000000000000000000000
Rears
6. Using the wheel well mounting plate, mark the holes where the provided
rivnuts will be installed. If there is an existing hole, you should not need to
drill as the rivnut should be the correct size.
7. Install the rivnuts and be sure not to over tighten them.

0
8. Install the center main fender bracket loosely to the fenders as shown.
9. Install the two end brackets to the wheel well bracket as shown below.
10. Attach the fender to the wheel well bracket loosely.
11. Once attached, center the fender and tighten down.
12. You can now attach the LED lights on the front fenders.
/