Page is loading ...

Notes and Maintenance
Before you begin installation, read all instructions thoroughly.
Proper tools will improve the quality of installation and reduce the time required.
To protect the product, wax after installing. Regular waxing is recommended
to add a protective layer over the finish. Do not use any type of polish or wax
that may contain abrasives that could damage the finish.
For polished, gloss and other smooth finishes,
polish may be used to clear small scratches and scuffs on the finish.
Mild automotive detergent may be used to clean the product.
Do not use dish detergent, abrasive cleaners, abrasive pads,
wire brushes or other similar products that may damage the finish.
Refer to the table to the left when securing hardware during the
installation process to help prevent damage to the product or vehicle.
Torque Specifications
METRIC
M6 bolt 3 ft.-lbs.
M8 bolt 7 ft.-lbs.
M10 bolt 16 ft.-lbs.
M12 bolt 28 ft.-lbs.
SAE
1/4" bolt 3 ft.-lbs.
5/16" bolt 7 ft.-lbs.
3/8" bolt 16 ft.-lbs.
7/16" bolt 20 ft.-lbs.
1/2" bolt 28 ft.-lbs.
Use above torque setting
unless otherwise noted
PAGE 1 • 2500201-INS-RF • 800.798.0813 • NEED ASSISTANCE? • ARIESAUTOMOTIVE.COM
Level of Difficulty
Moderate
Scan
for helpful
install tips
INSTALLATION MANUAL
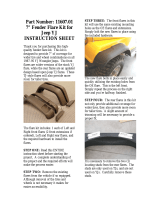
Parts List
1 Driver-side fender flare
1 Passenger-side fender flare
16 Hex bolt, M6 x 20mm
16 Rivnut, M6
17 Flat washer, M6
16 Lock washer, M6
1 Insert tool, M6
1 Left hand nut, M8
1 Metal spacer
Tools Required
Ratchet Socket, 10mm
Wrench, 13mm Socket, 13mm
Drill Cut-off tool
Plier-style thread
set tool, M6
Drill bit,
25/64" OR 10mm
Paint marker Trim removal tool
Product Image
2500201

ARIESAUTOMOTIVE.COM • NEED ASSISTANCE? • 800.798.0813 • 2500201-INS-RF • PAGE 2
Step 1
To install the rear fender flares, remove
all push-in retainers. Take care not to
damage the plastic inner fender flare.
Using a 10mm socket, remove all hex
bolts. Remove the stock fender flare.
Step 2
Hold the ARIES rear fender against the
body to check alignment with factory
holes and mark the mounting locations.
Step 3
If one of mounting points do not line up
with a factory hole, mark a new mounting
location. Drill a new hole at the marked
location using a 25/64" or 10mm drill bit.
Check to make sure that the threaded
metal insert will fit.
Do not make the holes larger than
required or the rivnuts my fail to install.
Step 4
If a plier-style thread-set will be used
to install the rivnuts proceed to the
installation locations in step 5.
Screw the left handed nut completely
onto the thread-set tool. Slide the metal
spacer onto the larger thread until it rests
against the M8 left hand nut.
Place an M6 flat washer on the
small thread followed by an M6 rivnut.
Thread the rivnut onto the small end
of the tool until it seats the washer
against the shoulder between the
M6 and M8 threads.

PAGE 3 • 2500201-INS-RF • 800.798.0813 • NEED ASSISTANCE? • ARIESAUTOMOTIVE.COM
Step 6
Hold the plastic inner fender flare in place
and mark for trimming. Cut carefully and
check the fit. Place the flare aside when
finished.
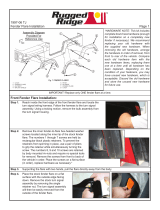
Step 5
Insert the the rivnut into the drilled hole.
Using an open ended 13mm wrench,
hold the M8 nut on the thread setting tool.
With a 13mm socket, turn the head of
the bolt clock-wise until the M8 nut and
metal spacer contact the M6 washer
and rivnut. After tension is felt, carefully
compress the rivnut in the hole while
applying slight pressure to keep it seated
(approximately two full rotations).
WARNING: Over tightening the rivnut may
damage the thread set tool and / or vehicle
rocker panel. Only compress the rivnut
enough to seat in the hole without rotating.
Step 7
Lift the ARIES rear fender into place and
thread on the supplied 6mm bolt, locking
washer and flat washer.
Step 8
Reinstall the inner fender well using
the stock hardware where applicable.
To ensure a tight fit, additional
fastening may be required with
zip ties (not included).

ARIESAUTOMOTIVE.COM • NEED ASSISTANCE? • 800.798.0813 • 2500201-INS-RF • PAGE 4
Step 10
Congratulations on the installation
of your new ARIES fender flares.
With the fender flares installed, periodic
inspections should be performed to ensure
all mounting hardware remains tight.
To protect your investment, see the
'Notes and Maintenance' section on
the first page of this instruction manual.
Step 9
Tighten down all hardware with a
10mm socket. Repeat this process
on the passenger side.
/