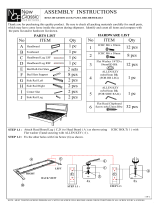
NOTE : MUST TIGHTEN SCREWS PERIODCALLY WITH USE SCREW WILL BECOME LOOSE CHECK TIGHTNESS OF ALL SCREW EVERY 6-8 WEEKS.
2 OF 2
STEP 2.1 :
A
DO NOT FULLY TIGHTEN SCREW
IN THIS STEP BEFORE ALIGN
THE SIDE RAIL AS SHOWN.
H
G
SIDE VIEW
ALIGN BEFORE TIGHTEN
FRONT VIEW
J
R
L
Right Sticker
Left Sticker
J
H
G
J
G H
J
BG
H
STEP 2.1 :
STEP 2.2 :
4
1
3
x8
STEP 2.2 :
5
LOOSEN TIGHTEN
5
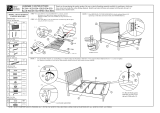
Attach Side Rail ( G ) & ( H ) to the Side Rail Leg ( J ) as shown using JCBC BOLT( 1 )with
Flat washer (3)and securing with ALLEN KEY ( 4 ) by outside side rail (G) & (H) .
Loosen JCBB Bolt at Headboard & Footboard Leg using Allen Key (5) (Do not tighten them before
Hook SET-UPSIDE RAIL TO HEAD BOARD (A) closely and push down to fit and tighten
them accordingly.
Repeat step 2.2 with other end of rail to hook onto FOOTBOARD (B).
E
I
F
2
4
STEP 3.1 :
G
E
6
STEP 3.2 :
Push the side rail(G)&(H)
meet with wooden slat(E)
and fix the CSK Screw(6)
by using the Screw Driver.
F
Leveler
STEP 3.3 :
E
I
B
6
STEP 3.4 :
STEP 3.5 :
REMARK:
Push Slat (E) to the end of side rail
and secure with CSK Screw(6)
as shown.
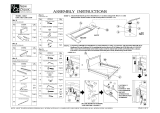
STEP 3 : Fix the Bed Slat Support (F ), to Bed Slat (E) and Center slats (I) tighten with
JCBC Bolt (2) as shown . Install the bed slat ( E ) to side rail ( G ) & ( H ) and tighten with
Csk Screw ( 6 ) as per diagram shown. (NOTE: THE SETUP MUST DONE AT THE DECIDED
LOCATION FOR THE BED TO OBTAIN PERFECT STABILITY)
Repeat step 3 for other set of slats assembly.
H


