Page is loading ...

ASSEMBLY INSTRUCTIONS
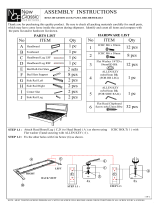
B1655-315 OBSIDIAN 5/0 Q HEADBOARD,FOOTBOARD & SLATS
B1655-335 OBSIDIAN 5/0-6/6 Q/EK SIDE RAILS
Thank you for purchasing this quality product. Be sure to check all packing materials carefully for small parts,
which may have come loose inside the carton during shipment. Identify and count all items and compare with
the parts list and/or hardware list shown.
NO COMPONENT DRAWING QTY
AHeadboard 1 pc
BFootboard 1 pc
CHeadboard Leg LSF 1 pc
DHeadboard Leg RSF 1 pc
ESlats 4 pcs
FSlats Support Leg 4 pcs
GSide Rail 2 pcs
HBottom Stretcher 1 pc
PARTS LIST
NOTE : MUST TIGHTEN SCREWS PERIODCALLY WITH USE SCREW WILL BECOME LOOSE CHECK TIGHTNESS OF ALL SCREW EVERY 6-8 WEEKS.
1 OF 2
NO COMPONENT DRAWING QTY
1JCBC M6 x 1 3/16" Blk 6 pcs
2Spring Washer 1/4" Blk 6 pcs
3Flat Washer 1/4"IDx4/8"OD Blk 6 pcs
4Allen Key M4 x 2 9/16" Blk 1 pc
5Allen Key M5 x 2 9/16" Blk 1 pc
6Flat Head Chipboard Screw
M4 x 1 2/8" Rbw 12 pcs
STEP 1 : Attach Head Board Leg ( C & D ) to Head Board ( A ) as shown using JCBC BOLT ( 1 ) with Spring Washer ( 2 ), Flat washer ( 3 )
and securing with Allen Key ( 4 ).
41
2
3
x6
D
C
A
ASSEMBLY INSTRUCTIONS
B1655-115 OBSIDIAN 6/6-6/0 EK/WK HEADBOARD,FOOTBOARD
& SLATS
B1655-335 OBSIDIAN 5/0-6/6 Q/EK SIDE RAILS
NOTE : MUST TIGHTEN SCREWS PERIODCALLY WITH USE SCREW WILL BECOME LOOSE CHECK TIGHTNESS OF ALL SCREW EVERY 6-8 WEEKS.
1 OF 2
STEP 1 : Attach Head Board Leg ( C & D ) to Head Board ( A ) as shown using JCBC BOLT ( 1 ) with Spring Washer ( 2 ), Flat washer ( 3 )
and securing with Allen Key ( 4 ).
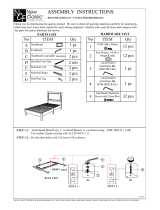
ASSEMBLY INSTRUCTIONS
B1655-115 OBSIDIAN 5/6-6/0 EK/WK HEADBOARD,FOOTBOARD
& SLATS
B1655-235 OBSIDIAN 6/0 WK SIDE RAILS
PARTS LIST
NOTE : MUST TIGHTEN SCREWS PERIODCALLY WITH USE SCREW WILL BECOME LOOSE CHECK TIGHTNESS OF ALL SCREW EVERY 6-8 WEEKS.
1 OF 2
STEP 1 : Attach Head Board Leg ( C & D ) to Head Board ( A ) as shown using JCBC BOLT ( 1 ) with Spring Washer (2), Flat washer (3)
and securing with Allen Key ( 4 ).
HARDWARE LIST
HARDWARE LIST
41
2
3
x6
D
C
A
41
2
3
x6
D
C
A
NO COMPONENT DRAWING QTY
AHeadboard 1 pc
BFootboard 1 pc
CHeadboard Leg LSF 1 pc
DHeadboard Leg RSF 1 pc
ESlats 4 pcs
FSlats Support Leg 8 pcs
GSide Rail 2 pcs
HBottom Stretcher 1 pc
NO COMPONENT DRAWING QTY
1JCBC M6 x 1 3/16" Blk 6 pcs
2Spring Washer 1/4" Blk 6 pcs
3Flat Washer 1/4"IDx4/8"OD Blk 6 pcs
4Allen Key M4 x 2 9/16" Blk 1 pc
5Allen Key M5 x 2 9/16" Blk 1 pc
6Flat Head Chipboard Screw
M4 x 1 2/8" Rbw 12 pcs
NO COMPONENT DRAWING QTY
AHeadboard 1 pc
BFootboard 1 pc
CHeadboard Leg LSF 1 pc
DHeadboard Leg RSF 1 pc
ESlats 4 pcs
FSlats Support Leg 8 pcs
GSide Rail 2 pcs
HBottom Stretcher 1 pc
NO COMPONENT DRAWING QTY
1JCBC M6 x 1 3/16" Blk 6 pcs
2Spring Washer 1/4" Blk 6 pcs
3Flat Washer 1/4"IDx4/8"OD Blk 6 pcs
4Allen Key M4 x 2 9/16" Blk 1 pc
5Allen Key M5 x 2 9/16" Blk 1 pc
6Pan Head Chipboard Screw
M3.5 x 5/8"mm Blk 16 pcs
7L-Bracket Blk 8 pcs
8Flat Head Chipboard Screw
M4 x 1 2/8" Rbw 4 pcs
Thank you for purchasing this quality product. Be sure to check all packing materials carefully for small parts,
which may have come loose inside the carton during shipment. Identify and count all items and compare with
the parts list and/or hardware list shown.
Thank you for purchasing this quality product. Be sure to check all packing materials carefully for small parts,
which may have come loose inside the carton during shipment. Identify and count all items and compare with
the parts list and/or hardware list shown.

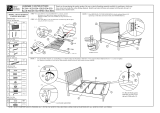
NOTE : MUST TIGHTEN SCREWS PERIODCALLY WITH USE SCREW WILL BECOME LOOSE CHECK TIGHTNESS OF ALL SCREW EVERY 6-8 WEEKS.
2 OF 2
STEP 2 :
Hook side rail ( G ) to Headboard ( A ) closely and push down to fit. repeat step 2 with
other end of rail to hook onto Footboard ( B ).
5
G
B
STEP 3 :
Push the side rail (G) meet with wooden
slat (E) and fix the CSK screw (6)
by using the Screw Driver (NOT PROVIDED).
x8
STEP 3.1 :
STEP 3.4 :
leveler
STEP 3.2 :
STEP 3.3 :
leveler
F
E
F
6
5
G
G
E
NOTE : MUST TIGHTEN SCREWS PERIODCALLY WITH USE SCREW WILL BECOME LOOSE CHECK TIGHTNESS OF ALL SCREW EVERY 6-8 WEEKS.
2 OF 2
STEP 2 :
5
G
B
Tighten the 4 Corner with Allen Key ( 5 ) . Fix the Bed Slat Support Leg ( F ), to Bed Slat ( E ) as shown . Install the bed slat ( E )
to side rail ( G ) and tighten with Csk Screw ( 6 ) as per diagram shown.
(NOTE: THE SETUP MUST DONE AT THE DECIDED LOCATION FOR THE BED TO OBTAIN PERFECT STABILITY)
STEP 3 :
Push the side rail (G) meet with wooden
slat (E) and fix the CSK screw (6)
by using the Screw Driver (NOT PROVIDED).
x8
STEP 3.1 :
STEP 3.4 :
leveler
STEP 3.2 :
STEP 3.3 :
leveler
F
E
F
6
5
G
G
E
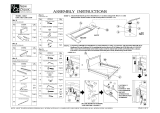
NOTE : MUST TIGHTEN SCREWS PERIODCALLY WITH USE SCREW WILL BECOME LOOSE CHECK TIGHTNESS OF ALL SCREW EVERY 6-8 WEEKS.
2 OF 2
STEP 2 :
5
G
B
Tighten the 4 Corner with Allen Key ( 5 ).Fix the Bed Slat Support Leg ( F ), to Bed Slat ( E ) as shown . Install the bed slat ( E )
to side rail ( G ) lastly tighten Bed Slats with L-bracket ( 7 ) by using Pan Head Chipboard Screw ( 6 ).
(NOTE: THE SETUP MUST DONE AT THE DECIDED LOCATION FOR THE BED TO OBTAIN PERFECT STABILITY)
STEP 3 :
x8
STEP 3.1 :
leveler
STEP 3.2 :
STEP 3.3 :
leveler
F
E
F
5
G
STEP 3.5 :
STEP 3.4 :
67
6
7
E
E
G
COMPLETED ASSEMBLY
COMPLETED ASSEMBLY
Tighten the 4 Corner with Allen Key ( 5 ) . Fix the Bed Slat Support Leg ( F ), to Bed Slat ( E ) as shown . Install the bed slat ( E )
to side rail ( G ) and tighten with Csk Screw ( 6 ) as per diagram shown.
(NOTE: THE SETUP MUST DONE AT THE DECIDED LOCATION FOR THE BED TO OBTAIN PERFECT STABILITY)
Tighten the 4 Corner with Allen Key ( 5 ).Fix the Bed Slat Support Leg ( F ), to Bed Slat ( E ) as shown . Install the bed slat ( E ) to side
rail ( G ) lastly tighten Bed Slats with L-bracket ( 7 ) by using Pan Head Chipboard Screw ( 6 ). Loosen or Tighten the Adjuster as
necessary to level the bed. Bed assembly should be done in final location to ensure stability.
6
H
x4
C
STEP 3.5
BACK VIEW/
SUPPORT LEG MARKING
(BACK VIEW)
(FRONT VIEW) H
6
H
x4
C
STEP 3.5
BACK VIEW/
SUPPORT LEG MARKING
(BACK VIEW)
(FRONT VIEW) H
8
H
x4
C
STEP 3.5
BACK VIEW/
SUPPORT LEG MARKING
(BACK VIEW)
(FRONT VIEW) H
Hook side rail ( G ) to Headboard ( A ) closely and push down to fit. repeat step 2 with
other end of rail to hook onto Footboard ( B ).
Hook side rail ( G ) to Headboard ( A ) closely and push down to fit. repeat step 2 with
other end of rail to hook onto Footboard ( B ).
/