Page is loading ...

ASSEMBLY INSTRUCTIONS
PAGE 1 OF 2
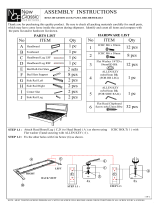
NOTE : MUST TIGHTEN SCREWS PERIODCALLY.SCREW NATURALLY LOOSEN WITH USE.CHECK TIGHTNESS OF ALL SCREW EVERY 6-8 WEEKS.
4
1
2
3
A
B
RIGHT LEFT
A
No ITEM Qty
A
Headboard
1 pc
B
Headboard Left & Right
2 pcs
No ITEM Qty
1JCBC M6 x 35mm 8 pcs
2SPRING WASHER 1/4" Rbw 8 pcs
3Flat Washer 1/4"ID x 19mmOD
Blk 8 pcs
4ALLEN KEY m4x65mm Blk 1 pc
4a Adaptor 1pc
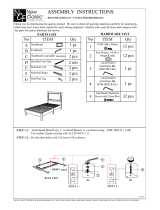
No ITEM Qty
C
Footboard
1 pc
No ITEM Qty
D
Side Rail
2 pcs
E
Slat
3 pcs
F
Slat Support 10
pcs
G
Concealed Panel
6 pcs
H
Bed Slat with marking
2 pcs
C
No ITEM Qty
5JCBC M6 x 50mm 10
pcs
6ALLEN KEY m4x65mm Blk 1 pc
7JCBB Bolt M8 x 70mm 4 pcs
8Flat Washer 5/16"ID x
22mmOD Blk 8 pcs
9
Wing- Nut M8
4 pcs
10 ALLEN KEY m5x65mm Blk 1 pc
11 CSK M4 x 32mm 10
pcs
12 Pan Head Screw M3.5 x 20MM 30
pcs
Loosen the JCBB Bolt from Headboard (A) and Footboard (C) using ALLEN KEY (10).Attach the Side Rail (D) to
Headboard (A) and Footboard (C) by pushing the bracket down to fit it.Tighten the JCBB Bolt with ALLEN KEY
(10). Connect the LED terminal socket which is place on left & right of side rail (D) and Footboard (C) as shown.
CAUTION : Do not connect the LED terminal socket that place nearby heaboard leg on this STEP.
STEP 2 :
D
10
D
10
( STEP 2.c )
C
C
D
CAUTION !!!
PLEASE
CONNECT THE
LED TERMINAL
SOCKET
AFTER FIT IN
THE HOOK PART
AS SHOWN.
x8
PLEASE REMOVE MASKING
TAPE BEFORE CONNECT
MASKING TAPE LED SOCKET
B
D
10
10
D
B
++_
_
+
+
_
+_
_
_
Nail Leg
30 x 30 x 225mm
Nail Leg
Attach Head Board Leg ( B ) to Head Board ( A ) as shown using JCBC BOLT ( 1 ) with
Spring Washer (2),Flat washer (3) and securing with ALLEN KEY ( 4 ).
STEP 1 :

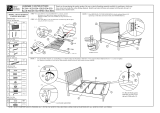
ASSEMBLY INSTRUCTIONS
PAGE 2 OF 2
NOTE : MUST TIGHTEN SCREWS PERIODCALLY.SCREW NATURALLY LOOSEN WITH USE.CHECK TIGHTNESS OF ALL SCREW EVERY 6-8 WEEKS.
11
H
x10
G
F
6
5
x10
F
Fix the Bed Slat Support ( F ) to the Bed Slat ( E ) & ( H ) as shown.
Fix the Bed Slat ( E ) by push closely to the Side Rail ( D ) by using SCK Screw ( 11 )
as shown.
STEP 4 :
Attach Concealed Panel ( G ) at the upper Bed Slat ( E ) & ( H )
using Panhead Screw ( 12 ) and tighten with Screw Driver.(not
Included)
STEP 5:
E
ON & OFF TOUCH SWITH BUTTON
4a
x2
9
8
7
9
8
7
x2
Tighten JCBB bolt ( 7 ) with Flat Washer ( 8 ) and Wing Nut ( 9 )
as show below.
STEP 3 :
D
Loosen the attached wire terminal socket at the back headboard (A) with screw driver (NOT PROVIDED) as
shown. Connect the Terminal LED socket carefully.Lastly connect the adaptor (4a) into input power socket.
STEP 5:
A
LED SOCKET
LOOSEN THE SCREW
TO CONNECT
PLEASE REMOVE MASKING
TAPE BEFORE CONNECT
LOOSEN THE SCREW
TO CONNECT
POWER SOCKET
LED SOCKET
BACK VIEW
+
_
+
+
G
E
GE
12
x30
PLEASE REMOVE PROTECTIVE
FILM BEFORE USE
H
E
H
/