Page is loading ...

LOWRI FULL DAYBED
NO HARDWARE LIST HARDWARE LIST
QTY NO QTY
14
PCS
ASSEMBLY TIPS
1. Remove hardware from box and sort by size.
2. Please ensure that all hardware and parts are
presented prior start of assembly.
3. Please follow attached instruction in the same
sequence as numbered to assure fast and easy
assembly.
WARNING !
1. Don't attempt to repair or modify part that are
broken or defective. Please contact with the
store immediately.
2. This product is for home use only and not
intended for commercial establishment.
4
PCS
10
FULL THREAD STUD
M6 x 70mm
MINIFIX
JCBC M6 x 60mm
6
PCS
2
JCBC M6 x 50mm
4
PCS
3
HOUSING
4
PCS
11
4
JCBC M6 x 40mm
4
PCS
5
JCBC M6 x 30mm
4
PCS
6
BARREL NUT
9
PCS
7
HEX NUT M6
4
PCS
8
NYLON WASHER
4
PCS
9WOODEN DOWEL
M8 x 30mm
6
PCS
12
L-BRACKET
6
PCS
CSK M4 x 25mm
32
PCS
CSK M3.5 x 12mm
12
PCS
THMS M4 x 28mm
3
PCS
BASE GLIDE
7
PCS
HANDLE
3
PCS
SPANNER
1
PCS
13
14
15
16
17
18
ALLEN KEY M4
19 1
PCS
20
JCBC M6 x 80mm
3
PCS
Page 1 of 10

PART LIST
M
M
B
M
L
D
L
GJ
A
N - 12pcs
E
C
K
HJ
I
FJ
I
G
K
H
O
P
P
P
Page 2 of 10

i)
i)
ii)
i)
i)
ii)
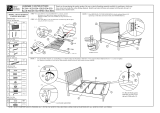
ASSEMBLY INSTRUCTION
STEP 1
Attach Side Panel(G) to Front Frame(D) and tighten JCBC M6 x 30mm(5) by using Allen Key M4(19). Repeat the procedure
for other side.
STEP 2
Tight Minifix(10) into hole of Front Frame(D) and insert Housing(11) into hole of Support(I).
Attach Support(I) to the Front Frame(D) and tighten Housing(11) by using screw driver.
Attach Slider Support(J) to the Front Frame(D). Repeat the procedure for other side.
G
D
D
5
5
19 G
G
D
10
11
I
D
J
D
I
IJ
J
J
Page 3 of 10

i)
i)
i)
i)
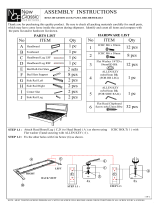
ASSEMBLY INSTRUCTION
STEP 3
STEP 4
Tight Minifix(10) into hole of Back Frame(F) and insert Housing(11) into hole of Support(I).
Attach Back Frame(F) to Support(I) & Slider Support(J) and tighten Housing(11) by using screw driver.
Repeat the procedure for other side.
Insert Barrel Nut(6) into hole of Back Frame(F) and tighten JCBC M6 x 50mm(3) by using Allen Key M4(19). Repeat the
procedure for other side.
F
I
10
11
F
I
I
J
J
J
3
3
19
6
6G
F
F
G
G
Page 4 of 10

i)
i)
i)
i)
ASSEMBLY INSTRUCTION
STEP 5
STEP 6
Attach L-Bracket(12) to Back Frame(F) & Slider Support(J) and tighten CSK 3.5 x 12mm(14) by using screw driver.
Repeat the procedure for other side.
12
14
14
F
J
F
J
J
J
12
14 14
J
D
D
J
J
J
Attach L-Bracket(12) to Front Frame(D) & Slider Support(J) and tighten CSK 3.5 x 12mm(14) by using screw driver.
Repeat the procedure for other side.
Page 5 of 10

i)
i)
ii)
iii)
i)
i)
ii)
iii)
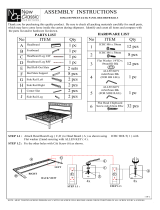
ASSEMBLY INSTRUCTION
STEP 7
STEP 8
Attach Corner Block(H) to the Side Panel(G) & Back Frame(F) and tighten CSK M4 x 25mm(13) by using screw driver.
Repeat the procedure for other side.
Tight Base Glide(16) into hole of bottom Leg Support(K,L) first.
Insert Barrel Nut(6) into hole of Leg Support(L) and tighten JCBC M6 x 60mm(2) by using Allen Key M4(19).
Insert Wooden Dowel(9) into hole of top Leg Support(L) and attach to Front Frame(D).
13
13
H
G
F
H
H
G
F
G
16
K,L
D
L
F
K
9
2
19
6K
K
L
L
D
F
Page 6 of 10

i)
i)
ii)
i)
i)
ii)
ASSEMBLY INSTRUCTION
STEP 9
STEP 10
Tight CSK M4 x 25mm(13) into hole of Leg Support(L) by using screw driver. Repeat the procedure for other side.
Tight a Full Thread Stud M6 x 70mm(1) into the hole of Headboard Bedpost(A).
Insert Wooden Dowel M8 x 30mm(9) into hole of Side Rail(C) & Front Frame(D).
Attach Side Rail(C) to the bedpost by inserting Nylon Washer(8) & Hex Nut M6(7) into the hole of Side Rail(C).
Tighten Hex Nut M6(7) with the Full Thread Stud M6 x 70mm(1) by using Spanner(18) securely.
Attach Assembly Drawer Frame(D) to the Front Bedpost(A) and tighten JCBC M6 x 60mm(2) by using Allen Key M4(19).
13
13
L
D
1
1
9
18
8
7
8
7
A
C
2
2
19
9A
D
A
C
D
Page 7 of 10

i)
i)
ii)
i)
i)
ii)
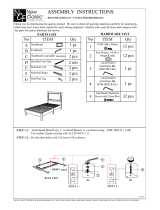
ASSEMBLY INSTRUCTION
STEP 11
STEP 12
Attach Back Panel(E) to Headboard Bedpost(A) and tighten JCBC M6 x 40mm(4) by using Allen key M4(19). Repeat the
procedure for other side.
Tight a Full Thread Stud M6 x 70mm(1) into the hole of Footboard Bedpost(B).
Insert Wooden Dowel M8 x 30mm(9) into hole of Side Rail(C) & Front Frame(D).
Attach Side Rail(C) to the bedpost by inserting Nylon Washer(8) & Hex Nut M6(7) into the hole of Side Rail(C).
Tighten Hex Nut M6(7) with the Full Thread Stud M6 x 70mm(1) by using Spanner(18) securely.
Attach Assembly Drawer Frame(D) to the Front Bedpost(B) and tighten JCBC M6 x 60mm(2) by using Allen Key M4(19).
4
E
19
A
A
E
1
1
9
18
8
87
7
C
B
2
219
9
D
B
D
B
C
Page 8 of 10

i)
i)
i)
i)
ASSEMBLY INSTRUCTION
STEP 13
STEP 14
Put the slats in position and screw the CSK M4 x 25mm (4) tighten by screw driver into the Bed Slat(D) and bed.
Attach Handle(17) to the Drawer Head(M) and tighten THMS M4 x 28mm(15) by using screw driver. Repeat the procedure
for other Drawer.
Insert the Drawer(M) into Drawer Frame(D).
13
13
N
N
C
15
17
M
Page 9 of 10

i)
ii)
i)
ii)
ASSEMBLY INSTRUCTION
Ensure all the screw and fixing are secured periodically.
Assembly are complete.
STEP 13
STEP 14
16
P
19
20
6P
NO
Tight Base Glide(16) into hole of bottom Center Leg(P) first.
Attach Center Leg(P) & Center Support(O) to Slat(N).
Insert Barrel Nut(6) into hole of Center Leg(P) and tighten JCBC M6 x 80mm(20) by using Allen Key M4(19).
Page 10 of 10
/