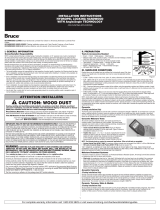
Stair Riser
Use VersaEdge to Position Flooring.
Molding MUST Rest on Plank Tongue
Sub FloorShim and Plank
MUST be Glued Down
5-5.5mm LVT
Tongue of
Flooring Plank
VT-VE(X)-Shim-5
Step 5
The tape may not sufficiently adhere to the rougher stair
or subfloor surfaces. Allow at least 24 hours for the
construction adhesive to form a bond. You should
always start at top of stairs and work your way down
to avoid contact with the installed moldings until cured.
NOTE: Complete cure takes 48-72 hours.
Step 4
Touch the bottom of molding to the stair riser and carefully
roll the stair nose in place. Make any final adjustments
before you push the molding all the way down. Once it’s
in the final position, press down firmly with your hands and
make your way down the entire stair nose. It may take 2 or
3 passes to set it firmly in place.
Stair Riser
Bottom of
Stair Nose
Step 3
Next, apply a generous bead of a Premium Polyurethane
Construction Adhesive along the entire inside corner.
Be sure to overlap the tape with the adhesive. Reveal
edge of plank may show when VersaEdge is installed. To
compensate, apply a little more adhesive to the molding.
Step 1
Install the riser flush to the stair. Use VersaEdge and shim to
determine where to start your flooring. Tongue side of flooring
plank MUST face VersaEdge so VersaEdge can fit snuggly onto
Tongue. Remove VersaEdge and glue the flooring plank and shim
down. Clean flooring and molding as directed below:
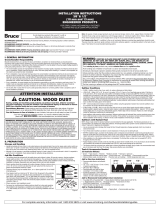
Step 2
Turn VersaEdge over and roughen the inside surface of the
VersaEdge to increase bond by means of 60 grit sandpaper,
sanding sponge, or a metal brush. Then, gently peel the
release paper all the way off the adhesive tape.
VersaEdge Stair Nose
CLEANING PREPARATION FOR BOTH SURFACES
Preparing the floor & molding as outlined is mandatory
to achieve the required bonding strength
1. Use a damp cloth (water only) to clean both surfaces of loose
particles or surface films.
2. Roughen the surfaces with sandpaper (100-150 grit), sanding
sponge or metal brush. For flooring, only roughen up area that
will be covered (1.25” to 1.5”).
3. Degrease both surfaces to remove all traces of oil, grease, dust,
and fingerprints by using a light solvent such isopropyl alcohol
(Refer to the manufacturer’s recommendations for additional
safe cleaning agents).
4. Let both surfaces dry thoroughly before applying adhesive.
Installation on 5 -5.5mm LVT flooring
“Flush Lock-Down” Installation Flooring with an overall thickness of 5-5.5
mm
Roughen up surface that
comes in contact
with glue
Painter’s
Tape to
protect
ooring
Sub Floor
LVT
PUR Adhesive
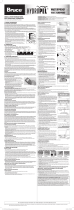
Stair Riser
Sub Floor
5-5.5mm Flooring
Adhesive Tape
PUR Adhesive
Adhesive Tape*
VersaEdge Surface
Roughened up with
Sanding Sponge or
Sandpaper
*The purpose of the double-sided tape is to secure the
molding firmly in place until the premium polyure-
thane construction adhesive totally cures.
Release Paper
PUR Adhesive
Caulk Gun
Adhesive Tape Underside of molding
generously covered
with PUR adhesive
7
DuraDecor | P: (855) 700 - 5666 | customercare@duradecor.com | duradecor.com