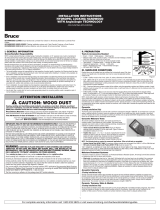
Roughen up surface that
comes in contact
with glue
Painter’s
Tape to
protect rest
of ooring
Flooring
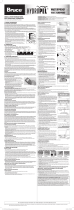
SlimTrim - OPTIONAL DOWEL INSTALLATION: Installation for use on CONCRETE
SlimTrim Installation Instructions for Use on Concrete
Install flooring planks, leaving 1 inch gap for molding installation. Draw line on flooring for hole placement. Using a 1/4”
concrete drill bit pre-drill 2” deep holes using same measurements as dowels. With pencil, mark on floor the location of
each dowel. BE SURE TO VACUUM PRE-DRILLED HOLES.
1
Concrete
2” 1/4”
Flooring
Pencil marks
1”
1”
1/4”
Drill bit
Lay a flat object over flooring and measure from the concrete at the center between the flooring up to the bottom of your
object. This will give you the distance to use on the Dowel Cutting Template below.
2
Concrete
Take Measurement HereFlat object
Dowel Cutting Template
Distance Measurement
3/4” NO CUT
Cut Here
Cut Here
Cut Here
Cut Here
Cut Here
5/8”
1/2”
3/8”
1/4”
1/8”
FOR CONCRETE ONLY!
Carefully cut or break dowels from Dowel Tree.
Use the Dowel Cutting Template to the right to
find your measurement on the template and lay
your dowel over the number that matches your
distance measurement.
Dowel Cutting Template
Distance Measurement
3/4” NO CUT
Cut Here
Cut Here
Cut Here
Cut Here
Cut Here
5/8”
1/2”
3/8”
1/4”
1/8”
3
Dowel Cutting Template
is located to the right of
Installation Instructions
With dowel on template, use a utility knife to cut
dowel as indicated on Dowel Cutting Template.
Repeat with all dowels that are to be used.
Dowel Cutting Template
Distance Measurement
3/4” NO CUT
Cut Here
Cut Here
Cut Here
Cut Here
Cut Here
5/8”
1/2”
3/8”
1/4”
1/8”
4
t
When molding is a finger’s width from the floor, insert tip of glue gun under one edge of molding and apply a polyurethane
construction adhesive along one side of the flooring. MAKE SURE YOU APPLY ADHESIVE TO ONLY ONE SIDE OF THE
MOLDING AND THAT ALL SURFACES THAT THE ADHESIVE TOUCHES IS DUST AND DEBRIS FREE.
8
PUR-Glue
adhesive
About
3/8”
(9.5mm)
Using both hands, start at one end and gently push molding 1/4” down at a time. It should take several passes to push
molding all the way down. Best hand position is holding dowel between pointer fingers and pushing down with thumbs
directly over dowel. DO NOT TRY TO PUSH ENTIRE MOLDING IN ALL AT ONCE.
7
Second Pass (1/4”)
Next Passes (1/4”)
First pass (1/4”)
When finished applying adhesive, start again at beginning of molding and push dowels all the way down until molding is
secure. Use a rubber mallet to gently tap on top of each dowel until molding sits flush. Use pencil marks as reference.
9
Pencil marks
NOTE: Dowels have to fit tightly for the molding to function properly. If you find the
dowel is too difficult to slide in, take 100/120 grit sandpaper, lay it flat on a surface and
sand down the dowel head slightly with a couple of passes (See Detail A at the right).
6
Slide dowels into groove on bottom of the SlimTrim molding and position them according to
template. Line up dowels with pre-drilled holes. Adjust dowels as needed.
DETAIL A
Roughen up surface
that comes in contact
with glue
CLEANING PREPARATION FOR BOTH SURFACES
Preparing the floor & molding as outlined is mandatory to achieve the required bonding strength
1. Use a damp cloth (water only) to clean both surfaces of loose particles or surface films.
2. Roughen the surfaces with sandpaper (100-150 grit), sanding sponge or metal brush. For flooring, only roughen
up area that will be covered (1.25” to 1.5”).
3. Degrease both surfaces to remove all traces of oil, grease, dust, and fingerprints by using a solvent such as
methyl ethyl ketone (MEK), acetone or isopropyl alcohol.
4. Let both surfaces dry thoroughly before applying adhesive.
5
Clean floor and molding as directed below:
SURFACE PREPARATION
11
DuraDecor | P: (855) 700 - 5666 | customercare@duradecor.com | duradecor.com