Page is loading ...

HUMIDI-TECH
®
Electric Humidifier
Installation, Operation,
and Maintenance Manual
READ AND SAVE THESE INSTRUCTIONS

ii
DRISTEEM HUMIDI-TECH ELECTRIC HUMIDIFIER INSTALLATION, OPERATION, AND MAINTENANCE MANUAL
WARNING
CAUTION
Indicates a hazardous situation that could result in death or
serious injury if instructions are not followed.
Indicates a hazardous situation that could result in damage to or
destruction of property if instructions are not followed.
WARNING
Attention installer
Read this manual before installing, and leave this manual with product owner. This product must be installed by qualifi ed
HVAC and electrical contractors and in compliance with local, state, federal, and governing codes. Improper installation
can cause property damage, severe personal injury, or death as a result of electric shock, burns, or fi re.
DriSteem Technical Support: 800-328-4447
Read all warnings and instructions
Read this manual before performing service or maintenance procedures on any part of the system. Failure to follow all
warnings and instructions could produce the hazardous situations described, resulting in property damage, personal injury,
or death.
Failure to follow the instructions in this manual can cause moisture to accumulate, which can cause bacteria and mold
growth or dripping water into building spaces. Dripping water can cause property damage; bacteria and mold growth can
cause illness.
Hot surfaces and hot water
This steam humidifi cation system has extremely hot surfaces. Water in tanks, steam pipes, and dispersion assemblies can
be as hot as 212 °F (100 °C). Discharged steam is not visible. Contact with hot surfaces, discharged hot water, or air
into which steam has been discharged can cause severe personal injury. To avoid severe burns, follow the cool-down
procedure in this manual before performing service or maintenance procedures on any part of the system.
Warnings and cautions
WARNINGS AND CAUTIONS

iii
DRISTEEM HUMIDI-TECH ELECTRIC HUMIDIFIER INSTALLATION, OPERATION, AND MAINTENANCE MANUAL
Warnings and cautions
WARNING
Disconnect electrical power
Disconnect electrical power before installing supply wiring or performing service or maintenance procedures on any
part of the humidifi cation system. Failure to disconnect electrical power could result in fi re, electrical shock, and other
hazardous conditions. These hazardous conditions could cause property damage, personal injury, or death.
Contact with energized circuits can cause property damage, severe personal injury, or death as a result of electrical shock
or fi re. Do not remove humidifi er electrical panel cover, heater terminal cover, or subpanel access panels until electrical
power is disconnected.
Follow the shutdown procedure in this manual before performing service or maintenance procedures on any part of the
system.
Electric shock hazard
If the humidifi er starts up responding to a call for humidity during maintenance, severe bodily injury or death from electric
shock could occur. To prevent such start-up, follow the procedure below before performing service or maintenance
procedures on this humidifi er (after the tank has cooled down and drained):
1. Use Vapor-logic
®
keypad/display to change control mode to Standby.
2. Shut off all electrical power to humidifi er using fi eld-installed fused disconnect, and lock all power disconnect switches in
OFF position.
3. Close fi eld-installed manual water supply shut-off valve.
CAUTION
Hot discharge water
Discharge water can be as hot as 212 °F (100 °C) and can damage the drain plumbing.
To prevent such damage from humidifi ers without water tempering, allow the tank to cool before draining.
Humidifi ers equipped with a water tempering device such as a DriSteem Drane-kooler need fresh make-up water in order to
function properly. Make sure the water supply to the water tempering device remains open during draining.
Excessive supply water pressure
Supply water pressure greater than 80 psi (550 kPa) can cause the humidifi er to overfl ow.
WARNINGS AND CAUTIONS

iv
DRISTEEM HUMIDI-TECH ELECTRIC HUMIDIFIER INSTALLATION, OPERATION, AND MAINTENANCE MANUAL
WARNINGS AND CAUTIONS . . . . . . . . . . . . . . . . . . . . . . . . . . . . . . . . . . . . . . . . . . . . . . . . . . . ii
OVERVIEW. . . . . . . . . . . . . . . . . . . . . . . . . . . . . . . . . . . . . . . . . . . . . . . . . . . . . . . . . . . . . . . . .2
Capacities, electrical specifications, and weights . . . . . . . . . . . . . . . . . . 4
Dimensions . . . . . . . . . . . . . . . . . . . . . . . . . . . . . . . . . . . . . . . . . . . . . 5
INSTALLATION . . . . . . . . . . . . . . . . . . . . . . . . . . . . . . . . . . . . . . . . . . . . . . . . . . . . . . . . . . . . . .6
Selecting a location . . . . . . . . . . . . . . . . . . . . . . . . . . . . . . . . . . . . . . . 6
Mounting the humidifier . . . . . . . . . . . . . . . . . . . . . . . . . . . . . . . . . . . . 7
Piping: . . . . . . . . . . . . . . . . . . . . . . . . . . . . . . . . . . . . . . . . . . . . . . . . 8
Tap/softened water . . . . . . . . . . . . . . . . . . . . . . . . . . . . . . . . . . . . 8
DI/RO water option . . . . . . . . . . . . . . . . . . . . . . . . . . . . . . . . . . . . 9
Supply water and drain piping . . . . . . . . . . . . . . . . . . . . . . . . . . . 10
Drane-kooler . . . . . . . . . . . . . . . . . . . . . . . . . . . . . . . . . . . . . . . . 11
Wiring . . . . . . . . . . . . . . . . . . . . . . . . . . . . . . . . . . . . . . . . . . . . . . . 12
Humidistat and transmitter placement . . . . . . . . . . . . . . . . . . . . . . . . . . 14
Dispersion: . . . . . . . . . . . . . . . . . . . . . . . . . . . . . . . . . . . . . . . . . . . . 15
Selecting the dispersion assembly location . . . . . . . . . . . . . . . . . . . 15
Interconnecting piping requirements . . . . . . . . . . . . . . . . . . . . . . . . 16
Interconnecting piping requirements . . . . . . . . . . . . . . . . . . . . . . . . 17
Drip tee installation . . . . . . . . . . . . . . . . . . . . . . . . . . . . . . . . . . . 18
SDU-I and SDU-E . . . . . . . . . . . . . . . . . . . . . . . . . . . . . . . . . . . . . 19
Single tube . . . . . . . . . . . . . . . . . . . . . . . . . . . . . . . . . . . . . . . . . 24
Rapid-sorb . . . . . . . . . . . . . . . . . . . . . . . . . . . . . . . . . . . . . . . . . 26
Table of contents
ATTENTION INSTALLER
Read this manual before installing.
Leave manual with product owner.
Where to fi nd more information
Our web site:
The following documents are available on our
web site: www.dristeem.com
• Catalogs
– Humidi-tech
– Ultra-sorb
®
• Installation, Operation, and Maintenance
manuals (IOM)
– Ultra-sorb
– Vapor-logic controller (includes
humidifier operation and troubleshooting)
• DriSteem Humidification System Design
Guide (includes steam loss tables and
general humidification information)

1
DRISTEEM HUMIDI-TECH ELECTRIC HUMIDIFIER INSTALLATION, OPERATION, AND MAINTENANCE MANUAL
Table of contents
Start-up procedure . . . . . . . . . . . . . . . . . . . . . . . . . . . . . . . . . . . . . . . 33
OPERATION . . . . . . . . . . . . . . . . . . . . . . . . . . . . . . . . . . . . . . . . . . . . . . . . . . . . . . . . . . . . . . 33
Start-up checklist . . . . . . . . . . . . . . . . . . . . . . . . . . . . . . . . . . . . . . . . 34
Tap/softened water . . . . . . . . . . . . . . . . . . . . . . . . . . . . . . . . . . . . . . 35
MAINTENANCE . . . . . . . . . . . . . . . . . . . . . . . . . . . . . . . . . . . . . . . . . . . . . . . . . . . . . . . . . . . 35
Ultra-sorb . . . . . . . . . . . . . . . . . . . . . . . . . . . . . . . . . . . . . . . . . . 38
DI/RO water option . . . . . . . . . . . . . . . . . . . . . . . . . . . . . . . . . . . . . . 40
DI/RO water option . . . . . . . . . . . . . . . . . . . . . . . . . . . . . . . . . . . . . . 41
Keypad/display and troubleshooting
The Vapor-logic Installation and Operation
Manual, which was shipped with your
humidifi er, is a comprehensive operation
manual. Refer to it for information about using
the keypad/display and Web interface, and for
troubleshooting information.
Download DriSteem literature
Most DriSteem product manuals can be
downloaded, printed, and ordered from our
web site: www.dristeem.com

2
DRISTEEM HUMIDI-TECH ELECTRIC HUMIDIFIER INSTALLATION, OPERATION, AND MAINTENANCE MANUAL
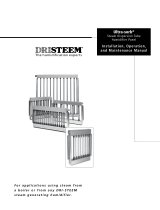
Product Overview
FIGURE 2-1: INSTALLATION OVERVIEW
(HUMIDI-TECH FOR TAP/SOFTENED WATER SHOWN)
Bracket under evaporating
chamber allows easy removal
for cleaning
Removable
evaporating
chamber
Water fi ll
access hole
Incoloy alloy-sheathed
immersion heaters
Keyholes
for wall
mounting
Water fi ll
Electrical area
Skimmer port
and overfl ow
drain
Electrical conduit knockouts
Flexible vapor
hose, pipe, or
tubing connects to
dispersion tube(s) or
to an SDU
Duct
Single
dispersion tube
with condensate
return line
OM-82-4
Notes:
See Pages 8 and 9 for detailed
installation drawings.
Damage caused by chloride corrosion is not
covered by your DriSteem warranty.
OVERVIEW
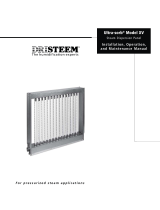
Supply water connection
Float rod
Float ball
OM-7396
Humidifi ers using tap or softened water control
water levels electronically using a three-rod
probe. The controller responds with the above
actions when the water level reaches each rod.
VLC-OM-030
Fill valve opens when
water level is below this
probe.
Low-water cutoff. Power
to heaters is cut if water
level drops below this
probe.
Fill valve closes when
water level rises to this
probe.
Humidifi ers using DI/RO water control water
levels using a fl oat valve and low-water cutoff
switch.
TAP/SOFTENED WATER
Humidi-tech humidifi ers with tap/softened water (shown above) use electricity
to heat tap or softened fi ll water into steam for humidifi cation. A conductivity
probe monitors the water level; therefore, water conductivity must be at least
30 µS/cm for proper operation. Humidi-tech with tap/softened water will not
operate with DI/RO water. For DI/RO water, use Humidi-tech with the DI/RO
water option.
DI/RO WATER OPTION
Humidi-tech humidifi ers with DI/RO water systems (systems using deionized
water or water that has been treated using reverse osmosis) use electricity to
heat DI/RO fi ll water into steam for humidifi cation. Water level is controlled
with a fl oat valve and low water cutoff switch. Float valves are compatible with
DI/RO water only.
Humidifi ers with the DI/RO water option are virtually maintenance free and
require little or no downtime.
WATER TYPE CONVERSION
Humidi-tech tap/softened water humidifi ers can be converted in the fi eld
for use with DI/RO water, and Humidi-tech DI/RO water humidifi ers can be
converted in the fi eld for use with tap/softened water. Contact your DriSteem
representative or distributor for parts and instructions.
FIGURE 2-2: WATER LEVEL CONTROL
FOR TAP/SOFTENED WATER HUMIDIFIER
FIGURE 2-3: WATER LEVEL CONTROL
FOR DI/RO WATER OPTION HUMIDIFIER

3
DRISTEEM HUMIDI-TECH ELECTRIC HUMIDIFIER INSTALLATION, OPERATION, AND MAINTENANCE MANUAL
Product overview
DISPERSION OPTIONS
In addition to single tube dispersion, shown in Figure 2-3, the dispersion
options shown on this page are available for Humidi-tech humidifi ers. See the
installation instructions beginning on Page 19.
OVERVIEW
OM-56-1
Remote from humidifi er
Directly above humidifi er
OM-55-1
Air
intake
vents
Steam
outlet
OM-636-1
OM-637-1
FIGURE 3-1: ULTRA-SORB DISPERSION
FIGURE 3-2: RAPID-SORB DISPERSION
FIGURE 3-3: SDU MOUNTING OPTIONS

4
DRISTEEM HUMIDI-TECH ELECTRIC HUMIDIFIER INSTALLATION, OPERATION, AND MAINTENANCE MANUAL
OVERVIEW
Capacities, electrical specifi cations, and weights
DC-1168
Hose clamp (for vapor hose)
Table 4-2:
Steam connection sizes
HT model Steam outlet
2, 4, 6, 8 1 1/2" hose or BSP connection
10*, 12*, 14*, 16* 1 1/2" or 2" hose or BSP connection
21, 25, 30, 34 2" hose or BSP connection
* If using with an SDU-E (Space Dispersion Unit External Absorption),
the Humidi-tech steam outlet must be 2" to match the SDU-E steam
inlet.
The steam outlet is designed to connect to a
vapor hose or BSP connection.
Tap/softened water Humidi-tech shown.
Table 4-1:
Humidi-tech electrical specifications, capacities and weights
HT model Single-phase 230V Three-phase 400V
Shipping
weight (kg)
Operating
weight (kg)
kW
Steam capacity
(kg/h)
I max. (A)
Steam capacity
(kg/h)
I max. (A)
2 2.5 8.0 — — 37 44
4 5.0 16.0 5.4 8.7* 37 44
6 7.5 24.0 8.2 13.0* 41 56
8 10.0 31.9 10.9 17.3* 41 56
10 12.5 39.9 13.6 15.2* 43 64
12 15.0 47.9 16.3 17.3 43 64
14 — — 19.1 20.2 43 64
16 — — 21.8 23.1** 43 64
21 — — 28.6 30.3** 44 70
25 — — 34.0 36.1** 44 70
30 — — 40.8 43.3** 47 72
34 — — 46.3 49.1** 47 72
* For wire sizing, the highest leg draw is shown due to current imbalance.
** No available SDU option for these models.
Notes:
• SDU-I is available for Models HT-2 through HT-10.
• SDU-E is available for all models, except Model HT-2 and Models HT-16 through HT-34.
• Models with the SDU option have additional electronic components in the Humidi-tech cabinet. If adding an SDU, add the following to the
Humidi-tech shipping and operating weights:
SDU-E: 5.5 kg
SDU-I: 4.0 kg
• All Humidi-tech humidifi ers operate at 50/60 Hz.
• SDUs ship separate from the Humidi-tech.
FIGURE 4-1: STEAM OUTLET CONNECTIONS

5
DRISTEEM HUMIDI-TECH ELECTRIC HUMIDIFIER INSTALLATION, OPERATION, AND MAINTENANCE MANUAL
Dimensions
OVERVIEW
DC-1167
50 mm
Venting
13 mm hole in base for water
fi ll line
Steam outlet
Top view
614 mm
Left side view
Front view
Bottom view
57 mm
409 mm
472 mm
57 mm
614 mm
19 mm
276 mm
50 mm
25 mm
57 mm
38 mm
146 mm
DN20 pipe thread frame drain
DN20 pipe thread tank drain
16 mm
38 mm
146 mm
Control or SDU wiring
knockout
Power wiring knockout
Control or SDU wiring
knockout
Power wiring knockout
FIGURE 5-1: HUMIDI-TECH DISPERSION

6
DRISTEEM HUMIDI-TECH ELECTRIC HUMIDIFIER INSTALLATION, OPERATION, AND MAINTENANCE MANUAL
Selecting a location
INSTALLATION
HUMIDIFIER
When selecting a location for the humidifi er, consider the following:
• Proximity to the duct
Install the humidifi er near the air duct system where the dispersion
assembly will be located. The maximum recommended length for steam
hose connecting a single humidifi er to a dispersion assembly is 3 m. The
maximum recommended developed length for tubing or pipe connecting a
single humidifi er to a dispersion assembly is 6 m.
For more information about installing dispersion assemblies, see
“Dispersion,” beginning on Page 15.
• Elevation of the installed dispersion assembly
The recommended installation location for the dispersion assembly is at an
elevation higher than the humidifi er. However, if the dispersion assembly
must be installed at an elevation lower than the humidifi er, install a drip tee
and drain. See “Drip tee installation” on Page 18.
Before installing a dispersion assembly or interconnecting piping, review all
pitch requirements in the “Dispersion” section of this manual.
• Required clearances (see Figure 7-1)
• Electrical connections
Electrical power supply connections are at the lower or upper right rear
corner of the unit. See “Wiring” on Pages 12 and 13.
• Supply water and drain piping connections
Water supply piping and drain connections are at the lower left rear corner
of the unit. See the piping illustrations and instructions starting on Page
8.
• Exterior wall insulation
Install the humidifi er on an exterior wall only if the wall is properly insulated.
DISPERSION CONTROL DEVICES
See Figure 14-1 for recommended installation locations for the dispersion
assembly and associated control devices.

7
DRISTEEM HUMIDI-TECH ELECTRIC HUMIDIFIER INSTALLATION, OPERATION, AND MAINTENANCE MANUAL
Mounting the humidifi er
INSTALLATION
Follow the instructions below for your wall type, and mount the humidifi er level
and plumb. See Figures 8-1 and 9-1.
• Wood studs 16" (406 mm) on center:
Mark hole locations at the centers of the studs, and predrill ¼" (6 mm)
diameter pilot holes. Secure the cabinet to the wall with the lag bolts
(provided).
• Metal studs 16" (406 mm) on center:
Mark hole locations at centers of studs, and drill 3/8" (10 mm) holes
through the studs and wall. Push a 3/8" (10 mm) bolt through the wall, the
studs, and a backing plate on the other side of the wall. Secure the cabinet
to the wall with a nut and washer.
• If 16" (406 mm) on-center studs are not available:
Mount spanner boards on the wall, spanning two studs. Locate one board
at the top of the cabinet (for the lag bolts) and the other board 3" (76 mm)
on center from the bottom of the cabinet. Secure the cabinet to the spanner
boards.
• Hollow block or poured concrete wall:
Mark hole locations, and drill appropriate pilot holes for two 3/8" (10 mm)
toggle bolts or two 3/8" (10 mm) machine bolt lead anchors. Secure the
cabinet in place with the bolts and anchors.
Top (when SDU is not mounted directly
above the Humidi-tech): 460 mm
Right side electrical
controls: 915 mm
Supporting wall
Front 915 mm
Floor: 610 mm
Left side:
305 mm
Secured to supporting
wall
To dispersion assembly
DC-1201
Maintain these clearances for service and maintenance.
WARNING
Mounting hazard
Mount humidifi er per the instructions
in this manual and to a structurally
stable surface. Improper mounting of
the humidifi er can cause it to fall or tip,
resulting in severe personal injury or
death.
FIGURE 7-1: HUMIDI-TECH CLEARANCE RECOMMENDATIONS

8
DRISTEEM HUMIDI-TECH ELECTRIC HUMIDIFIER INSTALLATION, OPERATION, AND MAINTENANCE MANUAL
Piping:
INSTALLATION
FIGURE 8-1: HUMIDI-TECH (TAP/SOFTENED WATER) FIELD PIPING OVERVIEW
Tap/softened water
Water supply line:
• DN8 connection size
• 175 to 550 kPa required water pressure.
• If water piping to humidifi er is nonmetallic,
the fi rst 1 m of water supply piping from
humidifi er should be metallic.
Steam vapor hose (maximum run 3 m). May also use pipe or tubing.
See the DriSteem Design Guide for maximum pipe or tubing lengths.
Unions by installer
Shock arrester
recommended to
reduce water hammer
DN20 pipe thread tank
drain, skimmer, and
P-trap piping, rated for
100 °C. If piping run is
over 3 m, increase pipe
to DN32 after P-trap.
25 mm air gap
Spill funnel. Plumb
to fl oor drain.
Open drain required.
See fi rst note below.
DN20 pipe thread frame drain and
P-trap piping, rated for 100 °C
Frame drain
Cover
Install plumb
DC-1136
Notes:
• Locate air gap only in spaces with adequate temperature and air movement to absorb fl ash steam; otherwise, condensation may form on nearby
surfaces. Refer to governing codes for drain pipe size and maximum discharge water temperature.
• Offset humidifi er from spill funnel or fl oor drain to prevent fl ash steam from rising into cabinet.
• Dashed lines indicate provided by installer.
• Water supply inlet is more than 25 mm above skim/overfl ow port, eliminating the possibility of backfl ow or siphoning from tank. No additional
backfl ow prevention is required; however, governing codes prevail.
• Install a union in water supply and drain lines as shown to allow tank removal.
• Damage caused by chloride corrosion is not covered by your DriSteem warranty.
50 mm
300 mm
50 mm water seal or loop in
supply line to isolate steam from
nonmetallic supply piping

9
DRISTEEM HUMIDI-TECH ELECTRIC HUMIDIFIER INSTALLATION, OPERATION, AND MAINTENANCE MANUAL
INSTALLATION
DC-1139
Unions by installer
Strainer, by installer
DN20 pipe thread tank
drain, and P-trap piping,
rated for 100 °C. If
piping run is over 3 m
increase pipe to DN32
after P-trap.
25 mm air
gap
Spill funnel. Plumb
to fl oor drain
Frame
drain
Cover
Install plumb
First 1 m of water supply
line should be stainless
steel tubing with a 50 mm
water seal or loop in the
supply line to isolate steam
from nonmetallic supply
piping.
50 mm
300 mm
Notes:
• Locate air gap only in spaces with adequate temperature and air movement to absorb fl ash steam; otherwise, condensation may form on nearby
surfaces. Refer to governing codes for drain pipe size and maximum discharge water temperature.
• Offset humidifi er from spill funnel or fl oor drain to prevent fl ash steam from rising into the cabinet.
• Dashed lines indicate provided by installer.
• The water supply inlet is more than 25 mm above the overfl ow port, eliminating the possibility of backfl ow or siphoning from the tank. No
additional backfl ow prevention is required; however, governing codes prevail.
• Install a union in the water supply and drain lines as shown to allow tank removal.
• Damage caused by chloride corrosion is not covered by your DriSteem warranty.
Open drain required.
See fi rst note below.
DN20 pipe thread frame drain and
P-trap piping, rated for 100 °C
Steam vapor hose (maximum run 3 m). May also use pipe
or tubing. See the DriSteem Design Guide for maximum
pipe or tubing lengths.
Water supply line:
• DN8 connection size
• 175 to 550 kPa required water pressure.
Piping: DI/RO water option
FIGURE 9-1: HUMIDI-TECH (DI/RO WATER OPTION) FIELD PIPING OVERVIEW

10
DRISTEEM HUMIDI-TECH ELECTRIC HUMIDIFIER INSTALLATION, OPERATION, AND MAINTENANCE MANUAL
INSTALLATION
FIGURE 10-1: DRANE-KOOLER WATER TEMPERING DEVICE
Supply water piping may be of any code-approved material (copper, steel, or
plastic). The fi ll valve connection size is a DN10 pipe thread fi tting. In cases
where water hammer may be a possibility, consider installing a shock arrestor.
Water pressure must be between 175 kPa and 550 kPa.
If water piping to humidifi er is nonmetallic, we recommend that the fi rst 1 m of
water supply piping from the humidifi er be metallic with a 50 mm water seal
or loop in the supply line to isolate steam from nonmetallic supply piping.
Drain piping may be of any code-approved material (copper, steel, or plastic
rated for 100 °C minimum). If drainage by gravity is not possible, use a
reservoir pump rated for 100 °C water.
The fi nal connection size is DN20 copper for the tank and frame drains. Do
not reduce this connection size. Pipe the tank and frame drains separately, as
shown in Figures 8-1 and 9-1, to prevent backfl ow of drain water into
the humidifi er cabinet.
If the equivalent length of pipe from the humidifi er drain to the plumbing system
drain is more than 3 m, increase the pipe size to DN32.
See Figures 8-1 and 9-1 for more piping instructions.
Important: Install unions in the water supply and drain lines as shown in
Figures 8-1 and 9-1 to allow tank removal.
DriSteem's Drane-kooler, shown
mounted to a humidifi er, tempers
discharged water. For other Drane-
kooler mounting options or for more
information, contact your DriSteem
representative/distributor, or view
the Drane-kooler product data sheet
in the literature section at www.
dristeem.com
OM-7398
CAUTION
Hot discharge water
Discharge water can be as hot as
212 °F (100 °C) and can damage the
drain plumbing.
To prevent such damage from
humidifi ers without water tempering,
allow the tank to cool before draining.
Humidifi ers equipped with a water
tempering device such as a DriSteem
Drane-kooler need fresh make-up
water in order to function properly.
Make sure the water supply to the
water tempering device remains open
during draining.
Excessive supply water pressure
Supply water pressure greater than 80
psi (550 kPa) can cause the humidifi er
to overfl ow.
Piping: Supply water and drain piping

11
DRISTEEM HUMIDI-TECH ELECTRIC HUMIDIFIER INSTALLATION, OPERATION, AND MAINTENANCE MANUAL
INSTALLATION
Tank drain
Frame drain
Field piping
Notes:
t %BTIFEMJOFTJOEJDBUFQSPWJEFECZJOTUBMMFS
t 5PUBMMFOHUIPGQJQFCFUXFFOIVNJEJGFSBOE
%SBOFLPPMFSOPUUPFYDFFEN
%SBOFLPPMFS
1BSU/P/15DPOOFDUJPOT
1BSU/P#41DPOOFDUJPOT
Floor
4VQQMZXBUFSTIVUPGGWBMWF
Union
7BDVVNCSFBLFS
)PUESBJOXBUFSJOMFU%/
Union
Union
5FNQFSFEXBUFSPVUMFU%/
4VQQMZXBUFSJOMFU%/
UPL1B
.BYJNVNUFNQFSBUVSF¡$
5FNQFSFEXBUFSPVUnPX
MQN
¡$
DC-1160
DC-1138
Note:
Use a condensate pump rated for your application. Pumps are rated by
fl uid temperature, head (pressure), and fl ow (gpm). Contact your local
DriSteem representative for pump selection.
Funnel
Condensate pump
Check valve
Frame drain
Tank drain
Discharge piping
by installer
Piping: Drane-kooler
FIGURE 11-1: DRANE-KOOLER FIELD PIPING CONNECTIONS
FIGURE 11-2: LIFTING DRAIN WATER

12
DRISTEEM HUMIDI-TECH ELECTRIC HUMIDIFIER INSTALLATION, OPERATION, AND MAINTENANCE MANUAL
INSTALLATION
Wiring
FIGURE 12-1: FIELD WIRING
REQUIREMENTS
Fused
disconnect
(provided
by installer)
Power
supply
(provided
by installer)
OM-1007
Notes:
• Control wiring and power wiring must be
run in dedicated or separate earthed metal
conduit, cable trays, or trunking.
• Separate the line voltage wiring from low
voltage control circuit wiring when routing
electrical wiring inside the humidifi er cabinet.
• Do not use chassis or safety grounds as
current-carrying commons. Never use a safety
ground as a conductor or neutral to return
circuit current.
WARNING
Electric shock hazard
Only qualifi ed electrical personnel
should perform fi eld wiring installation
procedures. Improper wiring or contact
with energized circuits can cause
property damage, severe personal
injury, or death as a result of electric
shock and/or fi re.
Do not remove the humidifi er electrical
panel cover or the heater terminal cover
until electrical power is disconnected.
Contact with energized circuits can
cause property damage, severe
personal injury, or death as a result of
electrical shock.
HUMIDIFIER FIELD WIRING
All wiring must be in accordance with all governing codes, and with the
humidifi er wiring diagrams. The diagrams are located inside the removable
subpanel cover on the right side of the humidifi er cabinet. Power supply wiring
must be rated for 105 °C.
When selecting a location for installing the humidifi er, avoid areas close to
sources of electromagnetic emissions such as power distribution transformers.
The fi ll valve, drain valve, probes, and temperature sensors use Class 2, 24
VAC power.
The use of semiconductor fusing sized per IEC 60364 is recommended.
GROUNDING REQUIREMENTS
The approved earth ground must be made with solid metal-to-metal connections
and must be a good conductor of radio frequency interference (RFI) to earth
(multistranded conductors).
Ground wire should be the same mm2 size as the power wiring or sized per
IEC 60364 requirements.
PROPER WIRING PREVENTS ELECTRICAL NOISE.
Electrical noise can produce undesirable effects on electronic control circuits,
which affects controllability. Electrical noise is generated by electrical
equipment such as inductive loads, electric motors, solenoid coils, welding
machinery, or fl uorescent light circuits. The electrical noise or interference
generated from these sources (and the effect on controllers) is diffi cult to defi ne,
but the most common symptoms are erratic control or intermittent operational
problems.
IMPORTANT:
• For maximum EMC (electromagnetic compatibility) effectiveness, wire all
humidity, high limit, and airfl ow controls using multicolored shielded/
screened plenum-rated cable with a drain wire for the shield/screen.
Connect the drain wire to the shield/screen ground terminal with wire less
than 50 mm in length.
• Do not ground shield at the device end.

13
DRISTEEM HUMIDI-TECH ELECTRIC HUMIDIFIER INSTALLATION, OPERATION, AND MAINTENANCE MANUAL
INSTALLATION
Wiring
FIGURE 13-1: SHIELDED/SCREENED CABLE DRAIN WIRE CONNECTION TO LUG
Shield/screen ground lug
Vapor-logic
keypad
on front of
cabinet
Microprocessor
board
OM-1505
Note:
For maximum EMC effectiveness, all humidity, temperature, and airfl ow
controls should be wired using multicolored shielded/screened plenum-
rated cable with a drain wire for the shield/screen. The drain wire
should be connected to the shield/screen ground terminal with its length
kept to less than 2" (50 mm).
Humidifi er side view
Table 13-1:
European wiring requirements
230 volt single phase 400 volt three phase
Amps Wire size mm
2
Ground wire size mm
2
Amps Wire size mm
2
Ground wire size mm
2
0 - 18 2.5 2.5 0 - 15.7 2.5 2.5
18.1 - 24 4 4 15.8 - 21 4 4
24.1 - 30.7 6 6 21.1 - 27 6 6
30.8 - 42.7 10 10 27.1 - 37.5 10 10
42.8 - 57 16 16 37.6 - 51 16 16
57.1 - 75.7 25 16 51.1 - 66.7 25 16
75.8 - 93.7 35 16 66.8 - 82.5 35 16
93.8 - 113.2 50 25 82.6 - 100.5 50 25
113.3 - 144 70 35 100.6 - 128.2 70 35
144.1 - 174 95 50 128.3 - 155.2 95 50
174.1 - 201.7 120 70 155.3 - 179.2 120 70
Table 13-2:
European breaker requirements
I max. A Breaker size
0 - 8.0 10
8.1 - 10.4 13
10.5 - 12.8 16
12.9 - 16 20
16.1 - 20 25
20.1 - 25.6 32
25.7 - 32 40
32.1 - 40 50
40.1 - 50.4 63
50.5 - 64 80
64.1 - 80 100
80.1 - 100 125
100.1 - 128 160
128.1 - 160 200

14
DRISTEEM HUMIDI-TECH ELECTRIC HUMIDIFIER INSTALLATION, OPERATION, AND MAINTENANCE MANUAL
INSTALLATION
FIGURE 14-1: RECOMMENDED SENSOR LOCATION
Humidistat and transmitter placement
HUMIDISTAT AND SENSOR LOCATIONS ARE CRITICAL
Humidistat and sensor location have a signifi cant impact on humidifi er
performance. In most cases, do not interchanging duct and room humidity
devices. Room humidity devices are calibrated with zero or little airfl ow;
whereas duct humidity devices require air passing across them.
Recommended sensor locations (see fi gure below):
A Ideal. Ensures the best uniform mix of dry and moist air with stable
temperature control.
B Acceptable, but room environment may affect controllability, such as when
sensor is too close to air grilles, registers, or heat radiation from room
lighting.
C Acceptable. Provides uniform mixture of dry and moist air. If extended time
lag exists between moisture generation and sensing, extend sampling time.
D Acceptable (behind wall or partition) for sampling entire room if sensor is
near an air exhaust return outlet. Typical placement for sampling a critical
area.
E Not acceptable. These locations may not represent actual overall conditions
in the space.
F Not acceptable. Do not place sensors near windows, door passageways,
or areas of stagnant airfl ow.
G Best sensing location for a high-limit humidistat or humidity transmitter and
airfl ow proving switch.
s
s
s
s
s
s
s
s
Outside air
Relief air
Return air
Air handling
unit
8' to 12'
(2.4 m to 3.7 m) min.
Steam dispersion assembly
Turning vanes
Temperature compensation option: Place a
temperature compensation sensor on the lower corner
of the inside surface of double-pane window glass on
north- or northeast-facing window.
Window
Doorway
Window
Point of vapor absorption
Vapor absorption has taken place
Airfl ow switch or differential pressure switch (sail
type recommended for VAV applications)
High limit humidistat or high limit transmitter (set at
90% RH maximum) for VAV applications
Damper control
C
A
E
F
D
B
E
F
G
F
DC-1084
Other factors affecting humidity control
Humidity control involves more than the
controller’s ability to control the system. Other
factors that play an important role in overall
system control are:
• Size of humidification system relative to
load
• Overall system dynamics associated with
moisture migration time lags
• Accuracy of humidistats and humidity
transmitters and their location
• Dry bulb temperature accuracy in space
or duct
• Velocities and airflow patterns in ducts
and space environments
• Electrical noise or interference
Wall

15
DRISTEEM HUMIDI-TECH ELECTRIC HUMIDIFIER INSTALLATION, OPERATION, AND MAINTENANCE MANUAL
INSTALLATION
Dispersion:
FIGURE 15-1: ULTRA-SORB WITH THE
HIGH-EFFICIENCY TUBE OPTION
Selecting the dispersion assembly location
High-efficiency Tube option
Dispersion assemblies with the High-effi ciency
Tube option are designed to produce
signifi cantly less dispersion-generated
condensate and airstream heat gain, which
reduces wasted energy by up to 85%.
These improvements are accomplished by
reducing the thermal conductivity of the tubes
with 1/8" of polyvinylidene fl uoride (PVDF)
insulating material on the outside of the tubes.
These assemblies require careful unpacking,
installation, and handling. If your dispersion
assembly has the High-effi ciency Tube option,
be sure to read this section carefully.
DriSteem humidifi ers operate with several types of dispersion assemblies for
open spaces and for ducts and air handling units.
Dispersion assemblies in ducts and air handling units must be positioned where
the water vapor being discharged is carried off with the airstream and is
absorbed before it can cause condensation or dripping.
• For each dispersion device, DriSteem documents distances required for
non-wetting to occur. For more information about absorption non-wetting
distances, see the non-wetting tables in this humidifi er's product catalog,
available for viewing, printing or ordering at www.dristeem.com.
• In general, the dispersion assembly is best placed where the air can absorb
the moisture being added without causing con den sa tion at or after the unit.
This normally will be after the heating coil or where the air tem per a ture is
highest.
• Place the dispersion assembly such that absorption will occur
– before the intake of a high effi ciency fi lter, because the fi lter can remove
the visible moisture and become waterlogged;
– before coming in contact with any metal surface;
– before fi re or smoke detection devices;
– before a split in the duct; otherwise, the dispersion assembly can direct
more moisture into one duct than the other.
• When draining dispersion condensate to an open drain, provide a 1" (25
mm) air gap between the condensate drain piping and the drain. Locate the
gap only in spaces with adequate temperature and air movement to absorb
fl ash steam; otherwise, condensation may form on nearby surfaces.

16
DRISTEEM HUMIDI-TECH ELECTRIC HUMIDIFIER INSTALLATION, OPERATION, AND MAINTENANCE MANUAL
INSTALLATION
Table 16-1:
Maximum steam carrying capacity and length of interconnecting vapor hose, tubing and pipe*
Vapor hose Copper or stainless steel tubing and Schedule 40 steel pipe
Hose I.D. Maximum capacity Maximum length** Tube or pipe size*** Maximum capacity
Maximum
developed length
†
DN40 68 kg/h 3 m DN40 68 kg/h 6.1 m
DN50 113 kg/h 3 m DN50 100 kg/h 9.2 m
* Based on total maximum pressure drop in hose, tubing or piping of 1250 Pa
** Maximum recommended length for vapor hose is 3 m. Longer distances can cause kinking or low spots.
*** To minimize loss of capacity and effi ciency, insulate tubing and piping.
† Developed length equals measured length plus 50% of measured length, to account for pipe fi ttings.
Important:
Reducing the inside diameter of the
interconnecting piping will result in the internal
humidifi er system pressure exceeding the
parameters for acceptable performance.
Important:
Failure to follow the recommendations in this
section can result in excessive back pressure on
the humidifi er. This will result in unacceptable
humidifi cation system performance such as
leaking gaskets, blown water seals, erratic
water level control, and spitting condensate
from the dispersion tube.
The steam outlet on the humidifi er is sized to the output of the humidifi er. DO
NOT use vapor hose or interconnecting tubing/piping with an inside diameter
smaller than the humidifi er steam outlet. See note at left.
• See maximum steam carrying capacities in Table 16-1.
• If the humidifi er must be located higher then the dispersion assembly, use
the recommend installation shown in Figure 18-1.
CONNECTING TO HUMIDIFIER WITH VAPOR HOSE
• Support vapor hose to prevent sags, or low spots, and to maintain a
minimum pitch of 15% back to the humidifi er.
• Use DriSteem vapor hose. Other manufacturers of vapor hose may use
unacceptable release agents or material mixes that can affect humidifi er
system performance adversely. Using hose from alternative manufacturers
increases the possibility of tank foaming and accelerated aging. Foaming
causes condensate discharge at the dispersion assembly.
• Do not use vapor hose in outdoor applications.
• Do not insulate vapor hose. Insulation causes accelerated heat aging,
causing the vapor hose to become hard and susceptible to failure due to
cracks.
• For single tube applications, see hose kit sizes in Table 25-1.
Dispersion:
Interconnecting piping requirements
/