Page is loading ...

15
PURE-PRO REVERSE OSMOSIS SYSTEM
PRO
P
URE
DRINKING WATER SYSTEM
REVERSE OSMOSIS SYSTEM
PRO
P
URE
DRINKING WATE R SYSTEM
Thank you very much for selecting Pure-Pro Water Corp.
In order to bring the best use of your system, please read
the user's manual carefully before installation and follow
the regulations.
Industrial RO System
RO24000
Industrial
RO System
01 Feed water quality requirement
01 System specifications
02 Part list
07 Installation
08 Operation process & maintenance
10 Trouble shooting
13 Electric protective switch

01
PURE-PRO REVERSE OSMOSIS SYSTEM
14
PURE-PRO REVERSE OSMOSIS SYSTEM
PRO
P
URE
DRINKING WATE R SYSTEM
Feed Water Quality Requirement
Feed water pressure
Hardness
Cl
Turbidity
Feed Water TDS
22
2KG / cm ~ 4KG / cm
<50 PPM (AT CACO3)
< 0.1 PPM
< 1 NTU
< 1500 PPM
PS: Other than water quality described above, Please contact a nearest
technician for more info.
System specifications
Industrial RO System
PRO
P
URE
DRINKING WATE R SYSTEM
Industrial RO System
Models
Dimension (
N.W
Voltage
Hertz
Current
Booster pump
In / Out diameter
RO membrane housing
RO membrane
Pre-filters
Pressure gauges
Water quality indicator
Water flow indicator
Controller
cm)
24000GPD
(L)73 x (W)250 x (H)150
0 KG
Available in 380V, 410V, 440V
Available in 50 Hz, 60Hz
11.7A
4.0KW
IN 11/2" / OUT 1"
x 2
TFC-BW-8040 x 4
20"-PP x 7
Inlet / Operation
T.D.S.
Flow meter x 2
Digital computer controller box
45
(5.5HP)
SUS316 8080
Note

13
PURE-PRO REVERSE OSMOSIS SYSTEM
02
PURE-PRO REVERSE OSMOSIS SYSTEM
PRO
P
URE
DRINKING WATE R SYSTEM
Industrial RO System
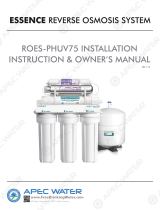
Part List
Item
01
02
03
04
05
06
07
08
09
10
11
12
13
14
15
16
17
18
Parts
Voltmeter
Pure water TDS meter
Electric current meter
Feed water Low-pressure switch alarm
Feed water pump overload warning
High pressure pump overload warning
Electric valve off indicator
Flush indicator
Power
Feed water functioning indicator
High pressure pump functioning indicator
Electric valve on indicator
Water full indicator
Power control switch
Feed water Pump switch
High pressure pump switch
Electric valve switches
Flush switch
Specification
600V (max.)
W32D
30A (max.)
24V-YL
24V-RL
24V-RL
24V-RL
24V-YL
220V-WL
24V-GL
24V-GL
24V-GL
24V-GL
OFF / ON
MANUAL/ OFF/ AUTO
MANUAL / OFF/ AUTO
MANUAL / AUTO
OFF / ON
PRO
P
URE
DRINKING WATE R SYSTEM
Industrial RO System
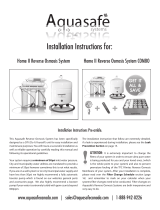
Electric protective switch
< Circuit diagram >
Low pressure switch
Low pressure adjuster
High pressure
adjuster
< Circuit diagram >
A Joint
B Joint
C Joint
1. Low pressure adjuster:
To lower pressure, turn
anticlockwise and vice versa.
2.High pressure adjuster:
To rise pressure, turn
anticlockwise and vice versa.
Joint points:
1. No joint on A
2. B and C joints are connected
with green wire to Control box
AB
C
01 02 03
04 05 06 07 08
09 10 11 12 13
14 15 16 17 18

03
PURE-PRO REVERSE OSMOSIS SYSTEM
12
PURE-PRO REVERSE OSMOSIS SYSTEM
PRO
P
URE
DRINKING WATE R SYSTEM
Industrial RO System
PRO
P
URE
DRINKING WATE R SYSTEM
Industrial RO System
Problems Possible causes Solution
RO system
is not
functioning
1. Wrong setting for computer
controller.
2. The pressure of feed water
isn't high enough. (should
2
be higher than 1.5kg / cm )
3. The location difference
between RO system and
feed water tank.
4. The power for RO system is
abnormal.
1. Control box in condition of
high water level.
2. Control box in condition of
low water level.
3. Control box is
malfunctioned.
1. Check the setting.
2. Check water-in pressure
and if pre-filter clogged.
3. Change the control method
of RO system and adjust low
pressure switch.
4. Check power supply and
also adjust voltage.
Tolerance to be within the
± 5% is considered as
normal.
1. Check pure water tank and
circuit of high water level.
2. Check feed water and pre-
filters and pump.
3. Change computer box.
RO system
can't work
after
flushing
1. Flush solenoid valve is
malfunctioned.
2. Restrictive valve is not fully
open.
3. Pressure needle valve is
malfunctioned.
1. Change flush solenoid.
2. Adjust the restrictive valve.
3. Adjust pressure needle
valve and check if needle
valve is normal.
Insufficient
water out-
put of RO
membrane
4. Insufficient inlet water
pressure.
4. Pump head is worn out thus
cause insufficient pressure.
19
20
21
22
23
24
25
26 27
28
29
30
31
32
33
34 35
36 37

11
PURE-PRO REVERSE OSMOSIS SYSTEM
04
PURE-PRO REVERSE OSMOSIS SYSTEM
Item
19
20
21
22
23
24
25
26
27
28
29
30
31
32
33
34
35
36
37
Parts
Feed water connection
Feed water check valve
Feed water deliver valve
Sediment filtration tank valve
Sediment filtration tank
Feed water gauge
Feed water pressure switch
Main pump
Pump water restrictor
*Anti-scalant valve
RO membrane housing pressure gauge
1st. RO membrane housing
RO membrane housing pressure gauge
2nd. RO membrane housing
Flush electronic solenoid valve
Flush electronic solenoid valve
Operation pressure adjustable valve
Drainage meter
Pure water flow meter
PRO
P
URE
DRINKING WATE R SYSTEM
Industrial RO System
Specification
1 1/2"
SCH-80-1 1/2"
SCH-80-1 1/2"
SUS3/4"
TK7-20
10KG
HS-506
CR10-12
SUS 1 1/2"
SCH-80-1"
25KG
SUS#316-8080
25KG
SUS#316-8080
MD-25
MD-25
SUS1"
30GPD
30GPD
PRO
P
URE
DRINKING WATE R SYSTEM
Industrial RO System
Problems Possible causes Solution
Membrane
clogged
1. There isn't sufficient
softened water supplied to
the RO system.
7. Contained too much Iron.
2. Drain valve or tubing
clogged.
3. The rate of drain and pure
water shows abnormal.
4. The TDS of feed water (or
the recovery TDS) is too
high.
5. Colloid suspension is too
much.
6. Feed water quality is too
poor.
1. Check the water softening
process and also calculate
if softening quantity can
supply the RO system to
purify.
2. Check drain valve and
tubing.
3. Adjust the rate to/ or above
1:1.
4. Check feed water source
and also decrease the
recovering rate. The
consistence of recovery
must be less than TDS 1500
PPM
5. Install UF or 0.45u minus
filter on pre-filters.
6. Improve the feed water
quality or increase pre-
filters.
7. Expose to air or add
medicament for re-filtration.

05
PURE-PRO REVERSE OSMOSIS SYSTEM
10
PURE-PRO REVERSE OSMOSIS SYSTEM
38
39 40
41
42
43
44
45
46 47
48 49 50 51
52 53 54 55
56
57
58
59 60 61
PRO
P
URE
DRINKING WATE R SYSTEM
Industrial RO System
PRO
P
URE
DRINKING WATE R SYSTEM
Industrial RO System
Trouble shooting
Problems Possible causes Solution
Pump
doesn't
work
1. Wrong power in.
8. Pump head is stuck
2. Electrical solenoid switch
is malfunctioned.
3. Electrical solenoid switch
is overload, protective
switch shuts down.
4. Control box is on the
condition of lower water
pressure.
5. Tank shut-off switch is
malfunctioned / The joint
point for post carbon and
sand filter isn't connected.
6. Control box is
malfunctioned.
7. Axle center of pump is
clogged with rust
1. Check power phases
2. Check the coil and joint
points ( use a multimeter
RX1 to see if it's
connected.)
3. Measure the operation
current with clamp meter,
and also set the
measurement to be 1.25%
more. (Press the stick back)
4. Check the pressure
difference between water-
in and pre-filter, also if the
joint point to low pressure
switch is connected.
(use a multimeter RX1)
5. Check the joint between
with multi-meter RX1,
and test if AB point is
correct.
6. Check if there is electric
current output to electrical
solenoid switch from the
brown wiring of computer
box. Also check if the
power supply is normal.
7. Check if noise appears
when pump works. If so
please change the pump.
8. Please remove pump head.
Check if the manual pump
head can work. If not please
change the pump head.

06
PURE-PRO REVERSE OSMOSIS SYSTEM
09
PURE-PRO REVERSE OSMOSIS SYSTEM
PRO
P
URE
DRINKING WATE R SYSTEM
Industrial RO System
PRO
P
URE
DRINKING WATE R SYSTEM
Industrial RO System
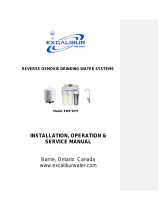
Item
38
39
40
41
42
43
44
45
46
47
48
49
50
51
52
53
54
55
56
57
58
59
60
61
Parts
Power supply fuse switch
Feed water pump fuse switch
High pressure pump fuse
Main electric circuit fuse R
Main electric circuit fuse T
Electric circuit control fuse
Transformer
Electric current signal converter
Feed water pump
High pressure pump solenoid valve
Electric control valve signal converter
Electric recycling valve signal converter
Programmer controller
Backup programmer controller
Main power input
Feed water pump output
High pressure pump output
Electronic solenoid valve connecting points
Waster water recycling connecting points
Flush solenoid valve output
Internal pressure protector
TDS detecting pints
Low-pressure switch connecting points
Tank shut-off switch connecting points
Specification
3P 30A
3P 15A
3P20A
2A
2A
2A
380V~220V 2A
5:1
MSP11-1HP
MSP16-5.5HP
R1(MY2NJ)
R2(MY4NJ)
AX1N-24MJ
8EY
R.S.T.G
U1.V1.W1.
U2.V2.W2
5(on), 6(off) , N(COM)
4, N
Y4, N
X2, 24V
11, 12
X1, 24V
X3, 24V
Shut off Process:
A. Switch the high pressure pump to OFF.
B. Switch feed water pump to OFF.
C. Switch power control to OFF.
D. Switch power supply fuse to OFF.
E. Switch water outlet check valve to OFF.
Maintenance:
1. Pre-treatment Filter: According to the water quality, service life can last for
1~3 months.
2. Check the actual fluid of permeate for concentrate water. Make a record.
Once the permeate water production is down to 10~15% of the normal
production for, an acid washing for the RO membranes is required.
3. Check inlet water and operation pressure.
Maintenance

PURE-PRO REVERSE OSMOSIS SYSTEM
07 08
PURE-PRO REVERSE OSMOSIS SYSTEM
PRO
P
URE
DRINKING WATE R SYSTEM
Industrial RO System
PRO
P
URE
DRINKING WATE R SYSTEM
Industrial RO System
Installation
1. Connect PVE tubing to 11/4" water-in and ball valve pipe.
2. Connect 1" tubing to "drainage" as indicated.
3. Connect 1" tubing to "pure water" as indicated. (or to water storage tank, if)
4. Connect earth link wire (green) from the control box to the floating ball
switch on the tank in order to control full water leverage.
5. Connect power supply. (Note: voltage)
NOTE:
1. Please confirm the power supply applied to the system.
2. Please confirm the connection of pure and drain water tubing to be correct.
2
3. Please confirm the inner diameter of main power wire no less than 3.5mm
4. Wires connected to full water switch and floating switch shall not be used
for other purposes.
5. When with connection to water softener, please set up the reverse flush
switch function to prevent the main RO system from sucking in the resin
and salt water. (the main RO system should stop operating when reverse
flush starts)
6. Please clean pre-filters every week in order to receive sufficient water-in
supply.
Operation process & Maintenance
Attention Before Operation:
2
A. Feed water pressure exceeds 2.0Kg/cm
B. Supply the same electrical current in accord with the voltage of the main
system. Supplied electrical current is better within ± 5% in compare to the
main system voltage.
C. Connection for pure / drainage is completed.
D. Valves are switched to the correction direction. ( feed water check valve:
SCH-80-1 1/2", anti-scalant valve: SCH-80-1", anti-scalant flush valve
(close-end) SCH-80-1" should be OFF; feed water deliver valve SCH-80-1
1/2", pump water restrictor: SUS 1 1/2", operation pressure adjustable
valve: SUS1", anti-scalant flush valve (open-end) SCH-80-1", should be
ON ).
E. Switches for the panel controller turned to the correct direction.
A. Switch on power supply.
B. Swift the switch for feed water pump to AUTO; check the feed water
pressure (24) to ensure the pressure is between 2~4Kg.
C. Swift the switch for High pressure pump to AUTO.
D. Swift Electric valve switches to AUTO.
E. Swift Flush switch to OFF.
F. RO system begins auto checking for 5 seconds. (low-pressure switch, tank
shut off switch, feed water pump, feed water solenoid valve)
G. Check if the electric current is working within the indicated pump range.
H. Adjust the ratio and pressure of permeate water and concentrate water:
a. First adjust the operation pressure adjustable valve SUS1 and recycled
water flow meter valve SUS3/4", to decide the proportion among pure
water, drainage and recycled water. (25GPM : 20GPM : 5GOM).
*the worst the water quality is, the bigger the proportion to be made.
b. Adjust restrictor flow on high pressure pump to the same amount of pure
water production.
I. During production of water, system starts auto-flush every hour.
J. When water storage is tank, system shuts off automatically.
*Water storage tank is an optional item.
Operating Process: ( Pre-operating have been checked )
/