Page is loading ...

Home II Reverse Osmosis System Home II Reverse Osmosis System COMBO
Installation Instructions for:
www.aquasafecanada.com | [email protected] | 1-888-942-0226
Installation Instructions Pre-amble.
This Aquasafe Reverse Osmosis System has been specically
designed as a DIY (Do It Yourself) unit for easy installation and
maintenace purposes. You will insure a successful installation as
well as reliable operation by carefully reading this manual and
following its operational guidelines.
Your system requires a minimum of 50psi inlet water pressure.
City and municipality water utilities are mandated to provide a
minimum of 50psi however sometimes this is not what results.
If you are on a well system or on city/municipal water supply and
have less than 50psi we highly recommend a fully automatic
booster pump which is found on our websites general parts
and accessories page. We also highly recommend a booster
pump if your water is extremely turbid with ppm counts beyond
600ppm.
The installation instruction that follow are extremely detailed.
if a leak is experienced during installation, please see the Leak
Prevention Section on page 15.
ATTENTION: It is extremely important to change the
lters of your system in order to ensure ultra pure water
is being produced for you and your loved ones, (which
is the whole point to your system) and also to prevent
premature fouling of the TFC Filmtec Reverse Osmosis
Membrane of your system. After your installation is complete,
please read over the Filter Change Schedule section (page
16) and remember to mark on your calendar when your
systems lter changes need to be conducted. Filter changes on
Aquasafe’s Reverse Osmosis Systems are both inexpensive and
very easy to do.

Contents
Installation Instructions for Home II Reverse Osmosis System & COMBO
Installation Instructions Pre-amble. .............................................................................i
1.0 Relax, take your time. You will nd this process easy and straight forward. .......................................1
2.0 Take everything out of the box .................................................................................2
3.0 Remove the protective plastic from the prelters ................................................................2
4.0 Inserting the R.O. Membrane ...................................................................................3
4.1 Inserting the pre-lter elbow adaptors .....................................................................3
5.0 Preparing the Feed Water to your system .......................................................................3
5.1 Special note about braided wire plumbing .................................................................4
5.2 Installing the Needle Piecing Saddle Clamp to the cold water line. ..........................................4
5.3 Connecting the feed water line to your system. .............................................................4
5.4 Piercing the cold water line ................................................................................5
5.5 Flushing of the Pre-lters ..................................................................................5
6.0 R.O. Membrane feed water line hook-up (pre-lter to R.O. Membrane) ...........................................6
7.0 Setting the Flow Restriction Ratios of your System. ..............................................................7
8.0 Installing the Final Polishing Filter ..............................................................................9
9.0 Prepare the R.O. Water Holding Tank ...........................................................................10
10.0 Clear the Decks. ..............................................................................................10
11.0 Preparing the Discharge Water Saddle Clamp. ................................................................11
12.0 Installing the Faucet. .........................................................................................12
Extra information for the Home II COMBO ..........................................................................13
Where do I install the PSI Meter from my “COMBO” System? ....................................................13
How do I use the TDS Meter from my “COMBO” System? .......................................................14
How do I store my extra case of 21 (6 changes) pre lters? .....................................................14
Leak Prevention Page ......................................................15
Threaded Fittings ............................................................................................15
Pre-Filter Canister Housing ...................................................................................15
Home II System Filter Change Schedule .........................................16
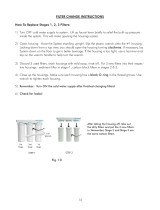
Stage 1,2 & 3 Pre-Filters – When to conduct a lter change. .........................................................16
Stage 4 – When should I change the reverse Osmosis Membrane? ..................................................16
Testing to see if your R.O. Membrane needs replacing. .........................................................17
Are you unsure when your replaced the R.O Membrane Last? ..................................................17
Stage 5 – When should I change the Final Polishing Filter? .........................................................18
Home II System Filter Change Instructions .......................................18
Pre-Filters – How to conduct a lter change. .......................................................................18
R.O. Membrane – How to change the R.O. Membrane of your system. ..............................................19
Final Polishing Filter - How to change the Final Polishing Filter ......................................................21
Water Systems & Parts Warranty Information .....................................22

www.aquasafecanada.com | Home II Installation Instructions 05/13 | page 1
1.0 Relax, take your time. You will find this process easy and straight forward.
Aqua-safe
exclusive E-Z Flush
Flow Restrictor
Pure water outlet
to faucet, icemaker etc.
waste water drain
waste water drain
5th Stage - Final Polishing Filter
to 3.2 gallon
Reservoir Tank
4th Stage
Membrane Housing
4th Stage
Membrane
Housing
1st Stage
5 Micron Sediment
2nd Stage
5 Micron Granular Activated Carbon
for chemicals
3rd Stage
1 Micron Coconut Carbon Block
for chemicals
www.aquasafecanada.com
Aqua-safe
exclusive E-Z Flush
Flow Restrictor
Back View
Home II - Front View
5th Stage
Final Polishing Filter
for taste
Pure water outlet
to faucet, icemaker etc.
of membrane houseing
4 way Auto Shut-o
Valve (ASV)
3 Pre-Filters
{
Final Polishing Filter
red tubing
yellow tubing
blue
tubing
white
tubing
municipal or
well water
(feed water)
manual
shut-o
valve
orange
tubing
Final Polishing Filter
Simply follow the step by step instructions below. Please
do not make the mistake of skipping a step.
FOR REFERENCE PURPOSE ONLY: Directly below is a
schematic showing the positioning of all tubing in a fully
set up system. Please read the instructions step by step.
The install is straight forward but reading through each
step is crucial to completing your install properly in the
least amount of time possible.
The installation should take between 60 to 90 minutes
and when all is set up you will have ultra pure, healthy
drinking water for the health and enjoyment of you and
your loved ones.
Did you know? Reverse Osmosis literally is the most
powerful water ltration method known to man.
¬Congratulations, you have just taken a huge step
towards better overall health and well being.

page 2 | Home II Installation Instructions 05/13 | www.aquasafecanada.com
2.0 Take everything out of the box
Examine the contents of the Large and Small parts bag against the photos below. If any pieces are
missing, check the box, sometimes the pieces can fall out of their bags during the system’s journey to
you.
3.0 Remove the protective plastic from the prefilters
Inside each of the three prelter canisters you will nd a prelter with protective plastic for quality as-
surance purposes. Paying close attention to how the lter is sitting inside the prelter housing, remove
the plastic and then reinsert the prelter the same way the prelter was taken out. Do this one at a
time. If by chance you loose track of which lter goes into which prelter canister, the SED (sedimen-
tary lter) is stage one, the GAC (granular activated carbon lter) is stage two and the CCB (coconut
carbon block lter) is stage three. See pictures below of the three prelters. The GAC is the only one
of the three prelters that only goes in one way. The GAC must be placed with the gasket up and the
plastic mesh down.
With the prelters inside each prelter canister, carefully screw the canisters into place. Try to keep the
prelters centered as much as possible during this process. Now, using the large canister wrench from
the Large Parts Bag, tighten each of the prelters with reasonable force in order to seal the lters into
place.
1
2
3 6
74 5
1 2
3
6
7
4 5
1 2
3
6
7
4 5
1
2
3 6
74 5
Figure 1
Small Parts Bag
Figure 2
Large Parts Bag
Figure 3
The three
pre-filters
3. 4 inch blue tubing;
4. male T adaptor
5. straight male adaptor
4. 2X canister clips
6. 3 inch red tubing
7. 2X elbow adaptors
5. drain saddle
clamp
6. teflon tape
7. blue tubing
1. tank top valve
1. needle piercing
saddle clamp
2. manual shut off valve
2. small canister
wrench
3. large canister
wrench
1
2
3
6
7
4
5
Sedimentary Filter (SED) Granular Activated Carbon (GAC) Coconut Carbon Block (CCB)

www.aquasafecanada.com | Home II Installation Instructions 05/13 | page 3
If need be you can use a pair of needle nose pliers or similar tool to grip the white cylinder pro-
truding from the base of the RO Membrane to gain the leverage needed to push the membrane
entirely into its proper position.
4.0 Inserting the R.O. Membrane
The R.O. Membrane is shipped sealed for
freshness. Remove the R.O. Membrane
from its sealed plastic bag and insert the
membrane rmly into the R.O. Housing
(see Fig 4). It can only go in one way, the
end with the two small o-rings is to be
inserted rst.
Please Note: It is extremely important
the two small black “O” rings on the tip
of the membrane seal tightly into place
inside the membrane housing. Please
make sure to insert the membrane as
rmly as possible into the membrane
housing.
When you are certain the Reverse Osmosis
Membrane is rmly in place screw the R.O.
Membrane housing cap back into its place (Fig
4) and then tighten with reasonable force using
the small canister wrench from the Large Parts
Bag.
4.1 Inserting the pre-filter elbow adaptors
Using two of the elbow adaptors from the Small
Parts Bag, screw one of them into the “INLET”
(left) side of the three pre-lters (Fig. 5) and the
other into the “OUTPUT” (right) side of the three
pre-lters (Fig 5).
S Please note: Apply 4-7 wraps of Teon
tape, found in the Large Parts Bag, on each of
the elbow adaptors throughout this installation
to prevent any possible leaks.
5.0 Preparing the Feed Water to your system
Found under your sink are the water supply shut o valves to your hot and cold water lines. You will
need to SHUT OFF the cold water valve. Run the hot water for 30 seconds and then feel which line un-
der your sink is warm. SHUT OFF the opposite water line – since that will be the cold water line. After
this valve is o, turn on your sink’s cold water tap to make sure there is NO cold water owing from
your kitchen sink faucet. If you shut the valve o correctly, there should be no cold water owing.
www.aquasafecanada.com
Insert elbows into the holes on
either end of the prelter housing
“water in”
side
“water out”
side
Figure 5
Screw elbow
adaptors into
both sides of the
pre-filter housing
www.aquasafecanada.com
Insert blue RO Membrane
into housing
Screw cap
on housing
1
2
Membrane housing
blue RO Membrane
Cap
Figure 4
Inserting the R.O.
Membrane in to
its housing
TIP

page 4 | Home II Installation Instructions 05/13 | www.aquasafecanada.com
5.1 Special note about braided wire plumbing
Please Note: DO NOT ATTEMPT
TO INSTALL THE NEEDLE PIERCING
SADDLE CLAMP TO BRAIDED WIRE
PLUMBING (Fig. 6).
You can install the needle piercing saddle clamp to
all other forms of cold water lines found under the
common sink, just not the kind of plumbing de-
picted in Fig 6. The braided plumbing in Fig 6 is too
soft a material and will therefore not allow for the
proper seal needed. The inside of braided plumbing lines may vary and therefore may look dierently
from this example. Don’t let this confuse you. If the plumbing line is braided, DO NOT attempt to install
the feed water needed piercing valve to it. If you have this kind of plumbing there is usually a piece of
copper pipe that is located directly under your kitchen sink’s faucet assembly which you can mount to
OR see our 3/8” x 3/8” x 1/4” plumbing adaptor on our website.
5.2 Installing the Needle Piecing Saddle Clamp to the cold water line.
Rotate the horizontal turning bar of the needle piercing valve to the left (counter clockwise) as you
do not want to pierce your cold water line at this stage. Make sure the needle is retracted all the way.
Next, clamp your cold water line TIGHTLY using the needle piercing saddle clamp which can be found
in your Large Parts Bag. (Fig. 7) You will need a Phillips screwdriver and small pair or pliers for this step.
Be sure to install above your
sink’s shut o valve.
DO NOT ATTACH TO THE HOT
WATER PIPE—AS HOT WATER
WILL DAMAGE THE FILTERS
WITHIN YOUR SYSTEM.
DO NOT PIERCE THE COLD
WATER LINE AT THIS
STAGE !
5.3 Connecting the feed water line to your system.
Next, take the 2-4 Inch piece of red tube from the Small Parts Bag and insert it into the elbow on the
“INLET” (left) side of the pre-lters (Fig. 8 - next page), then take the manual shut o valve, also found
in the Small Parts Bag, and attach it to the other end of the red tube (Fig. 8 - next page).
Figure 6
Braided undersink
plumbing. DO
NOT attempt to
Install onto this
kind of plumbing.
Figure 7
Needle piercing
valve in place
on home’s cold
water line.
Corrugated nylon tube
Braided wire plumbing
h
o
m
e
’
s
c
o
l
d
w
a
t
e
r
l
i
n
e
t
o
f
a
u
c
e
t
home cold water shut o
orange tubing
horizontal turning bar
Needle piercing
saddle clamp
To more easily insert the tubing into the various ttings of your system it
is helpful to remove the blue “C” clip from around the collet and then in-
sert the tubing. After the tubing has been inserted into place, pull lightly
on the tubing in order to make room for the collet and then place the
collet back into its original position. The blue “C” clip holds the collet in its
proper position while the system is in operation.
TIP
blue
‘C’ Clip
collet
WARNING

www.aquasafecanada.com | Home II Installation Instructions 05/13 | page 5
S Please make sure to FIRMLY push the tubing into the various ttings throughout this installation.
Now insert the needle piecing saddle clamp’s orange tubing into the other side of the Manual Shut O
valve completing the feed water line pathway to your ltration system.
5.4 Piercing the cold water line
Ensuring the needle piecing saddle clamp is rmly in place, screw down the needle of the saddle
clamp using the horizontal bar on top of the clamp.
Note: You will feel resistance when the needle is piercing the cold water line, so pay attention to the
amount of resistance experienced. This resistance will stop when you have successfully pierced the
cold water line. CAUTION: Do not screw in the needle valve to its maximum depth as you then risk
piercing the opposite side of your cold water line.
After the cold water line has been pierced, turn the horizontal bar on the top of the clamp counter
clockwise (left) until it becomes snug. This retracts the piercing needle creating a path for feed water
to ow into the orange tubing – supplying your system with its feed water.
PLEASE NOTE: Do not turn your home’s emergency cold water shut o back to its ON position yet!
5.5 Flushing of the Pre-filters
Found in your Large Parts
Bag is a coiled length of blue
tubing. Uncoil the tubing
and insert one end into
the “OUTPUT” elbow (right
side) of the three pre-lters
and place the other end of
the blue tubing into your
kitchen sink. (Fig 9)
This will allow for the water to ow through the three pre-lters and then into your kitchen sink, ush-
ing out any and all loose particulates and carbon dust thereby preventing these initial loose particu-
lates from reaching the 4th stage (Reverse Osmosis Membrane) ensuring maximum life span of the
Reverse Osmosis Membrane.
www.aquasafecanada.com
blue tubing
manual
shut o
valve
Figure 9
Flushing the
pre-filters
Figure 8
Complete the
feed water
pathway to your
system by
following the
diagram
Insert 4 inch piece of
red tubing into elbow
on “water inlet” side of
pre-lter housing
1
Attach shut
o valve to
red tubing
2
Attach orange
tubing to other
side of shut
o valve
3
red tubing
orange tubing
Manual shut
o valve
Cap
elbow
“water inlet”
(left) side
(1st prelter
housing)
orange tubing
leads to needle
piercing saddle
clamp which
is attached to
your home’s
cold water line
Side
view

page 6 | Home II Installation Instructions 05/13 | www.aquasafecanada.com
You can now turn your home’s emergency cold water shut o valve back to its “ON” position. Please
note: By turning the cold water shut o valve back to its “ON” position you are allowing for the ow of
cold water to the system. The system’s three pre-lters will then ll with water which will come out of
the blue tube that is placed in your kitchen sink.
Allow the water to run through your system for 20 minutes to ensure proper ushing of the three pre-
lters. After the 20 minute pre-lter ush, turn the manual shut o valve, found on the feed water line
(see Fig 9), 90 degrees to the tubing as this will stop the ow of water to your system.
Next, following the diagram below, remove the blue tubing inserted into the “OUTPUT” (Right Side) of
the prelters that you just used to ush the three prelters.
To remove tubing from any point on
your system simply follow this dia-
gram (Fig. 10) You can easily remove
the tubing from any tting on your
system by removing the blue “C” clip
which will expose the “collet”. Then
simply push in the collet so that it is
ush with the tting and then pull
out the tubing.
Please note: In the future, be sure
to de-pressurize your system before removing tubing from any tting on your system. To de-pressurize
your system you simply need to turn the manual shut o valve, found on the feed water line, to its 90
degree (OFF) position, then turn your tank top valve, found on top of the water holding tank, to the 90
degree (OFF) position and then press down on your faucet. De-pressurizing your system is extremely
easy and takes just seconds.
NOTE: At this stage of the installation you have not yet installed the water holding tank or the faucet
and therefore, by simply turning the manual shut o valve to its 90 degree position, you have success-
fully depressurized the system and you can now remove the blue tubing used to ush the pre-lters
from the “OUTPUT” (right side) of the pre-lters.
6.0 R.O. Membrane feed water line hook-up (pre-filter to R.O. Membrane)
Figure 10
How to
disconnect tubing
using the ‘quick-
release’ collet
Figure 11
Connect the short
white water lines
attached to the
auto shut-off
valve
4 way auto
shut-o valve
(ASV)
yellow tubing
(comes pre-connected
to ow restrictor)
Manual
Shut-O Valve
blue tubing (comes pre-connected)
Connect
short white
tube to elbow
on OUTPUT side
of pre-lters
Connect short white
tube to elbow on
R.O. Membrane
housing cap
NOTE: Back View - hanging
bracket not shown for clarity
1
2

www.aquasafecanada.com | Home II Installation Instructions 05/13 | page 7
Take the short white tube connected to the “IN” side of the 4 way auto shut-o valve (ASV) on the top
of the unit and insert it into the elbow adaptor on the “OUTPUT” (right side) of the pre-lters. (Fig. 11)
Remember to insert the tubing rmly. Next, take the short white line connected to the “OUT” side of
the 4 way auto shut-o valve (ASV) on the top of the unit and insert it into the elbow adaptor on the
cap of the R.O. Membrane housing (Fig 11).
These two white tubes complete the connection between the pre-lters and the R.O. Membrane.
7.0 Setting the Flow Restriction Ratios of your System.
Using the same blue tubing used to ush the pre-lters, insert one end of the blue tubing into the E–Z
Flush Flow Restrictor (Fig 12). After you have inserted the blue tubing into the E–Z Flush Flow Restric-
tor, insert the other end of the blue tubing into your kitchen sink. The water that will ow through
your E-Z Flush Flow Restrictor is referred to as “BRINE” water and will discharge into your drain washing
away the harmful particulates removed by the R.O Membrane.
Next, get a bowl or a bucket and place it under the short piece of blue tubing that is coming out of the
auto shut-o valve (ASV). The water that will ow out of the short piece of blue tubing that is com-
ing out of the auto shut-o valve (ASV) is the puried water produced by the R.O. Membrane and is
referred to as “PERMEATE” water.
Now, turn the dial on top of the E–Z Flush Flow Restrictor clockwise (Right), entirely closing the valve
of the E–Z Flush Flow Restrictor and then turn the Manual Shut-O Valve (Fig.12) found on the feed
water supply line of your system to its “ON” Position. Within a moment PERMEATE water will begin to
ow out of the short blue piece of tubing coming out of the Auto Shut O Valve (ASV), at the rate of a
very fast drip to a slow trickle. Air inside the R.O. Membrane will be forced out causing the fast drip or
slow trickle to sputter with the air escaping. Wait 2-3 minutes for the air to fully purge so that a steady
output is achieved from the R.O. Membrane.
Next, carefully open the dial on-top of the E-Z ush Flow restrictor counter clockwise (left) VERY SLOW-
LY until the amount of BRINE water owing through the E-Z Flush Flow Restrictor is owing THREE
TIMES FASTER than that of the PERMEATE water ow coming out of the RO Membrane. In this way
4 way auto
shut-o valve
(ASV)
Connect long blue tubing
to E-Z Flush Flow Restrictor
and put other end in sink.
‘BRINE’ water rejected
by R.O. membrane
NOTE: Back View - hanging
bracket not shown for clarity
1
2
Put a bowl or bucket under the short piece of blue
tubing coming out of the ASV to catch the ‘PERMEATE’
water (cleaned by the R.O. Membrane)
E-Z Flush Flow
Restrictor
Close the E-Z Flush Flow Restrictor and
turn the Manual Shut-O Valve on
blue tubing
Manual
Shut-O Valve
to water supply
3
Figure 12
Preparing to set
up the E-Z Flush
Flow Restrictor

page 8 | Home II Installation Instructions 05/13 | www.aquasafecanada.com
you achieve a 3:1 ratio where 3 parts is BRINE water and 1 part is PERMEATE water. (You can do this by
judging the ow visually or see the note below for how to do a timed measurement.)
When you are condent that you have properly set the ow ratios as explained above, locate the
“marker sleeve” which is found directly under the top dial of E–Z Flush Flow Restrictor. Screw this
marker sleeve down the threads of the shaft of the dial so that it is ush with the main body of the E–Z
Flush Flow Restrictor. This will serve as an exacting marker to the amount of ow restriction you have
set. Now turn the Manual Shut-O Valve back to its (OFF) position and remove the blue tubing from
the E–Z Flush Flow Restrictor.
PLEASE NOTE: The 3:1 ratio depicted above can
easily be achieved by visually judging the rate of the
BRINE / PERMEATE ows. However if you want to
achieve exacting ratios between brine and permeate
water you can simply time how long it takes to ll a
certain volume such as a measuring cup or the like
(Fig 13). When doing this “timed measurement” the
permeate water should take three times as long to ll
the same volume over that of the brine water (3:1 Ra-
tio). We do not recommend anything over a 1:1 ratio
as it is extremely important for the R.O. Membrane to
have adequate BRINE ow to be able to ush away the harmful particulates it is removing while lter-
ing the water. A setting near to or at 1:1 ratio is only recommended if you are in a desert environment
and need to conserve as much water as possible or if you are charged large sums of money per gallon
from your water utility. A RATIO BEYOND 1:1 IS VERY LIKELY TO DAMAGE THE R.O. MEMBRANE. YOU
SHOULD ALWAYS HAVE MORE BRINE WATER FLOW THEN PERMEATE WATER FLOW.
For your convenience this system is fully automatic! When you draw water from the Aquasafe faucet,
the system will auto-ll its holding tank and then shut o until more water is drawn from the sys-
tem where the cycle would then repeat. This means that you will always have an abundance of pure,
healthy water on tap at any given time you desire.
Figure 13
Timing flow rates
to set up the
E-Z Flush Flow
Restrictor
‘BRINE’ water
rejected by
R.O. membrane
‘PERMEATE’ water
takes 3x longer to
ll the same cup
The permeate water coming directly out of the R.O. Membrane housing (via the auto shut-o valve)
should achieve an 85% or greater reduction in ppm (parts per million) from that of your unltered
cold tap water in your home that has not been ltered by this system. If a TDS Meter was ordered
with your system gather a few ounces of water in a small glass and test the ppm’s - comparing the
ppm count of the permeate water coming directly out of your R.O. Membrane against that of your
home’s unltered cold water. It may take up to 15-20 minutes for the RO Membrane to become fully
activated and ushed of its food grade preservative to achieve this minimum 85% ppm reduction
Example: Home’s unltered tap water is 300ppm / R.O. Permeate water should be 45ppm or less.
You can nd this value for your results by multiplying them by 0.15 (the 15% of particulates that are
left when 85% have been removed). If you do not see the minimum of 85% reduction in ppm’s after
20 minutes of permeate water ow, it means your R.O. Membrane is not seated properly in the R.O.
Membrane housing. You will need to take the R.O. Membrane out and re-insert as rmly as possible,
reassemble and then re-test the ppm’s as depicted above. If you do need to re-seat your R.O. Mem-
brane it is a very quick and easy procedure. Testing the ppm reduction rate of the permeate water
coming directly out of the RO Membrane housing is the most important ppm reduction test
you can perform and is a sure way to know if your system is performing as it should.
TIP

www.aquasafecanada.com | Home II Installation Instructions 05/13 | page 9
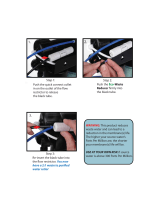
8.0 Installing the Final Polishing Filter
Push the two clips (found in the Large Parts Bag) onto the R.O. Membrane housing in preparation for
the Final Polishing Filter (step 1, Fig 14).
Now push the Final Polishing Filter into the canister clips (step 2, Fig. 14). The direction of the Final Pol-
ishing Filter is important. YOU MUST HAVE THE TEXT UPSIDE DOWN. PLEASE NOTE: The reason for in-
serting the Final Polishing with the text upside down is so the Blue hose will easily reach the “T” adap-
tor. You will notice an arrow engraved on the polishing lter which indicates the direction of water
ow. The “T” adaptor should always be inserted on the opposite side of the polishing lter to which the
arrow is pointing. In this way water will ow from the water Storage Tank, through your Final Polish-
ing Filter, then to your Aquasafe Faucet every time you take water from the system. The Final Polishing
Filter remineralizes your water to ensure it has a full-bodied taste. Because of this the ppm of the water
dispensed at your Aquasafe faucet will be higher than that coming out of the R.O. Membrane.
Take the male “T” adaptor from the Small Parts Bag and screw it into the left side of the Polishing Filter.
Then take the straight male adaptor from the small parts bag and screw it into the right side of the
Polishing Filter (steps 1 & 2 in Fig 15). Remember to apply 4-7 wraps of Teon tape.
Next, Insert the short blue hose connected to the “OUT” side of the 4 way ASV (Automatic Shut O
Valve) and push it into the “T” Adaptor on the left side of the Polishing Filter (step 3, Fig 15).
Figure 14
Attaching the
Final Polishing
Filter
Figure 15
Attaching the
Final Polishing to
the D.I. Canister
Final Polishing Filter
www.aquasafecanada.com
www.aquasafecanada.com
Push 2 canister clips onto
the R.O. Membrane housing
Push the Final Polishing lter down onto the
canister clips. Ensure the writing on the
Polishing lter is upside down.
1
2
Final Polishing Filter
www.aquasafecanada.com
1
Connect the male ‘T’ adaptor to the left side
of the Polishing Filter
2
Connect the
straight male
adaptorto the
right side of the
Polishing Filter
Final Polishing Filter
male ‘T’
adaptor
straight
male adaptor
Connect the short blue Permeate water line
coming out of the ASV to the elbow adaptor
on the left side (as viewed from the front) of
the Final Polishing Filter
4 way auto
shut-o valve
(ASV)
NOTE:
Back View -
hanging
bracket
not shown
for clarity
3

page 10 | Home II Installation Instructions 05/13 | www.aquasafecanada.com
9.0 Prepare the R.O. Water Holding Tank
The R.O. Water Holding Tank has an air bladder and a water bladder
inside it. The air bladder comes pre-set from the factory at 7 PSI for your
convenience. CAUTION: Changes to the PSI of the air bladder inside
the R.O Water Holding tank may cause harmful back pressure which can
result in the Auto Shut-O Valve (ASV) malfunctioning. As such, please
do not attempt to adjust the air pressure of your R.O Water Holding
tank.
Please note: For your convenience, the R.O Water Holding tank can
stand up or lay horizontal to conserve space if necessary.
Screw the tank top valve found in your Small Parts Bag onto the threads
found on top of the R.O Water Holding Tank (Fig. 16). Remember to
apply 4-7 wraps of Teon tape to the thread of the tank itself.
PLEASE NOTE: The long length of blue tubing used to ush your prelters is the tubing you will use to
hook up both the water storage tank as well as the dedicated Reverse Osmosis faucet that came with
your system.
You will need to cut this length of blue tubing in two pieces accordingly. The length of tubing used to
hook up your kitchen faucet (which will be attached to the left side of the Polishing Filter) will prob-
ably need to be longer than the length of blue tubing used to hook up your R.O Water Holding tank
(which will be attached to the right side of the Polishing Filter). Take a moment and judge how much
tubing you will need for each purpose
based upon where the nal placement
of your system will be located under
your sink (or the like) and then cut the
blue tubing to length with a sharp
knife making sure your cut is straight
(not at an angle).
Now insert one end of the cut length
of blue tubing (for the tank) into the
male “T” adaptor found on the left side
of the Final Polishing Filter and the
other end into the tank top valve con-
necting the holding tank to the system
(Fig. 17).
10.0 Clear the Decks.
If you have not already done so, the next step is to totally clean out under your sink. Get some rags to
wipe up any water drips that may be present from the installation process. Now, step back and look at
where you want the unit and the tank positioned. Please remember, you have to service the system so
consider accessibility.
www.aquasafecanada.com
Connect the Polishing Filter to the tank top valve
using a length of blue tubing cut to t your setup
Final Polishing Filter
Figure 17
Attach the tank
top valve to the
Final Polishing
Filter
Stand the unit inside a drip pan. Disposable aluminum baking sheets work ne. We suggest this
because you may have water drips while servicing the system or when you change out lters.
TIP
Figure 16
Attach the tank
top valve to the
R.O. Water
Holding Tank

www.aquasafecanada.com | Home II Installation Instructions 05/13 | page 11
11.0 Preparing the Discharge Water Saddle Clamp.
Find a location on the drain pipe under
your sink where you wish to secure the
discharge water saddle clamp found
in your Large Parts Bag (Fig. 18). Make
sure—MAKE REALLY SURE — that the
location you have chosen is above the
trap! (The trap is the “U” shaped part
of the drain pipe) You may secure the
saddle clamp on a horizontal pipe JUST
AS LONG AS YOU ARE ABOVE THE TRAP!!!
Also try to secure the saddle clamp
where it will not block anything, like
where you want to put your system or
the R.O. Water Holding Tank.
Drill out your chosen spot with a 1/4 inch drill bit. The 1/4 inch hole that you drill into the carefully
chosen location on your drain pipe is where the yellow discharge line will be inserted into and secured
into place with the discharge water line (Drain) Saddle Clamp.
Take the gasket that came with your Large Parts Bag and remove the backing. Then stick the gasket to
the inside of the saddle clamp making sure that the yellow tubing is showing through at least 1/2 inch
(Fig. 19). Now secure the saddle clamp in its chosen location rmly making sure the tubing is inserted
into the drain pipe. Attach the other end of the yellow discharge line to the E- Z Flush Flow Restrictor
on the back of the unit.
Figure 18
Where to install
the drain saddle
clamp
NOT OK
Do NOT install the drain saddle
clamp inside the dashed line area.
It MUST be installed above the trap
You can install the
saddle clamp on
horizontal
or vertical pipes
sink sink
OK
OK
Trap
The material of the Drain Saddle Clamp is exible. If your drain pipe is slightly larger than the cir-
cumference of the drain saddle clamp simply press the saddle clamp rmly onto the drain in order
to catch the bolts on the opposite side. You only need to tighten the bolts to the point where the
gasket begins to compress against your drain pipe.
TIP
Figure 19
Assembling and
attaching the
drain saddle
clamp
rubber gasket
quick connect
tting
drain pipe
yellow drain
line
Insert yellow drain line
into quick connect tting
rubber gasket
1
2
Remove the backing
from the gasket and
stick it to the inside of
the saddle clamp
making sure that the
yellow tubing is
showing through at
least 1/2 inch

page 12 | Home II Installation Instructions 05/13 | www.aquasafecanada.com
12.0 Installing the Faucet.
Installing the faucet is next. You will most likely be installing the faucet through the sink top or beside
the sink top. Below are 4 dierent types of counters. Follow the instructions for your counter type. Be
aware that you can drill through your stainless steel sink but you will also have to drill through what-
ever counter material you have underneath your sink. If you have a porcelain sink, we advise against
an amateur installation. Either nd another spot (like beside the sink) or get a Pro.
a) Laminate: the most common material is a laminated counter top. Choose the most appropriate
spot on top, then crawl under and see where it clears. Remember, you have a large plastic washer
to put under the counter. The safe thing to do is to drill a pilot hole with your smallest bit rst. Then
drill a ½ inch hole and assemble the faucet (refer to diagram above). The rubber gasket goes under
the chrome faucet and the plastic washer goes under the counter. After putting the plastic washer in
place, put on the lock washer and then tighten the nut. Either have someone hold the faucet or put
a wrench on it and secure the wrench to prevent it from turning while you tighten the nut. Be careful
not to damage the faucet surface.
b) Stainless Steel: Do the same as for laminate, except be really sure of your clearance space. Take a
metal punch (or a big nail) and give the magic spot a good hit. At this indentation drill a pilot hole.
A wood drill will not do it. You must use a metal drill bit suitable for stainless. Once the pilot hole is
made, follow up with a ½” hole and attach the faucet.
c) Marble or Granite: This is not that hard, but takes some time. You need a diamond tipped drill and
about 15-20 minutes. The price of a ½” diamond tipped drill is around $75.00. Since you will probably
never use it again, you would probably be better o either renting the equipment or calling in a Pro.
Most glass installers have diamond drills and all vendors of stone have them. Some will rent it out, as
will “Rent-All” stores. Start the hole by drilling a ½” hole in a piece of scrap wood. This will serve as a
guide. Hold the piece of wood and let the diamond drill bit do the work. DO NOT push down or apply
pressure. Keep the hole lled with water and wipe out the hole often. It is important to let the weight
of the drill be the pressure and to let it just grind away at its own pace (which is slow).
d) Wood: If you have a wood counter top you could of course drill out the hole just beside the sink.
Also please keep in mind that you could run the 1/4 ” tubing to a location nearby your system.
See Faucet diagram on the next page for further reference. Follow the schematic in Fig. 20. Use the
other length of blue tubing that was cut in two pieces during step 10.0 as seen above for your faucet
installation. When you have your Aquasafe faucet rmly in place in the chosen location, insert the hose
leading from the faucet into the straight male adaptor on the left side of the Polishing Filter.
Check over all of the steps. Make sure all of your tubing is inserted rmly into the various adaptors.
You may now turn the manual shut-o valve found on your feed water line back to its “ON” position.
Your 3.2 Gallon water storage tank will now begin lling and will take a maximum 2-3 hrs to ll to
capacity for its rst time and quicker thereafter. Once the tank has lled, empty all the water out of the
water holding tank and let rell. To empty all water from your storage tank once lled you simply need
to open your faucet until the output from the faucet turns to a fast drip or slow trickle. The RO Mem-
brane is lled with food grade preservative for quality assurance and the nal polishing lter and the
holding tank’s water bladder should be ushed out before consuming the water. Empty two full tanks
of water in order to ensure proper ushing of your entire system. After ushing two full tanks, you can
then drink and cook with the ultra puried water.
After emptying your water storage tank twice, allow your system to pressurize. Monitor closely for
potential leaks. If leaks do occur, turn the Manual Shut O Valve attached to the 4 inch piece of red

www.aquasafecanada.com | Home II Installation Instructions 05/13 | page 13
tubingfound on the feed water line to its “OFF” position. The nature of water is to nd the path of least
resistance. Some initial small leaks are not unheard of. If a leak does occurs at any time please see
Aquasafe’s LEAKS PREVENTION SECTION on the page 15 of this document.
GET A GOOD FLASHLIGHT AND CHECK OVER THE ENTIRE SYSTEM CAREFULLY WHEN COMPLETED TO
SPOT ANY POTENTIAL LEAKS.
¬Congratulations on completing the installation process. You may now start drinking the ultra puri-
ed drinking water you desire for the health and enjoyment of you and your loved ones.
If you require further clarication after going through all of the information of these instructions,
please feel free to email Aquasafe for further support at: [email protected]
Extra information for the Home II COMBO
Where do I install the PSI Meter from my “COMBO” System?
If you have purchased the Home II System Combo, your system came with
a PSI Meter as seen in Figure 21. It is not necessary that the PSI Meter be
installed onto your system. The PSI Meter is provided as a convenience to
you as your entire system operates from water pressure. If need be, the
PSI Meter allows you to determine the water pressure at any point on your
Reverse Osmosis System which can make troubleshooting of any potential
problems on your system extremely easy. However, if you chose to install
the PSI Meter onto your system, there are two main areas where installing
Gooseneck
Rubber Spacer
Cover Plate
Rubber Seal
Plastic Ring
Steel Washer
Plastic Ferrule
Compression Nut
Blue tubing
threads
Counter Top
tighten this nut over the threads
under the faucet
Figure 20
Attaching the
faucet
Figure 21
The PSI Meter

page 14 | Home II Installation Instructions 05/13 | www.aquasafecanada.com
Figure 22
The TDS Meter
the PSI Meter on your system can be of use.
1. If you are on a well water system, and you think you may have lower then 50 psi throughout your
home’s plumbing, a good place to install the PSI Meter is on the feed water line to your Reverse
Osmosis System. This will allow for easy monitoring of the source water pressure entering your Re-
verse Osmosis System. Your system needs consistent pressure at 50 psi or above. Typical well water
systems will top out at 60 psi and bottom out at 40 psi. If this is the case we highly recommend an
automatic booster pump available on our website in General Reverse Osmosis Parts & Accessories.
2. Installing the PSI Meter on the blue water production line (Step 2 of Fig 15) will allow you to moni-
tor the water pressure of the puried water that has passed through the Reverse Osmosis Mem-
brane. This can be useful, as when the R.O. Membrane becomes clogged over time due to the
contaminants it is removing, the water pressure output from the blue water production line will de-
crease accordingly. Installing the PSI Gauge at this location will allow you to monitor this decrease
is output water pressure to let you know when you may need to replace your Reverse Osmosis
Membrane.
How do I use the TDS Meter from my “COMBO” System?
The TDS (Total Dissolved Solids) Meter of your system is ex-
tremely easy and intuitive to use and comes with its own set of
intructions, but here is a quick tutorial. First you will need to get
a small glass and rinse it of all dust or other particles. Now ll
the rinsed glass with the water for which you would like to de-
termine the TDS Reading (Total Dissolved Solids). Remove the
cap from the bottom of the TDS Meter and turn on the meter.
Now simply insert the portion of the TDS Meter that was cov-
ered by the cap into the glass of water. The number that shows
on the digital display is the ppm count (Parts Per Million) of TDS
(Total Dissolved Solids) in your water.
Note: Your TDS Meter has an auto shut o feature but try to remember to shut o the TDS Meter when
you are done testing your water to save on batteries !
How do I store my extra case of 21 (6 changes) pre filters?
Your case of 21 pre-lters (6 full changes) can be stored in the same state in which they arrived. Each
prelter comes wrapped in protective plastic. Store at room temperature. Shelf life is years.

www.aquasafecanada.com | Home II Installation Instructions 05/13 | page 15
LEAK PREVENTION PAGE
Threaded Fittings
To prevent a leak on any threaded tting that screws into the Reverse
Osmosis System you simply need to employ Teon tape. The main in-
structions pages indicates the preventative measure of wrapping the
threads of the various threaded ttings 4-7 times with Teon tape.
This preventative measure will ensure against any potential leaks
from the various threaded ttings throughout your Reverse Osmosis
System. ADDING SUFFICIENT TEFLON TAPE IS KEY!
If you are experiencing a leak from a 1/4 inch tube inserted into a threaded tting, you simply need to insert the tub-
ing into the threaded tting further. To do this you may need a small pair of pliers to assist you in gripping the tube. If
the use of pliers is needed, grab the tubing 1/2 inch from where the tube inserts into the threaded tting in order to
not scratch the section of tube that will be inserting further into the threaded tting. A scratched section of tubing
that is inserted into a threaded tting can act as a path for water to ow, which in turn may result in a small leak.
Pre-Filter Canister Housing
All Reverse Osmosis Pre-Filter Housings Are “Compression
Sealed”. This means that 99% of the time any leak coming from
the threads of the Pre-Filter Housing can be easily xed by tight-
ening with the system’s “large Canister Wrench”.
A “Large Canister Wrench” came with the Original Purchase of
your Reverse Osmosis System
blue
‘C’ Clip
collet
Pre-Filter Housing
Large Canister Wrench
To more easily insert the tubing into the various ttings of your system it is helpful to remove
the blue “C” clip from around the collet and then insert the tubing. After the tubing has been
inserted into place, pull lightly on the tubing in order to make room for the collet and then place
the collet back into its original position. The blue “C” clip holds the collet in its proper position
while the system is in operation.
TIP
Teflon Tape
Threaded Fitting

page 16 | Home II Installation Instructions 05/13 | www.aquasafecanada.com
HOME II SYSTEM FILTER CHANGE SCHEDULE
Pre and Post lters: Dened as the lter stages Pre (before the RO Membrane ) and Post (after the RO
Membrane).
Stage 1,2 & 3 Pre-Filters – When to conduct a filter change.
Stages 1, 2 and 3 are your system’s pre-lters which need to be changed every 1000 gallons of puri-
ed water produced. The average household consumes 5 gallons of drinking and cooking water daily
and as such a lter change is needed every 6 months or sooner. Mark your calendar for a routine lter
change every 6 months to ensure system performance.
Please Note: Maintaining the pre-lters of your system is key to ensuring system integrity in both wa-
ter quality achieved and overall longevity of its parts and components. The pre-lters are your system’s
rst line of defence - protecting and ensuring the maximum lifespan of the R.O. Membrane.
Stage 4 – When should I change the reverse Osmosis Membrane?
The R.O. Membrane is the very heart of your Aquasafe Reverse Osmosis System. The R.O. Membrane is
rated for 4000-5000 Gallons of puried water production. A new R.O. Membrane will last for approxi-
mately 3-4 years. Once again this calculation is worked out on the average as follows:
• A standard household will consume between 3-5 gallons of puried water each day for all its
drinking and cooking purposes. A 3 gallon per day consumption rate over a year’s time is equal
to roughly 1095 Gallons which therefore calls for a Reverse Osmosis Membrane change approxi-
mately once every 3.5 years.
• A 5 Gallons per day consumption rate over a years time is equal to roughly 1825 Gallons which
therefore calls for Reverse Osmosis change approximately once every 2- 2.8 Years.
If you have a TDS Meter a very simple but critical test you can perform in order to determine if your
R.O. Membrane needs to be replaced is to measure the PPM reduction rate of the puried (permeate)
water coming directly out of the R.O. Membrane housing (see Fig. 25 and 26 for how to do this).
If you are a 1 person household or a large family household it may be advantageous to monitor
approximately how many gallons of drinking and cooking water is consumed daily to factor the
proper lter change schedule for your individual situation.
• Example: Large household or oce environment consuming 8 Gallons per day.
1000 gallon pre-lter capacity / (8 GPD x 30.5 average days a month) = pre-lter change ap-
prox. every 4 months.
IF THE PREFILTERS ARE NOT CHANGED BEFORE 1000 GALLONS OF PURIFIED WATER IS
CONSUMED FROM THE SYSTEM, CHLORINE WILL BYPASS THE PREFILTERS REACHING AND
CHEMICALLY DAMAGING THE R.O. MEMBRANE RENDERING IT USELESS. Also, after the 1000
gallon mark, seepage may occur where very ne particulates will bypass the pre-lters stressing
the R.O. Membrane greatly This will result in pre-mature fouling of the R.O. Membrane resulting in
the R.O. Membrane needing to be replaced before its due time.
TIP
WARNING

www.aquasafecanada.com | Home II Installation Instructions 05/13 | page 17
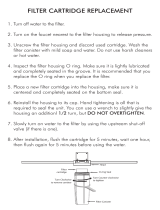
Testing to see if your R.O. Membrane needs replacing.
Step 1. How to depressurize your system (Fig 23)
Step 2. Test your permeate water (Fig 24)
The PPM count should be 15% or less in PPM’s from that of your unltered tap water that can be gath-
ered from any other tap in your home.
• Example: if your unltered tap water is 200ppm then the puried permeate water coming out of
the R.O. Membrane should be 30ppm or less (200 x 0.15).
If your R.O. Membrane is not producing the 85% or better in PPM reduction as depicted above, you
need to change this membrane.
Are you unsure when your replaced the R.O Membrane Last?
Aquasafe highly recommends you replace your Reverse Osmosis Membrane if you have never
changed the R.O. Membrane of your system and your system is more than 3 years old or if you cannot
remember the last time you have replaced your R.O. Membrane. If you are not sure it is better to be
safe than sorry. The R.O. Membrane is the most important part of the system, therefore ensuring it is
operating properly is key to properly producing the ultra puried healthy water you desire.
1
2
3
Shut o the ow of water to the feed
water supply line of your system via the
Manual Shut O Valve found spliced
into the feed water line.
Turn the tank top valve,
found on top of your
water holding tank,
to its “OFF” position.
feed
water
line
Manual Shut-O Valve
in OFF position
Final Polishing Filter
Press down on your
kitchen faucet until the
ow of water stops to
complete the
depressurizing process.
Tank Top Valve
in OFF position
ON OFF
Manual Shut-O Valve (top view)
TOP VIEW OF SYSTEM
1
4
Depressurize your system (see Fig. 23)
2
Remove (see Fig 10) the blue tubing coming out
of the R.O. Membrane housing from where it
connects into the Final Polishing Filter.
Gather some water coming from the
disconnected blue tube and test the PPM count
with your TDS Meter. The PPM count should be
15% (or less) than that of your unltered water.
Turn the feed
water back ON
with the Manual
Shut-O Valve
NOTE:
Back View -
hanging
bracket
not shown
for clarity
Manual
Shut-O Valve
in “OFF” position
E-Z Flush
Flow Restrictor
feed water in
to discharge
saddle clamp
3
TDS Meter
Final Polishing Filter
to tank
to faucet
Final Polishing Filter
Figure 23
How to
depressurize
your system
Figure 24
Testing your
permeate water
with the TDS
meter

page 18 | Home II Installation Instructions 05/13 | www.aquasafecanada.com
www.aquasafecanada.com
www.aquasafecanada.com
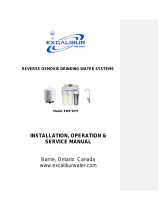
2
1
Depressurize your system (see Fig. 23)
3
4
5
large canister
wrench
NOTE: R.O. Membrane and other lters
and hoses not shown for clarity
Remove protective plastic from the
replacement SED (sedimentary) lter and
insert into housing. There is no up or
down to this lter.
SED
GAC CCB
Make sure the SED pre-lter is centered in the
pre-lter housing. Screw the rst pre-lter housing
back on using the canister wrench. Use reasonable
force to ensure a proper compression seal.
Unscrew the rst pre-lter housing with the large
canister wrench. Please note: There will still be
water in the housings of the lters so it will be
helpful to have a cloth at hand.
GAC lter
has a white
gasket at
the top and
mesh on
the bottom.
Replace the second (GAC -
Granular Activated Carbon) and
third (CCB - Coconut Carbon Block)
pre-lters in the same way. The
only lter for which direction
matters is the GAC lter.
Move on to the pre-lter ush.
Figure 25
Changing the
pre-filters
Stage 5 – When should I change the Final Polishing Filter?
This is the nal ltration stage in your R.O. System. The Final Polishing lter is rated for 1800-2000
gallons of puried water production and therefore should be changed every second time you change
your three pre-lters.
HOME II SYSTEM FILTER CHANGE INSTRUCTIONS
Pre-Filters – How to conduct a filter change.
Step 1. Install the new pre-lters (Fig 25)
Once you have nished tightening the third and nal pre-lter housing to the main system, you will
need to conduct a “pre-lter ush”.
/