Page is loading ...

1
FCC Notes:
This equipment generates, uses, and can radiate radio frequency energy and, if not
installed and used in accordance with the instructions manual, may cause interference
to radio communications. It has been tested and found to comply with limits for a Class
A digital device pursuant to subpart J of Part 15 of FCC Rules, which are designed to
provide reasonable protection against interference when being operated in a commercial
environment. Operation of this equipment in a residential area is likely to cause
interference in which case the user at his or her own expense will be required to take
whatever measures to correct the interference.
Warranty Limits:
Warranty terminates automatically when any person other than the authorized
technicians opens the machine. The user should consult his/her dealer for the problem
having happened. Warranty voids if the user does not follow the instructions in
application of this merchandise. The manufacturer is by no means responsible for any
damage or hazard caused by improper application.
About This Manual:
Posiflex has made every effort for the accuracy of the content in this manual. However,
Posiflex Technology, Inc. will assume neither liability for any technical inaccuracies or
editorial or other errors or omissions contained herein, nor that for direct, indirect,
incidental, consequential or otherwise damages, including without limitation loss of
data or profits, resulting from the furnishing, performance, or use of this material.
This information is provided “as is” and Posiflex Technology, Inc. expressly disclaims
any warranties, expressed, implied or statutory, including without limitation implied
warranties of merchantability or fitness for particular purpose, good title and against
infringement.
The information in this manual contains only essential hardware concerns for general
user and is subject to change without notice. Posiflex Technology, Inc. reserves the
right to alter product designs, layouts or drivers without notification. The system
integrator shall provide applicative notices and arrangement for special options utilizing
this product. The user may find the up-to-date information of the hardware from:
http://www.posiflex.com or http://www.posiflex.com.tw
or http://www.posiflexusa.com.
A backup of all data should be kept prior to installation of a drive unit or storage
peripheral. Posiflex will not be responsible for any loss of data resulting from the use,
disuse or misuse of this or any other Posiflex product.
XT-3715-JF
Fanfree LCD Touch Terminal
User’s Manual
Rev.: Original
P/N: 16780904010

2
All rights are strictly reserved. No part of this documentation may be reproduced,
stored in a retrieval system, or transmitted in any form or by any means, electronic,
mechanical, photocopying, or otherwise, without prior express written consent from
Posiflex Technology, Inc., the publisher of this documentation.
© Copyright Posiflex Technology, Inc. 2016
All brand and product names and trademarks are the property of their respective holders.
ALERT TO OUR HONORABLE CUSTOMERS:
Read thoroughly all the instructions and documents shipped with the
product before you do anything about it. Don’t take any premature action
before you fully understand the consequences.
A Lithium battery is installed in this product. Please always follow local
environmental protection laws / regulations for disposal of used batteries
and always replace the used one only with a new battery of the same type.
If you have a UPS battery installed in the product:
Temperature above 40°C must be strictly avoided as it could cause
termination of battery life and unexpected result even if the battery
is not in work.
Do NOT power off the system just by shutting off the AC power
leaving the battery supporting the whole system till completely
exhausted. Repeatedly using it up or improper maintenance
reduces the battery life dramatically.
Always fully recharge the UPS battery at least once every 3
months if the battery is not connected.
Always disconnect the UPS battery from the system if the system
is to be left OFF for more than 72 hours to prevent possible
damage. Only connect the UPS battery back right before you are
going to re-power on the system.
Replace the UPS battery as soon as the monitoring software
indicates the battery is out of service. Attempt to recharge a dead
battery is dangerous!
A separate battery monitor is not required for this series.
DAILY MAINTENANCE GUIDE
For regular cleaning of the XT system, please use only soft brush or dry soft
cloth. You may use a wet soft cloth to remove stains when necessary. Apply
only proper amount of mild neutral detergent for obstinate stains. Do NOT use
Acryl dissolving solvent or Polycarbonate dissolving solvent. You may apply
ammonia-based glass cleaner only on the screen surface.
CAUTION
Risk of explosion occurs if a wrong-type battery is used.
Dispose of used batteries according to local regulations.

3
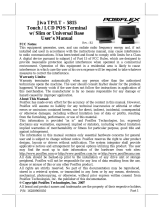
Introducing the XT-3715-JF
In today’s retail and hospitality market, POS terminal is no longer
just a cold and hard business tool. It is a part of the store
decoration, a part of the store image. Each curve and detail of the
POS terminal should add something to the overall mood of the
store, to lift the shopping experience of the customers.
With a bezel-free touch screen, beautifully sculptured slim body,
sexily curved base stand, XT-3715-JF series looks right at home
at any elegantly decorated store. And more than just good looks,
the XT series also offers ample of performance and flexibility to
satisfy the most demanding of daily POS operations.
The XT-3715-JF series comes with the selection of two newly
designed foldable bases, the curvy slim Generation 7E Base and
the larger but practical Generation 8E Base.
The new base foldable allows the XT-3715-JF series to be
configured into different configurations – “Flat Folded Mode”
saving the shipping package volume, “Low Profile Mode”
allowing greater interaction between cashier and the customers,
and the traditional "Full Extended Mode”. All this can be
achieved with a simple pull of the hidden lever. This one
terminal/multi-configuration concept provides unmatched
flexibility to store owners and system integrators alike.
Product Features
Standard Features
System
CPU: Intel Bay Trail-M N2807
Data storage device: 2.5” SATA HDD
Support Windows POSReady 7 / Win 7 / Windows
Embedded 8.1 Industry / Linux per request

4
Support high-performance DDR3L 1333 FSB, SO-DIMM
socket *1, 8GB (Max.)
VGA memory support DVMT 4.0
Mechanical Structure
Fanfree structure with Aluminum die-cast main unit casing
An advanced GEN 8E base design that supports storage
room for an optional UPS battery, power adapter, and
powered USB
Integrated structure for side mount upgrade kit: SA-
105/205/305/405; back mount display: LM/TM-3010/3014
and PD-6307
Water resistant structure allowing easy cleaning
Display
High-quality 15” TFT active matrix LCD panel
LCD panel with easy tilt angle adjustment from 15° to 90°
LCD brightness adjust buttons at side of main unit
Dual display support (per OS capability)
Power Source
Preconditioned power up function – by alarm clock or
LAN
12 VDC power adaptor, 60W / optional UPS battery
(2300mAh/12V)
I/O Interface
4 serial ports with 3 of DB9 connectors and one of 10-pin
RJ50 type modular connectors (optional COM5/6 from
service window via converter cable). The COM1/2/3/4
connectors are supported with capability for +5V DC
through BIOS setup and +12V DC through jumper setting.
6 USB ports on the I/O plate (USB 2.0 x 5 ,USB3.0 x 1 ),
1 USB port on the left side (USB2.0), 3 USB Header
Reserved for Internal USB Device Use
1 LAN port 10/100/1000 Base T with LAN status indicators
on jack (green for link and orange for data transmission)

5
1 external VGA monitor port with +12V DC support
through BIOS setting
LED indicators for systems operation status
1 built-in internal 2W speaker
1 CR port capable of controlling 2 cash drawers
One 4-pin 12V DC power input connector
One 4-pin connector for optional UPS battery in GEN 8E
base only
Optional Features
The underlined items in the following list means that option must
be set prior to shipment from the factory. The rest of items can be
set by the dealers.
System
DDR3L SODIMM memory expansions up to 8GB (Max.)
Preload Windows POSReady 7 / Win 7 / Windows Embedded
8.1 Industry / Linux per request
WIFI
Wireless LAN module, through Mini PCI-E Interface
Connection Cable
Parallel extension cable
RJ50-to-DB9 serial port conversion cable
Split cable for 2 cash drawer control
Base
GEN 8E base including UPS battery and powered USB
board, and supporting 60W/80W/120W/150W power
adaptor
Integration Kit
Integrated side mount upgrade kit for SA-105 provided with
optional MSR and for SA-205 provided with iButton
1” SATA SSD
Powered USB kit in GEN 8E base stand, such as PU-480 or
PU-490
Power adapter kits for 80W/120W/150W power adapters

6
Package Contents
Before you begin operating your POS terminal, please make sure
that the following materials are enclosed:
Terminal with base stand x 1
Power adaptor x 1
Power cord x 1
User manual x 1
Wall mount kit (optional) x1
Views of XT-3715-JF
Front and Rear Views of XT-3715-JF with Gen 7E Base Stand
Left Side View of XT-3715-JF with Gen 7E Base Stand
Power Button
Brightness Adjustment
Button “+”
Brightness Adjustment
Button “-”
USB 2.0 Port
Locking Hook
Neck Cover
DDR3 Memory Cover
LCD Touch Panel
Power Indicator
Base Stand
HDD Cover
Hinge
for LCD
Cable Exit
Cable Cover

7
Bottom View of XT-3715-JF with GEN 7E Base Stand
Front and Rear Views of XT-3715-JF with GEN 8E Base Stand
Left Side View of XT-3715-JF with GEN 8E Base Stand
Bottom Plate
Rubber Cushion
Wrapping Screw
2
nd
HDD Cover
Power Button
Brightness Adjustment
Button “+”
Brightness Adjustment
Button “-”
USB 2.0 Port
Locking Hook
DDR3 Memory Cover
LCD Touch Panel
Power Indicator
Base Stand
HDD Cover
Hinge
for LCD
Cable Exit
Neck Cover
Cable Cover

8
Bottom View of XT-3715-JF with GEN 8E Base Stand
Views of I/O Interfaces
1
DC-IN Power Jack
6
VGA Port
2
UPS Port
7
LAN Port
3
CR Port
8
USB 2.0 Port
4
DB9 COM Port
9
USB 2.0 Port
5
RJ50 COM Port
10
USB 3.0 Port
Operation Environment
It is very important that you check the following operation
guidelines:
This equipment must NOT be operated in an environment of
poor ventilation. There must be at least 25mm air clearance
around any top or side ventilation holes with a free flow of air
around the unit at ALL times for the installation.
The equipment must NOT be operated and stored in an
environment of which both the temperature and
humidity/moisture are extreme because it is suggested to
operate in the conditions of operation temperature ranging from
0°C to 40°C and humidity of up to 80% (non-condensing).
Rubber Cushion
Wrapping Screw
Powered USB Board Cover
Bottom Plate
Power Adaptor Chamber
UPS Chamber
1
3
6
7
8
10
2
4
5
9

9
Installing Optional Upgrade Kits
Upon your demands, you can install optional upgrade kits
respectively onto XT-3715-JF main unit and GEN 7E/8 base
stand. The introduction to the kits and the brief description of
installation of the kits are made below.
Onto the Main Unit
Side Mount Upgrade Kit
Before installing the side mount upgrade
kit, such as SA-105/205/305/405, remove
the 2 circled screws from the side mount
upgrade kit cover located at the left side of
the rear of main unit.
For the detailed description of installation
of the side mount upgrade kit, refer to the
XT-3715-JF technical manual or the user
manual of SA-series peripheral kit.
Rear Top Mount Upgrade Kit
1. Customer Pole Display
Before installing the rear top mount
upgrade kit, such as PD-
2608UE/305UE, remove the 2
circled screws from the rear top
mount upgrade kit cover located at
the upper side of the rear of main
unit.
For the detailed description of installation of the rear top
mount upgrade kit, refer to the XT-3715-JF technical
manual or the user manual of PD-series peripheral kit.

10
2. Second LCD Monitor
Before installing the rear top mount
upgrade kit, such as LM/TM-
3010/3014/3015 and PD-6607,
remove the 4 circled screws from
the rear top mount upgrade kit
cover located at the upper side of
the rear of main unit.
For the detailed description of installation of the rear top
mount upgrade kit, refer to the XT-3715-JF technical
manual or the user manual of LM/TM-series peripheral
kit.
Note: When being installed with the LM/TM-
3014/3015-XT, the XT system must be provided with a
80W power adapter.
Routing and Securing the Cable of PD or 2
nd
LCD
Monitor
There are four cable stoppers, upper right stopper, lower right
stopper, upper left stopper, and lower left stopper, formed
between the rear side of terminal and the viewing-angle
adjustment plate of base stand. The cable stoppers are provided
to route and secure the cable of customer pole display or
second LCD monitor.
With across reference to the figures below, follow the steps to
route and secure the cable.
At step 1, choose the left side or right side to route and secure the
cable.
Upper right stopper
Lower right stopper
Upper left stopper
Lower left stopper

11
At step 2, if the right side is chosen, for example, push the lower
right stopper (long) upward with your thumb to remove, and then
push the upper right stopper (short) to the right with your thumb
to remove.
At step 3, draw the cable through the cavity between the rear side
of terminal and the viewing-angle adjustment plate of base stand.
At step 4, push the upper right stopper (short) to the left with your
thumb and then push the lower right (long) downwards with your
thumb to secure the cable.
For the detailed description of routing and securing the cable of
customer pole display or second LCD monitor, refer to the XT-
3715-JF technical manual or the user manual of PD- or LM/TM-
series peripheral kit.
Onto the Base Stand
GEN 8E Base Stand
UPS Battery Kit
Before installing the UPS battery kit,
remove the 2 circled screws from the
UPS battery kit cover located at the
right compartment of the bottom side
of the base stand, as shown in the right
figure.
If you install both the hard disk drive kit and the UPS battery
kit, firstly install the hard disk drive kit and then the UPS
battery kit. For the detailed description of installation of the
UPS battery kit, refer to the XT-3715-JF technical manual or
the user manual of UPS battery kit.
1
2
3
Cable

12
Power Adapter Kit
1. For 80W Power Adapter
The power adapter kit is installed
at the left side of the bottom of the
base stand. Before installing the
power adapter kit, load the adapter
into a power adapter bracket.
For the detailed description of installation of the 80W
power adapter kit, refer to the XT-3715-JF technical
manual or the user manual of GEN 8E base stand.
2. For 120W/150W Power Adapter
The power adapter kit is likewise
installed at the left side of the
bottom of the base stand. Firstly
load a 120W or 150W power
adapter and then secure the power adapter with 2 holders.
Because the 120 power adapter and the 150W power
adapter are different from each other in length, the 120W
power adapter must be secured with 2 pieces of 120W
power adapter holders and the 150W power adapter must
be secured with 2 pieces of 150W power adapter holders.
For the detailed description of installation of the
120W/150W power adapter kit, refer to the XT-3715-JF
technical manual or the user manual of GEN 8E base
stand.
Secure the Power Cord
To avoid the power cord from being pulled
out accidentally, the 80W/120W/150W
power adapter kits are shipped with a power
cord bracket.

13
After installing the power adapter kit and connecting the
power cord to the power adapter, remember to use the power
cord bracket to secure the power cord.
Powered USB Adapter Kit
The powered USB adapter kit is
arranged at the middle section of the
bottom of the base stand. Before
installing the powered USB adapter kit,
remove the 2 circled screws from the powered USB adapter
cover located at the middle section of the bottom of the base
stand, as shown in the right figure.
For the detailed description of installation of the powered
USB adapter kit, refer to the XT-3715-JF technical manual
or the user manual of GEN 8E base stand.
Note: When the powered USB adapter kit is installed, the
XT system must be provided with a 150W power adapter.
Connecting Cables
Before connecting cables to the I/O interfaces of main unit,
please route and arranging the cables. Refer to the following step-
by-step instruction of cable routing and arrangement for the
details.
Fixing with screw

14
Routing and Arranging Cables
For GEN 7E Base Stand
Before connecting cables, please follow the steps made below to
remove the cable cover from the GEN 7E base stand for routing
and arranging the cables.
1. Press section A with your thumb.
2. Push down section A slightly with
your thumb and hold off section B
with your forefinger. Then, pull out
the cable cover.
3. Push and bend the main unit to the
end in the direction as shown by the
arrow.
4. With your forefingers, pull by force
the locking hook in the direction as
indicated by the arrow to remove the
neck cover from the base stand.
A
B
A

15
5. The cable cover and the neck cover
are well removed, as shown in the
right figure.
6. Then, slide the cable arrangement
cover to remove from the main unit.
After removing the covers illustrated above, follow steps made
below to route the cables from the bottom of base stand to the I/O
interfaces of the main unit.
7. Make the connectors, which will
be connected to the I/O interfaces
of main unit, pass through the
hole A of the bottom of base
stand.
8. Connect the connectors of cables to the I/O interfaces of
main unit.
CAUTION:
Before connecting the power cable to the power jack of
main unit, do NOT touch any metal pin of the connectors
or circuits to avoid high voltage hazard or electrostatic
discharge damage.
A

16
9. Install the cable arrangement cover, the neck cover, and the
cable cover back onto the base stand in reverse order.
Powering ON/OFF the XT-3715-JF
After connecting the power cable to the
power jack of main unit, slightly push to
open the power button cover at the left
side of the main unit.
Then press the power button to power on
the main unit. To power it off, press the
button again.
Once powering off the system, if you want
to power it on again, please wait for at
least 3 seconds.
If the system hangs due to a reason, such as software resource
conflict, please press and hold the power button for 10 seconds
around to forcedly shut down the system.
Software Support Features
The XT series provides a software power-off command for
application program maneuvers. The XT series also provides a
specific means for the software to detect if the system is working
on external or UPS battery power. Due to this feature, compatible
software applications have the ability to change operating
conditions when the system runs on standard/backup power. The
software programmer may refer to the XT-series technical
manual to apply such features.

17
Automatic Power on Control
The XT system may also turn on by Alarm Clock Wake Up or
Wake-on-LAN. For the Wake-on-LAN control, it requires a
qualified networking technician to check the LAN chip ID of the
system for the caller system to wake up.
When the XT system is turned off after a successful boot up, the
preset automatic power on function will keep monitoring the
preset conditions and turn on the system when the preset
conditions are met.
Please note that if the XT system is improperly turned off before
a complete boot up procedure, the above preset power on control
functions will be disabled until a next turning off after a complete
boot up.
Power Indicator
There is a power LED indicator serving
for several purposes located at the center
of lower rim of LCD panel. The relationship between the
indicator status and other conditions is summarized below:
Indicator Status
System
Status
External
Power
UPS Battery
Powering Up
Off
Off
Off
Not present
Not possible
Off
Off
Off
Present
Not allowed
Green
Off
On
No influence
Allowed
Blue
On
On
No influence
N/A
Blue/Flash
On
Off
Activated
Green/Rapid Flash
On
Off
Battery low
Installing an Operating System
This product is highly professional equipment. Therefore, we do
NOT encourage you to install any operating system into this
machine. Posiflex Technology, Inc. shall not be responsible for
any technical support to questions on this aspect. We suggest that
you contact your dealer for OS installation.

18
Operating System Recovery
For the XT-3715-JF main system preloaded with POS Ready 7/
Windows 7 /Windows Embedded 8.1 Industry on HDD, Posiflex
provides a recovery DVD shipped with the touch terminal for the
preloaded operating system. The system integrator shall take care
of software restoration after the OS is recovered. All upgrade
element drivers that are needed for manual installation in usual
way are available in the subfolder “\drivers” in the OS recovery
HDD and the latest versions of these required drivers will be
available on our web site: http://www.posiflex.com.tw. Then
follow instructions from your system integrator for software
recovery.
This recovery DVD is provided for the XT-3715-JF only. Do
NOT use a recovery DVD for another model of machine to
recover the operating system of your XT-3715-JF; otherwise,
the system might be unstable, shut down, or even cannot start!
Resolution of Main LCD Monitor
For best viewing result, please set your display resolution to 1024
x 768 for 15” LCD. The system video memory is shared with
system memory and supports DVMT 4.0.
VGA Port
The VGA port in the XT-3715-JF system supports either a
separately connected LCD monitor or a touch monitor. To
support the DC power to the Posiflex LCD monitor, a qualified
technician is needed to set the power supply in the XT main unit
through the VGA connector according to Posiflex technical
information. Do NOT connect another monitor to this port
before the power in this port is disabled.
Note: When the 2
nd
display is connected, the screen display of
system boot up stage and application in some OS will be smaller
than usual in both 1
st
and 2
nd
displays.

19
Serial Ports – COM1/2/3/4
In the system, there are 3 serial ports in form of DB9 pin male
connectors and 1 in form of 10-pin RJ50 connector available.
DB9 serial ports can supply +5 V and +12V DC power after
proper BIOS and jumper configuration. However, do NOT
connect any other device to this port before the power in this
port is disabled.
Touch Panel
The XT-3715-JF is provided with a projected capacitive touch
panel. The description described below is applicable for models
provided with a touch panel only. The user of those models
without any touch panel can ignore them.
※
The product information and specification are subject to change without
prior notice. To get the detailed information on XT-3715-JF, please
check this model from Posiflex Global Website
(
http://www.posiflex.com/en-global/Download/download).

20
Specifications
XT-3715-JF
CPU
Intel Bay Trail-M N2807
VGA interface
D-SUB 15 Pin, with 12V power for Posiflex LCD monitor
LCD display
15" 1024x768
Touch panel
Resistive touch panel
DRAM memory
DDR3L 1333 FSB, SO-DIMM socket *1, Max 8G
Serial port
4 ports, RJ-45 x2, DB9 x2, reserved COM5/COM6 header on back
window (optional for special order)
+5V software switch control for COM1/2/3/4/5/6;
+12V jumper control for COM1/2/3/4
Parallel port
Provided, proprietary port connector in jumper setting window
Connected with optional special convert cable
CR port
1 port, controlling 2 CR (2 CR Port Detected)
TPM
Optional
eMMC
Optional
Standard USB port
6 ports on the I/O plate (USB 2.0 x5 ,USB 3.0 x1 ), 1 ports on the left
side (USB 2.0), 3 USB header reserved for internal USB device use
PS/2 KB port
Provided, pin header on back window
Audio
2W speaker x1
Ethernet port
10/100/1000 Mb x 2
Wireless LAN
Optional, via mini PCI-e interface, with internal antenna
UPS port
Provided, battery optional
Extension slot
mini PCI-e slot with USB signal for Wi-Fi card
Storage device
Two SATA ports on M/B (one for 2.5" HDD/SSD and
the other for 1'' SSD only)
Power-off control
Hardware switch or by software control
Power switch
Soft switch
Power-on wake up
Via alarm/LAN
Mechanical
installation
Desktop or VESA wall mount
Power supply
12 VDC power adaptor, 60W
(Upgradable to 80W, 120W and 150W)
Power indicator
Power ON / standby, bi-color LED indicators
Ethernet link LED on Ethernet connector
Special Features
Fanless
Designed
Brightness control
By digital push button
Base stand
Gen 7E / 8E Base
OS support
POSReady 7 / Win 7 / Win 8.1 / Linux
Option Peripheral
SSD
16GB minimum
UPS battery
2300mAh/12V
I/O Box
7E base stand only
PU-480/PU-490
8E base stand only
/