Page is loading ...

neuro 105
User Manual
Programmable Profile
Controller
RS
OP3
neuro 105

CONTENTS
User Manual
neuro 105
1. FRONT PANEL LAYOUT 1
2. BASIC OPERATION 3
3. PAGES AND PARAMETERS 8
4. 11CONTROL PARAMETERS
5. ALARM PARAMETERS 13
6. INPUT / OUTPUT PARAMETERS 17
7. UTILITY PARAMETERS 20
8. 21OP2 & OP3 FUNCTION PARAMETERS
9. PROFILE : SEGMENT PARAMETERS 23
10. PROFILE : BAND / EVENT PARAMETERS 25
11. BUILDING PROFILE-PROGRAMS 28
12. 29PROFILE : CONFIGURATION PARAMETERS
13. 31SETPOINT PROFILE & PROFILE-PROGRAMS
14. 39TUNING
15. HARDWARE ASSEMBLY & CONFIGURATION 42
16. MECHANICAL INSTALLATIONS 49
17. ELECTRICAL CONNECTIONS 51
For Size 48X48
For Size 96X96
1. FRONT PANEL LAYOUT 56
2. HARDWARE ASSEMBLY & CONFIGURATION 58
3. 62ELECTRICAL CONNECTIONS

1
FRONT PANEL LAYOUT
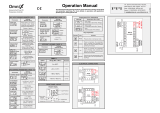
The controller front panel comprises of digital readouts, LED indicators and membrane keys as shown in figure 1.1 below.
READOUTS
The upper readout is a 4 digit, 7-segment bright red LED display and usually displays the PV (Process Value). In parameter
set-up mode, the upper readout displays parameter values.
The lower readout is a 4 digit, 7-segment bright green LED display and while running a PROFILE program displays either the
‘ramping setpoint’ / balance ‘soak time’ or % Output Power. If the controller is operating in fixed setpoint control mode (that is
while not running a profile); the lower readout displays the control Setpoint or % Output Power. In parameter set-up mode, the
lower readout displays prompts for the parameters.
The indications on the upper and lower readouts, in general, depend on the mode of operation and configuration parameters.
Refer respective sections for more details.
INDICATORS
There are five front panel red LED indicators. These indicators show various statuses. The Table 1.1 below lists each LED
indicator (identified by the front panel legend) and the associated status it indicates.
Figure 1.1
Table 1.1
Indicator Function
While a profile program is in progress; flashes if a RAMP segment is in
progress and glows steadily if the ramp is in HOLD state.
R
SWhile a profile program is in progress; flashes if a SOAK segment is in
progress and glows steadily if the soak timer is in HOLD state.
OP1 Indicates Output-1 ON/OFF status.
OP2 Indicates Output-2 ON/OFF status.
OP3 Indicates Output-3 ON/OFF status.
User Manual
neuro 105
Lower Readout
Output-2 Indicator
Output-1 Indicator
PAGE Key
DOWN Key UP Key
ENTER Key
Output-3 Indicator
Soak Indicator
Ramp Indicator
Upper Readout
PPI
OP1 OP2 OP3
S
neuro105
R
Section 1

2
User Manual
neuro 105
KEYS
There are four tactile keys provided on the front panel for configuring the controller, setting-up the parameter values and
selecting operation modes. The Table 1.2 below details the key functions.
Table 1.2
The keys are also assigned various other functions while the controller is in MAIN mode display. The key-functions depend on
the mode of operation (Automatic, Hand or Profile) and are described under the respective operation mode in the next
Chapter.
Symbol Key Function
DOWN
UP
ENTER
PAGE Press to enter or exit set-up mode.
Press to store the set parameter value and to scroll to the next
parameter on the PAGE.
Press to increase the parameter value. Pressing once increases
the value by one count; keeping pressed speeds up the change.
Press to decrease the parameter value. Pressing once decreases
the value by one count; keeping pressed speeds up the change.

3
POWER-UP
Upon switching on the power to the controller, all displays and indicators are lit on for approximately 3 seconds during which
time the controller runs through a self-test sequence. This is followed by the indication of the controller model name on the
upper readout and the firmware version on the lower readout, for approximately 1 second.
The upper readout now displays the measured PV (Process Value) and the lower readout displays the ramp setpoint / balance
soak time if running a profile program or control setpoint if operating in fixed setpoint mode. If in Hand (Manual) mode; the
lower readout displays the last output power set by the user. This is the MAIN display. It is the one that shall be used most often.
MAIN DISPLAY MODES
The controller can be programmed to operate in one of the three modes of operation, viz., Automatic (fixed setpoint), Hand
(Manual) and Profile mode. The modes and the corresponding MAIN displays are described below:
1. Automatic Mode
In this mode, the controller automatically adjusts the % (percentage) output power necessary to maintain the process value
at the control setpoint. The upper readout displays the Process Value. The lower readout can be toggled to display either
the control setpoint or the % output power by pressing ENTER key. That is, if the lower readout is indicating control setpoint,
press ENTER key to select % output power indication and vice-a-versa. The % output power is displayed with the leftmost
digit indicating the following alphabet to distinguish between the control setpoint and the % output power indications.
BASIC OPERATION
Left Most Digit Alphabet
While Showing % Power
What it Means
The alphabet P stands for Power and is indicated if the
controller is operating in Unidirectional control mode,
that is, single control output.
The alphabet H stands for heat and C stands for cool.
This is applicable if the controller is configured to
operate in Bidirectional control mode, that is, dual
control outputs.
P
H or C
The setpoint value on the lower readout can be adjusted directly (if quick adjustment of setpoint is enabled in PAGE- 12) as
explained later.
2. Hand (Manual) Mode
In this mode of operation, the % output power is manually adjustable by the user. The controller maintains the output power
set by the user, regardless of the control setpoint.
Activating Hand Mode and Adjusting Power
The Hand mode can be activated only if it is enabled in PAGE-12 parameter list. If enabled, step through the following
sequence for activating the Hand Mode and adjusting the power.
1. Hold ENTER key depressed for approximately 2 seconds until the lower readout displays % power with the leftmost digit
indicating one of the alphabets P, H or C with a flashing decimal point.
2. Release Enter key. The controller is now placed in Hand mode. The upper readout displays the PV and the lower readout
displays the % output power with the leftmost digit indicating P (Unidirectional control) or H / C (Bidirectional control) with a
flashing decimal point.
User Manual
neuro 105
Section 2

4
Remember that the flashing decimal point on the leftmost digit of the lower readout is an indication of the controller being
operated in Hand (Manual) Mode.
3. Adjust the output power using the UP and DOWN keys. Note that the power adjustment is allowed only within the set Power
Low and Power High limits. For Bidirectional (heat-cool) control, the Power Low and Power High limits are fixed to -100%
(full cooling) and +100% (full heating), respectively.
De-activating Hand Mode Operation
Once the Hand mode is activated, it remains in Hand mode until de-activated. To de-activate the Hand mode and return to the
original mode of operation.
1. Hold the ENTER key depressed for approximately 2 seconds until the flashing decimal point on the leftmost digit turns off.
2. Release Enter key. The Hand mode is now de-activated and the controller resumes its original mode of operation.
Note :
If the Hand mode is active and it is Disabled (in PAGE-12 parameter list), the controller gets locked in Hand Mode with the last set value of the
output power. That is, the Hand mode can not be de-activated (using ENTER key as described above) and also the output power value can
not be altered (using UP/DOWN keys). To de-activate the Hand mode or to alter the output power value, the Hand mode must be Enabled in
the PAGE-12 parameter list.
Effect of Activating Hand Mode While Running A Profile-Program
If the Hand mode is activated while running a profile-program, the controller puts the running profile segment in HOLD state,
that is, the execution of the current segment is suspended until the controller returns back to the Automatic mode upon de-
activating the Hand mode.
Power-Failure in Hand Mode
If the power to the controller is switched-off or a power-failure occurs while the controller is operating in Hand mode; upon
resumption of power, the controller continues to operate in Hand mode with the last user set power value.
Bumpless Transfer
The transfer from Automatic mode to Hand mode or vice-a-versa is Bumpless. That is:
Ÿ While transferring from Automatic mode to Hand mode, the controller maintains its output to the last computed value in the
Automatic mode until adjusted by the user.
Ÿ While transferring from Hand mode to Automatic mode, the controller starts adjusting the output power from the value last
adjusted by the user in the Hand mode.
This bumpless (smooth) transfer prevents any sudden and large changes in output power that can result in process
disturbances.
Note :
The Bumpless transfer is not strictly applied while transferring to and from Hand mode if the controller is running a Profile-program.
3. Profile Mode
The profile mode can be enabled in PAGE-18 parameter list. If enabled, the controller executes the user selected Profile-
Program upon issuing start command. The profiles and profile-programs can be configured / set using the parameters listed in
PAGE-15 through PAGE-18. In the Profile Mode, the controller behavior is same as that in Automatic mode except for the
setpoint that the controller respects for regulating the PV.
If no profile-program is in progress (usually the case, prior to start of a profile-program or after the end of a running profile-
program), the controller maintains the PV at the Control setpoint. If, however, the parameter Output Off (OP.OF) in PAGE-18 is
set to “Yes”, the controller keeps the control output(s) OFF (0% power) and thus the PV is allowed to attain the ambient
temperature.
User Manual
neuro 105

5
If a profile-program is being executed, the controller respects the ramp setpoint and attempts to maintain the PV at the ramp
setpoint. The Ramp Set point value is determined by the profile segment (ramp segment or soak segment) that is in progress.
Profile-Program Status Indications
While the controller is running a profile-program, the following display indications are available.
1. The front panel indicator R and S indicate whether a Ramp or Soak segment is in progress.
If the RAMP segment is in progress; the indicator R flashes or glows steadily depending upon the setpoint is ramping or is in
HOLD state, respectively. The indicator S remains off.
If the SOAK segment is in progress; the indicator S flashes or glows steadily depending upon the soak timer is running or is
in HOLD state, respectively. The indicator S remains off.
2. The Upper Readout displays the measured PV.
The Lower Readout displays either ramping setpoint value (if a ramp segment is in progress) or balance soak-time (if a soak
segment is in progress). Depressing ENTER key toggles the lower readout to % output power indication.
3. Upon holding the DOWN key depressed, the Lower Readout indicates the profile number (as PF.01, PF.02, etc.) and the
Upper Readout indicates the profile-program number (as Pr.01, Pr.02, etc.) that is currently being executed.
Upon holding the UP key depressed, the Lower Readout indicates the current segment number (as rP.1, rP.2, etc. for a
Ramp Segment and SK.1, SK.2, etc. for Soak Segment) of the current profile that is being executed. The Upper Readout
indicates the measured PV.
4. The controller provides the facility to cycle a program for a predetermined numbers of times or indefinitely. The current cycle
number in progress can be viewed in PAGE-0 (if not programmed for indefinite cycling). The lower readout displays the
prompt CYCL while the upper readout shows the current cycle number in progress. This is a view only parameter and thus
can not be altered.
Upon completion of the running profile-program, the upper readout continues to indicate the PV. The lower readout indicates
control setpoint or % output power. Until the next start command is issued, the controller continues to maintain the PV at the
control setpoint. If, however, the parameter Output Off (OP.OF) is set to “Yes”, the controller keeps the control output(s) OFF
(0% power) upon completion of a running profile-program until the next start command is issued.
Selecting a New Profile-Program & Issuing Start Command
A new profile-program can be started after the completion or manual abortion of a running program. If the controller is already
not running a profile-program, step through the following sequence to select and start a new profile-program.
1. Enter PAGE-0 from the MAIN display mode.
2. The lower readout shows PrG.n (Program Number). Use UP/DOWN keys to select the desired profile-program number and
press ENTER key.
3. The lower readout now shows Strt (Start) and the upper readout shows no (No). Use UP key to select YES (Yes) and press
ENTER key to return to the MAIN display. The controller starts executing the selected program.
Skipping the Running Segment / Holding the Program / Aborting A Running Program
The controller allows the user to skip a running profile segment (ramp or soak) and advance to the next segment or forcing the
program into indefinite HOLD start or to abort the execution of a running program.
Step through the following sequence for skipping a segment, forcing the program in hold state or to abort a program execution.
1. While the controller is executing a profile-program; enter PAGE-0 from the MAIN display mode.
User Manual
neuro 105

6
2. The desired operation can be selected on the lower readout by pressing ENTER key. The available operations are Advn
(Advance), HoLd (Hold) and Abrt (Abort).
Skip
While the controller displays Advn ( Advance) on the lower readout and no (No) on the upper readout; press UP key to select
YES (Yes) and then press ENTER key. The controller immediately terminals the execution of the running profile segment
and advances to the next segment.
Hold
While the controller display HoLd (Hold) on the lower readout, the upper readout indicates either YES (Yes) or no (No)
depending on whether the profile-program is already forced into hold state or not. Thus, this command allows the user to
force the program into hold state or to release from the hold state. Select no for releasing and YES for entering the hold
state and press ENTER key.
Note that the HOLD state enforced by user is automatically released if the power to the controller is switched off and on.
That is, the HOLD state, if enabled, is not stored in the controller memory and upon power-up the controller assumes the
default RUN state.
Abort
While the controller displays Abrt (Abort) on the lower readout and no (No) on the upper readout; press UP key to select YES
(Yes) and then press ENTER key. The controller immediately terminates the execution of the running profile-program.
3. Press PAGE key to return to the MAIN display mode after completing the desired operation(s).
(For more details on the profile programs and the associated operating terms, refer Section 13 : Setpoint Profiles & Profile-
Programs of this manual)
PV ERROR INDICATIONS
In case of PV exceeding the minimum or maximum range specified for the selected input type or in case of input sensor
(thermocouple / RTD) open / broken; the upper readout flashes the error messages as listed in Table 2.1
Error Message
(Upper Readout) Error Condition Cause
Process Value exceeds maximum input range.
Over-range
Or
Process Value exceeds minimum input range.
Under-range
Ur
The input sensor is open or broken.
OpenOpen
Table 2.1
User Manual
neuro 105
Notes :
1. Under PV Error condition, the control signal is held at the minimum level, that is, OFF.
2. For DC Linear inputs, under the input open condition, the upper readout displays value corresponding to 0 (Zero) level signal. For
example, consider 4-20mA input signal scaled to display 0.0 to 100.0. The upper readout then shows approximately -25.0 (corresponding
to 0 mA) upon input open.
3. In case of 3-wire RTD sensor input, if the compensating lead (connected at rear panel terminal number 3) is not connected or gets open,
the controller does not indicate PV error but the measured value is not compensated for the lead resistance.

7
QUICK ADJUSTMENT OF THE CONTROL SETPOINT
Except in the case of Hand mode or Profile mode operation; the control setpoint is quickly adjustable in the lower readout if the
quick setting mode is enabled in PAGE-12 parameter list. If enabled, step through the following sequence to adjust the control
setpoint:
1. If the lower readout is indicating % output power, depress ENTER key to select the control setpoint indication.
2. Press and release UP and DOWN key once. The lower readout starts flashing.
3. Press UP/DOWN keys to adjust the setpoint value. Pressing UP and DOWN key once changes the value by one count;
holding the key pressed speeds up the rate of change. The lower readout stops flashing as long as the UP or DOWN key is
pressed for adjustment to avoid any obstructions in viewing.
4. Press ENTER key once to register and store the altered value. The lower readout stops flashing.
5. Repeat steps 1 through 4 each time the setpoint value is to be modified.
Note :
The control setpoint is also available in PAGE-10 parameter list for adjustment. If the control setpoint needs to be adjusted while operating in
Profile mode or when the quick adjustment mode is disabled, access to PAGE-10 for the adjustment of the control setpoint.
User Manual
neuro 105

8
The controller requires various user settings that determine how the controller will function or operate. These settings are
called Parameters.
The PPI neuro series controllers are packed with various advanced features and as such require many user settable
parameters to activate the features. For the convenience and ease of operation, the various parameters have been grouped
separately depending upon the functions they define. Each such group is called a PAGE that is assigned a unique PAGE
NUMBER for its access. Each PAGE presents a specified list of parameters, in a fixed sequence, to the user for setting. The
user can access to a desired PAGE by entering its PAGE NUMBER and can select and set the desired parameter values.
PARAMETER PROMPTS
Each parameter has an identifying tag, called the parameter Prompt. While setting parameter values in a PAGE, the
parameter prompt is always displayed in the lower readout and its current value is displayed in the upper readout.
ACCESSING A PAGE
Each PAGE is accessible only from the MAIN display. That is, from the current PAGE, you must return to the Base display
before the other PAGE can be accessed.
To have an access to a PAGE from MAIN display, depress PAGE key. The lower readout shows PAGE and the upper readout
shows 0. Adjust the upper readout to the desired PAGE NUMBER using the UP/DOWN keys. Pressing the UP and DOWN key
once, changes the value by one count. Holding the key pressed speeds up the rate of change.
Upon adjusting the upper readout to the desired PAGE NUMBER, press ENTER key. The lower readout shows the prompt for
the first parameter listed in that PAGE and the upper readout shows its current value.
Note :
If the entered PAGE NUMBER is invalid (contains no parameter list or any associated function), the controller opens PAGE-10 as default but
without the facility of adjustments. That is, the PAGE-10 parameter list is presented for view only.
PAGES AND PARAMETERS
LOCKING/UNLOCKING PARAMETER ADJUSTMENTS
Though access to any PAGE is always permitted, the adjustments of the parameter values, however, can be locked at the
supervisory level. If the lock is enabled, the parameter values in each PAGE (except PAGE-0) can only be viewed but can not
be adjusted. That is, the UP / DOWN key operation is inhibited. This feature facilitates the supervisory level to protect the
parameter values from unauthorized tampering or accidental alterations by the operator.
The controller is shipped from the factory in Unlocked (Lock disabled) condition. The user can enable the lock once the initial
configuration and installation is done. For enabling the lock, step through the following sequence:
1. Depress PAGE key from the MAIN display.
2. The lower readout shows PAGE and the upper readout shows 0. Adjust the upper readout to PAGE NUMBER 123 and
press ENTER key.
3. The controller returns to the MAIN display with the LOCK enabled.
Note :
Since there is no front panel indication for the ‘Lock Enabled’ condition, ensure that the lock is enabled by trying to adjust the parameters in
any valid PAGE.
For disabling the LOCK (Unlocking), step through the following sequence:
1. Depress PAGE key from the MAIN display.
2. The lower readout shows PAGE and the upper readout shows 0. Adjust the upper readout to PAGE NUMBER 123 and
press ENTER key.
User Manual
neuro 105
Section 3

9
Notes :
1. If the quick adjustment mode for the control setpoint is enabled in PAGE-12 parameter list, the setpoint can be adjusted in the lower
readout even under LOCK condition. The supervisory level, thus, can allow or disallow the setpoint adjustment to the operator by
enabling or disabling the quick adjustment mode prior to locking
2. If Profile mode is enabled, the PAGE-0 (Profile / Program ‘Operating Commands’) are available even under LOCK condition.
3. If the Hand mode is enabled in PAGE-12 parameter list, the Hand mode activation and subsequent adjustment of the output power in the
lower readout is available even under LOCK condition. The supervisory level, thus, can allow or disallow the Hand mode operation to the
operator by enabling or disabling the Hand mode prior to Locking.
4. The ‘return to the default factory set values’ facility by accessing PAGE-99 is also inhibited (locked) when the LOCK is enabled.
Accessing PAGE-7 shall be treated as an invalid PAGE NUMBER.
5. Remember, it requires entering PAGE NUMBER 123 once for LOCKING but twice for UNLOCKING. Also, for UNLOCKING, the PAGE
NUMBER 123 must be entered twice during the same duration for which the controller is powered. That is entering the PAGE NUMBER
123 once prior to power loss and once after resumption of power shall not UNLOCK.
6. Do not forget to enable the LOCK again if it was UNLOCKED for some parameter value alteration.
ADJUSTING PARAMETER VALUES
Once a PAGE is accessed, step through the following sequence to adjust the values of the desired parameter(s):
1. Press and release the ENTER key until the prompt for the required parameter appears in the lower readout. The last
parameter in the list rolls back to the first parameter.
2. Use UP and DOWN keys to adjust the parameter value.
Note that some parameters (examples; Alarm Setpoint, Proportional Band, etc.) have numeric values while others
(examples; Alarm Logic, Control Mode, etc.) have a series of options. If adjusting a numeric value; depressing the UP /
DOWN key once, increases/decreases the parameter value by one digit. For parameters having a series of options,
depressing the UP/DOWN key once takes you to the next/previous option. In each case, keeping the UP/DOWN key
pressed speeds up the rate. If the value reaches the maximum / minimum settable value/option, the upper readout flashes
and the UP (if maximum value is reached) or DOWN (if minimum value is reached) key has no effect.
3. Press ENTER key. The new value gets stored in the controller’s non-volatile memory and the next parameter in the list is
displayed.
4. For returning to the MAIN display, press PAGE key.
Note :
It is a must to press the ENTER key after altering the value of a parameter else the new value will not be registered / stored. That is, a return to
the MAIN display (by depressing PAGE key) without pressing the ENTER key will not store the altered value in the controller memory and the
previous set value will be retained.
User Manual
neuro 105
3. The controller returns to the MAIN display.
4. Repeat steps 1 and 2. This time the controller returns to the MAIN display with the LOCK disabled (open).
TIME-OUT REVERT TO MAIN DISPLAY
While the controller is in set-up mode; If there are no key operations (that is, if none of the 4 front panel keys is pressed) for 60
seconds, the controller automatically reverts to the MAIN display mode.

10
User Manual
neuro 105
CONDITIONAL PARAMETERS
As discussed above the various parameters (user set values) are grouped and listed in separate PAGES. For convenience,
each PAGE contains a list of parameters that relate to some specific functions or operations.
Note, however, that not all parameters are always presented to the user. Some parameters are presented only if the
corresponding function or operation mode is selected. Such parameters are called the Conditional parameters, as their
availability is dependent on the options selected for some other parameters (in the same or other PAGE). For example,
consider the parameter Hysteresis (dead band) contained in PAGE-10 parameter list. This parameter is presented only if the
controller is set to operate in On-Off control by setting the Proportional Band parameter value to 0.
Suppressing the conditional parameters (if the conditions are not met) avoids ambiguity and makes the parameter list more
comprehensive. Refer the notes below each parameter table (listed in the following 6 sections) for the conditional parameters.
Also note that the parameters appear in the same sequence as shown in the table for each PAGE.

11
PAGE-10 presents the list of parameters that define the constants required by a particular control algorithm for the purpose of
computing and outputting the control signals. The Table 4.1 below lists these parameters followed by the definitions for each
parameter.
CONTROL PARAMETERS
Table 4.1
Parameter Description Settings
(Default Value)
Setpoint Low to
Setpoint High
(Default : 0)
0 to 9999
(Default : 50)
1 to 250
(Default : 2)
0 to 1000
(Default : 100)
User Manual
neuro 105
Section 4
This is the Setpoint value that the controller respects for the
control purpose while it is not running a profile or not in standby /
tuning mode.
CONTROL SETPOINT
PROPORTIONAL BAND
Sets proportional gain (% power per unit error). Defined in same
units and resolution as that for PV.
INTEGRAL TIME
Sets integral time constant in seconds. Setting the value to 0, cuts-
off the integral action.
HYSTERESIS
Sets differential (dead) band between On-Off switching for OP1.
0 to 250
(Default : 25)
0.5 to 120.0
(Default : 20.0)
(Default : 1.0)
0.1 to 10.0
DERIVATIVE TIME
Sets derivative time constant in seconds. Setting the value to 0,
cuts-off the derivative action.
CYCLE TIME
Sets the total ‘On + Off’ time in seconds for time proportional
power output through OP1 Relay / SSR.
RELATIVE COOL GAIN
Sets the ratio of cooling power to the heating power.

12
Parameter Description Settings
(Default Value)
0.5 to 120.0
(Default : 20.0)
This parameter, expressed in %, defines the minimum output
power that the controller will always maintain no matter what the
control algorithm demands. This parameter is mainly used to limit
the minimum closing of the actuators like valves. For most
applications this value is set to 0% (default value). This parameter
value must be less than the Power High Limit.
POWER LOW LIMIT
0 to less than
Power High
(Default : 0)
POWER HIGH LIMIT
This parameter, expressed in %, defines the maximum output
power that will not be exceeded no matter what the control
algorithm demands. This parameter is mainly used to limit the
maximum opening of the actuators like valves. For most
applications this value is set to 100% (default value). This
parameter value must be greater than the Power Low Limit.
Greater than
Power Low to 100
(Default : 100)
Notes :
1. This parameter could also be adjusted on lower readout if quick adjustment is enabled in PAGE-12 parameter list.
2. Available only if the Proportional Band value is set to 0 for On-Off control. Not Applicable for heat-cool PID control.
3. Available only if the proportional Band value is non-zero (PID control).
4. Available only if the control output (OP1) is Relay or SSR (refer PAGE-12 parameter list). In case of On-Off control, this parameter is not
functional but provided for Hand mode operation.
5. Available only if output-2 (OP2) is configured as Cool Control output in PAGE-15 parameter list.
6. Available only if output-2 (OP2) is configured as Cool Control output and the output type is configured for Relay or SSR drive in PAGE-15
parameter list.
7. These parameter values are not applicable for On-Off control with relay/SSR as control output or if the controller is configured for heat-
cool PID (refer PAGE-12 and PAGE-15 parameter lists).
8. Default values are the factory set values. Also, all the parameters can be set to their factory set values by accessing PAGE-99 and
pressing ENTER key. The controller resets and restarts with factory set values.
9. Refer PAGE-12 parameter list for definitions of Setpoint Low and Setpoint High parameters.
Cycle Time Note :
Even though very large Cycle Time values affect the control accuracy by inducing oscillations of the measured PV around control setpoint, in
many applications it is unavoidable. In case, higher value for Cycle Time must be used (when switching very high current loads), it is
recommended to decrease the Proportional Band value in small steps until satisfactory control accuracy is obtained. Allow enough time
between each step change of the Proportional Band for the control loop to stabilize.
Reducing Proportional Band value reduces the amplitude of the PV oscillations but marginally increases the frequency of oscillations. Thus,
do not reduce the Proportional Band too much. A reduction up to half the self-tuned value is suggested.
User Manual
neuro 105
COOL CYCLE TIME
Sets the On + Off cycle time in seconds for time proportional
power output through OP2 Relay / SSR.

13
PAGE-11 presents the Alarm related parameter list. The controller is provided with 2 independent “Soft” alarms, that is, the
alarms can be set and generated even if the corresponding output modules are not fitted or assigned to other function. The
alarm statuses are also available via digital communication, if the communication module is fitted.
If output modules (OP-2 for Alarm-1 and OP-3 for Alarm-2) are fitted and assigned to alarm functions, the relay (or SSR)
energizes / de-energizes based on the set values for the alarm parameters.
The Table 5.1 lists the various alarm-related parameters followed by the definitions for each parameter.
ALARM PARAMETERS
Table 5.1
Parameter Description Settings
(Default Value)
Throughout the range
for the selected input type
(Default : 0)
-999 to 999
(Default : 0)
3 to 999
(Default : 3)
User Manual
neuro 105
Section 5
(Default : None)
None
Process low
Process high
Deviation Band
Window Band
End of Profile
ALARM-1 TYPE
Select the Alarm-1 activation type. Selecting ‘None’ will disable
the alarm and suppress all the related parameters for Alarm-1.
ALARM-1 SETPOINT
Sets Alarm limit independent of control setpoint.
ALARM-1 DEVIATION BAND
Sets positive or negative deviation (offset) limit from control
setpoint for High or Low Alarm-1 activation, respectively.
ALARM-1 WINDOW BAND
Sets symmetrical positive and negative deviation (offset) limits
from control setpoint for both High and Low Alarm-1 activation.
1 to 999
(Default : 2)
ALARM-1 HYSTERESIS
Sets differential (dead) band between Alarm-1 switching ON and
OFF states.
(Default : Direct)
Direct
Reverse
ALARM-1 LOGIC
Set to Yes to suppress Alarm-1 activation upon power-up or
process start-up.

14
User Manual
neuro 105
Parameter Description Settings
(Default Value)
ALARM-2 TYPE
ALARM-2 SETPOINT
ALARM-2 DEVIATION BAND
ALARM-2 WINDOW BAND
No
Yes
(Default : No)
ALARM-1 INHIBIT
Set to Yes to suppress Alarm-1 activation upon power-up or
process start-up.
ALARM-2 HYSTERESIS
ALARM-2 LOGIC
ALARM-2 INHIBIT
The Parameter description & settings are the same as that for Alarm-1.
Table 5.2
Setting
option
(Upper Readout)
Alarm Type Alarm Function
None
Process low
Process high
Disables Alarm.
The alarm is activated when the PV equals or falls below the ‘Alarm
Setpoint’ value. The alarm is de-activated when the PV returns
above the set value.
The alarm is activated when the PV equals or exceeds the ‘Alarm
Setpoint’ value. The alarm is de-activated when the PV falls below
the set value.
Deviation Band
This alarm type is applied with respect to the control setpoint. The
deviation limit can be set above (positive value) or below (negative
value) the control setpoint.
The alarm is activated when the PV deviation from the control
setpoint exceeds the set deviation limit.
Window Band
This alarm type is applied with respect to the control setpoint. The
band is centered at the control setpoint, defining both positive and
negative limits.
The alarm is activated when the PV falls outside the band.
End of Profile The alarm is activated for 10 seconds after the last segment of the
profile is executed indicating the end of the current profile cycle.

15
ABSOLUTE AND RELATIVE ALARM
The Process Low and the Process High alarms are known as Absolute alarms as these have set values (Alarm Setpoint) that
are independent of the control setpoint. On the other hand, the Deviation and the Window Band alarms are known as Relative
alarms as these are always referenced to the control setpoint. This means that the absolute alarms may need re-setting as the
control setpoint is altered. However, the relative alarms may not require re-setting if the desired deviation limits are the same
regardless of the actual value of the control setpoint.
ALARM STATUS UNDER PV ERROR CONDITIONS
The alarm status under PV error conditions depend upon the type of the PV error and the alarm type, as described below :
Ÿ Under-range
Since this error occurs when the PV falls below the minimum range specified for an input type, the alarm signals are
generated by comparing the set alarm limits with the minimum range value. This means that the alarm gets activated if the
set alarm type is either Process Low or Negative Deviation or Band.
Ÿ Over-range
Since this error occurs when the PV exceeds the maximum range specified for an input type, the alarm signals are
generated by comparing the set alarm limits with the maximum range value. This means that the alarm gets activated if the
set alarm type is either Process High or Positive Deviation or Band.
Ÿ Open (Input Sensor Open or Broken)
For thermocouple and RTD Pt100, the input sensor open error is treated as Over-range. However, for DC Linear inputs
(mV/V/mA), the input sensor open error is treated as Under-range (as the measured PV under input open condition
corresponds to the 0 level signal).
The Table 5.3 below summarizes the alarm status under various PV error conditions. The alarm ON status means the alarm is
activated and OFF means the alarm is not activated.
User Manual
neuro 105
Table 5.3
PV ERROR TYPE ALARM TYPE ALARM STATUS
Under-range
or Open
(DC Linear input)
Over-range
or Open
(Thermocouple or
RTD Pt100 input)
Process Low
Process High
Negative Deviation
Positive Deviation
Band
ON
OFF
ON
ON
OFF
Process Low
Process High
Negative Deviation
Positive Deviation
Band
ON
ON
ON
OFF
OFF

16
User Manual
neuro 105
Notes :
1. Available only if the Alarm type is Process-Low or Process-High.
2. Available only if the Alarm type is Deviation.
3. Available only if the Alarm type is Band.
4. Not available if Alarm type is End of Profile (EOP).
5. Default values are the factory set values. Also, all the parameters can be set to their factory set values by accessing page 99 and pressing
ENTER key. The controller resets and restarts with factory set values.

17
PAGE-12 parameter list allows the user to configure the controller to match with the available input sensor and the load drive. It
also presents the parameters for conditioning the input sensor signal and to exercise the supervisory control over the operator
level.
The Table 6.1 below lists the Input / Output parameters.
CONFIGURATION PARAMETERS
Parameter Description Settings
(Default Value)
This parameter allows the user to enable (permit) or disable
(restrict) the activation of the Hand mode operation from the Base
display. This is a supervisory control parameter.
HAND (MANUAL) MODE ENABLE/DISABLE
Enable
Disable
(Default : Disable)
This parameter allows the user to enable (permit) or disable
(restrict) the adjustment of the control setpoint on the lower
readout in MAIN display. This parameter facilitates supervisory
control over the operator level.
QUICK ADJUSTMENT OF
SETPOINT ENABLE/DISABLE
Table 6.1
User Manual
neuro 105
Enable
Disable
(Default : Enable)
Refer Table 6.3
(Default : Type K)
Refer Table 6.2
(Default : Relay)
Section 6
INPUT TYPE
Select Input type in accordance with the type of Thermocouple or
RTD, sensor or transducer output connected for process value
measurement. Ensure proper hardware jumper settings, if
required.
CONTROL OUTPUT (OP1) TYPE
Select the output type in accordance with the hardware
configuration for Output-1 (OP1).
RESOLUTION FOR PV
(Not Available for Thermocouple Inputs)
Sets the process value indication resolution (decimal point). All
the resolution based parameters (control setpoint, hysteresis,
alarm setpoints etc.) then follow this resolution setting.
Refer Table 6.3 for the available
max/min Ranges & Resolution for
each input type.
(Default : 1)
RANGE LOW FOR PV
Sets process value corresponding to minimum DC Linear signal
input (e.g., 0V, 0mA, 4mA, etc.)
(Default : 0)
Same as above

18
(Default : -200)
Same as above
(Default : 1300)
Same as above
(Default : 0)
-1999 to 9999
SETPOINT LOW
Sets minimum permissible control setpoint value.
OFFSET FOR PV
This value is algebraically added to the measured PV to derive the
final PV that is displayed and compared for alarm / control.
Final PV = Measured PV + Offset
SETPOINT HIGH
Sets maximum permissible control setpoint value.
User Manual
neuro 105
Parameter Description Settings
(Default Value)
Refer Table 6.3 for the available
max/min Ranges & Resolution for
each input type.
(Default : 1000)
PV RANGE HIGH
Sets process value corresponding to maximum DC Linear signal
input (e.g., 5V, 10V, 20mA, etc.)
DIGITAL FILTER FOR PV
Sets the time constant, in seconds, for the low-pass digital filter
applied to the measured PV. The filter helps smoothing/averaging
the signal input and removing the undesired noise.
0.5 to 25.0
(Default : 1.0)
Table 6.2
Option What it Means
Electromechanical Relay contacts
DC Voltage pulses for driving external Solid State Relay (SSR)
0 to 20 mA DC Current
4 to 20 mA DC Current
Control Output Type - Table6.2 shows below.
/