PPI Omni 48 User manual

Type
User manual

PPI Omni 48, your newly acquired temperature controller, offers precise temperature control for a wide range of industrial applications. With its self-tuning PID algorithm, it efficiently maintains the desired temperature by analyzing the process dynamics and adjusting its control actions accordingly. Omni 48 accepts inputs from thermocouples (J and K types) and Pt100 RTD sensors, making it compatible with various temperature measurement devices.

PPI Omni 48, your newly acquired temperature controller, offers precise temperature control for a wide range of industrial applications. With its self-tuning PID algorithm, it efficiently maintains the desired temperature by analyzing the process dynamics and adjusting its control actions accordingly. Omni 48 accepts inputs from thermocouples (J and K types) and Pt100 RTD sensors, making it compatible with various temperature measurement devices.

Economic Self-Tune PID
Temperature Controller
User Manual
Omni
Omni
48
Omni
96
1
2
3
4
5
6
7
8
9
10
11
12
85 ~ 265 V
AC SUPPLY
72X72
Omni
72
CONTENTS
User Manual
OmniX
1. PANEL MOUNTING & ELECTRICAL CONNECTIONS 1
2. FRONT PANEL : LAYOUT AND OPERATION 3
3. SET UP MODE : ACCESS AND OPERATION 5
4. INPUT/OUTPUT CONFIGURATION PARAMETERS : PAGE-12 7
5. CONTROL PARAMETERS : PAGE-10 9
6. SUPERVISORY PARAMETERS : PAGE-13 11
7. OPERATOR PARAMETER : PAGE-0 12
1
Figure 1.1
PANEL CUTOUTS
WARNING
M I S H A N D L I N G / N E G L I G E N C E C A N
R E S U LT I N P E R S O N A L D E AT H O R
SERIOUS INJURY.
Section 1
PANEL MOUNTING
Follow the steps below for mounting the controller on panel:
1. Prepare a square cutout to the size shown in Figure 1.1 depending on the model (OmniX48, OmniX72, OmniX96).
2. Remove the Panel Mounting Clamp from the controller Enclosure.
3. Insert the rear of the controller housing through the panel cutout from the front of the mounting panel.
4. Hold the controller gently against the mounting panel such that it positions squarely against the panel wall.
5. Slide the mounting clamp forward until it is firmly in contact with the rear face of the mounting panel and the tongues of the
clamp engage in the ratchets on the controller enclosure. Ensure that the clamp springs push firmly against the rear face of
the mounting panel for secured mounting.
ELECTRICAL CONNECTIONS
Observe the followings while making electrical connections.
1. Run power supply cables separated from Thermocouple / RTD cables.
2. Use appropriate fuses and switches, wherever necessary, for driving the high voltage loads.
3. Do not over-tighten the terminal screws while making connections.
4. Switch-off the controller supply while making / removing any connections .
The Electrical Connection Diagram is shown on the Right Side of the controller enclosure. The diagram shows the terminals
viewed from the REAR SIDE with the controller label upright. The terminal numbers are also embossed on the rear side of the
controller. Refer Figure 1.2 (a) for model OmniX48, Figure 1.2 (b) for model OmniX72 and Figure 1.2 (c) for model OmniX96.
User Manual
OmniX
PANEL MOUNTING AND ELECTRICAL CONNECTIONS
Panel Cutout
45 X 45 mm
-0, +0.5 mm
48
Omni
Panel Cutout
68 X 68 mm
-0, +0.5 mm
72
Omni
Panel Cutout
92 X 92 mm
-0, +0.5 mm
96
Omni
Figure 1.2(a) Figure 1.2(b) Figure 1.2(c)
C NCNO
85~265
VAC
CONTROL
OUTPUT
INPUT
SSR
T/C
Pt100
N
L
RELAY
CONTROL
OUTPUT
5
1
2
3
4
6
7
8
9
10
Omni
85 ~ 265 V
AC SUPPLY
RELAY
1
2
3
4
5
6
7
8
9
10
11
12
NCCNO
+
-
SSR
T/C
Pt100
+
-
INPUT
N
L
CONTROL
OUTPUT
CONTROL
OUTPUT
Omni 72
T/C
Pt100
INPUT
RELAY NO NCC
13
14
15
16
17
12
18
11
9
10
8
6
7
1
3
2
4
5
85 ~ 265 V
AC SUPPLY
L N
+
-
SSR
CONTROL
OUTPUT
CONTROL
OUTPUT
Omni 96
2
INPUT (Terminals 1, 2 and 3)
The controller accepts Thermocouples (J & K Type) and RTD Pt100. Connect Thermocouple or RTD Pt100 as described
below.
Thermocouple
Connect Thermocouple Positive (+) to terminal 1 and Negative (-) to terminal 2 as shown in Figure 1.3
(a). Use correct type of extension lead wires or compensating cable. Avoid joints in the cable.
RTD Pt100, 3-wire
Connect single leaded end of RTD bulb to terminal 1 and the double leaded ends to terminal 2 and 3
(interchangeable) as shown in Figure 1.3 (b). Use copper conductor leads of very low resistance for
RTD connections. Ensure that all 3 leads are of the same gauge and length. Avoid joints in the cable.
3
2
1
Figure 1.3(a)
3
2
1
Figure 1.3(b)
OUTPUT
The Controller is supplied with both Relay contacts and SSR Drive Voltage outputs on separate terminals. Use output type in
accordance with the value set for the parameter ‘Control Output Type’ on Page-12.
The Terminals for Relay and SSR output (for all 3 models) are shown in the Figures 1.4 (a) & 1.4 (b), respectively.
User Manual
OmniX
N/O (Normally Open), C (Common), N/C (Normally Closed) contacts are potential-free and are rated 10A/240 VAC (resistive
load).
SSR Drive Voltage
Connect Terminal marked (+) to positive SSR Terminal and Terminal marked (-) to negative SSR Terminal.
POWER SUPPLY
Figure 1.4(a)
4
5
5
6
8
9
Figure 1.4(b)
Figure 1.5
9
10
10
11
17
18
L
N
L
N
L
N
The controller accepts single phase, 50/60 Hz Line Voltage ranging from 85 to 264 VAC. Use well-insulated copper conductor
2
wire of the size not smaller than 0.5 mm . Connect Line Voltage as shown in Figure 1.5.
Relay
8
N/C
7
C
6
N/O
9
N/C
8
C
7
N/O
12
N/C
11
C
10
N/O
48
Omni
72
Omni
96
Omni
48
Omni
72
Omni
96
Omni
48
Omni
72
Omni
96
Omni
3
POWER UP
Upon switching on the power to the controller, all displays and indicators are lit on for approximately 3 seconds. This is followed
by the indication of the model name on the Lower Readout and on Upper Readout.
FRONT PANEL : LAYOUT AND OPERATION
Figure 2.1
READOUTS
The Upper Readout is a 4 digit, 7-segment bright red LED display and usually displays the Measured Temperature. In Set-up
Mode, the Upper Readout displays parameter values/options.
The Lower Readout is a 4 digit, 7-segment bright green LED display and usually displays SP (Control Setpoint) or % Output
Power. In Set-up Mode, the Lower Readout displays prompts for the parameters.
INDICATOR
The Front panel Indicator OP shows the ON/OFF status of the control output (Relay/SSR).
KEYS
There are four tactile keys provided on the front panel for configuring the controller and setting-up the parameter values. The
Table 2.1 lists each key (identified by the front panel symbol) and the associated function.
User Manual
OmniX
Table 2.1
Section 2
Function
Symbol Key
DOWN
UP
PAGE
ENTER
Press to enter / exit Set-up mode.
Press to increase the parameter value. Pressing once
increases the value by one count; holding the key pressed
speeds up the change.
Press to decrease the parameter value. Pressing once
decreases the value by one count; holding the key pressed
speeds up the change.
Press to store the set parameter value and to scroll to the next
parameter.
PPI
OP
Upper Readout
Lower Readout
ENTER Key
UP Key
DOWN Key
PAGE Key
Output status
Indicator
Omni 48
4
MAIN DISPLAY
After the Power-up display sequence, the Controller enters MAIN Display Mode. The Upper Readout shows the measured PV
(Process Value) and the Lower Readout displays the SP (Control Setpoint). The MAIN Display Mode is the one that shall be
used most often.
If the controller is configured to operate in PID Control Mode; the Lower Readout can be toggled to indicate either SP or %
Output Power using the ENTER Key. The default Lower Readout upon Power-up is SP. While indicating % Power, the left most
digit indicates P and remaining digits indicate power value.
ADJUSTING SP
The SP value can be directly adjusted on the Lower Readout while the controller is in the MAIN Display Mode and the Lower
readout is showing SP value. Step through the following sequence to adjust the SP value:
1. Press and release UP/DOWN key once. The Lower Readout starts flashing.
2. Use UP/DOWN keys to adjust the SP value.
3. Press and release ENTER key. The Lower Readout stops flashing and the set value is registered and stored in the
controller’s non-volatile memory.
Table 2.2
Over-range
(Temperature above Max. Range)
PV Error Type
Under-range
(Temperature below Min. Range)
Open
(Sensor open / broken)
Message
Figure 2.3
User Manual
OmniX
TEMPERATURE ERROR INDICATION
In case the Temperature falls below the Minimum Range or rises above the Maximum Range specified for the selected ‘Input
Type’ or in case the input sensor is open / broken; the Upper Readout flashes the error messages listed in Table 2.2 below. The
Figure 2.3 illustrates an open sensor condition.
PPI
OP
Omni 48
Figure 2.2
Press ENTER key
to store the
new SP Value
Adjust value on
Lower Readout using
UP/DOWN keys
or
MAIN Display
Mode
New SP
Value
MAIN Display
Mode
Measured Temperature
SetPoint (SP)
TUNE INDICATION (Applicable for PID Control Only)
Upon issuing ‘Self Tune Command’, the controller starts tuning itself to the process under control.
While the controller is busy in Tuning itself to the process, the Lower Readout flashes the message
“Tune”, as shown in figure 2.4 below. The user is advised not to disturb the process or alter any
parameter values while the “Tune” message is being flashed. The “Tune” message automatically
disappears upon completion of Tuning procedure and the controller reverts to MAIN Display Mode.
Figure 2.4
PPI
OP
Omni 48
5
The controller requires various user settings that determine how the controller will function or operate. These settings are
called Parameters.
For the convenience and ease of operation, the various parameters have been grouped separately depending upon the
functions they define. Each such group is called a PAGE. Each PAGE is assigned a unique number, called PAGE NUMBER,
for its access. The parameters contained in a PAGE are presented in a fixed sequence to the user for setting. The user can
access a desired PAGE by entering its PAGE NUMBER and can select and set the desired parameter values.
PARAMETER PROMPTS
Each parameter has an identifying tag, called the Parameter Prompt. While setting parameter values in a PAGE, the
parameter prompt is always displayed on the Lower Readout and its current value is displayed on the Upper Readout.
ACCESSING A PAGE
Each PAGE is accessible only from the MAIN Display Mode. That is, from the current PAGE, the user must return to the MAIN
Display Mode before the other PAGE can be accessed.
Figure 3.1 illustrates access to the desired PAGE from MAIN Display Mode.
Figure 3.1
User Manual
OmniX
SET-UP MODE : ACCESS AND OPERATION
Section 3
MAIN Display
Mode
Press PAGE
key to enter
Set-up mode
Press ENTER
key to open
the Page
Use UP/DOWN
keys to set
Page Number
or
Default Page Page Number
First Parameter
on PAGE-12
ADJUSTING PARAMETER VALUES
For accessing and adjusting the parameter, one must first open the PAGE containing the parameter.
Figure 3.2 illustrates how to access the desired parameter(s) and adjust the corresponding value(s). The example shows
accessing the parameter ‘Control Logic’ and changing its value from ‘Reverse’ to ‘Direct’. Press PAGE key to revert to MAIN
Mode.
Figure 3.2
First Parameter
on PAGE-12
Keep pressing
ENTER Key to select
desired parameter
Use UP/DOWN
keys to set the
value to dir Logic
Press ENTER key
to store the value &
move to next parameter
Next Parameter
on PAGE-12
Next Parameter
on PAGE-12
New Parameter
value
or
6
User Manual
OmniX
PARAMETER LOCKING
For protecting the parameter values from unauthorized / accidental alterations, the parameter adjustments can be Locked.
The Operator Page is not affected by locking.
Locking
Follow the steps below to apply Locking when the controller is unlocked.
1. Press and release PAGE key while the controller is in the MAIN Display Mode. The Lower Readout shows PAGE and the
Upper Readout shows 0.
2. Use UP / DOWN keys to set the Page Number to 123 on the Upper Readout.
3. Press and release ENTER key. The controller returns to the MAIN Display Mode with the Lock enabled.
The Figure 3.3 illustrates the steps for Locking.
Figure 3.3
SETTING DEFAULT VALUES
The controller is shipped from the factory with all the parameters set to their default values. Refer Figure 3.4 above for
regaining the factory default values.
Un-Locking
For Un-Locking, repeat the sequence of steps shown in figure 3.3 twice.
Press PAGE
key to enter
Set-up mode
Use UP/DOWN
keys to set the
‘Locking’ Code
Press ENTER key
to Lock & Return to
MAIN Mode
MAIN Mode
MAIN Mode
Default Page Locking Code
or
Figure 3.4
Press ENTER key.
Controller resets and restarts
with default parameter values
Press PAGE
key to enter
Set-up Mode
Use UP/DOWN
keys to set the
‘Default’ Code
MAIN Mode
MAIN Mode
Default Page Default Code
or
7
Parameter Description
Settings
(Default Value)
(Default : Type K)
Reverse
Direct
(Default : )Reverse
SETPOINT LOW
Sets minimum permissible control setpoint value.
Min. Range to Setpoint High
for the selected Input type
(Default : Min. Range for the
)Selected Input Type
SETPOINT HIGH
Sets maximum permissible control setpoint value.
Setpoint Low to ax. RangeM
for the selected Input type
(Default : Max. Range for the
)Selected Input Type
DIGITAL FILTER
This value determines the averaging rate of measured
temperature and thus helps removing undesired fast changes in
the measured temperature. The higher the value the better the
averaging but the slower the response to actual changes. The
default value, 1.0 Second, is appropriate in most cases.
0.5 to 25.0 Seconds
(in steps of 0.5 Seconds)
(Default : 1.0)
OFFSET FOR MEASURED TEMPERATURE
This value is algebraically added to the measured Temperature to
derive the final temperature that is displayed and compared for
alarm / control.
Final Temperature = Measured Temperature + Offset
-1999 to 9999 or
-199.9 to 999.9
(Default : 0)
INPUT / OUTPUT CONFIGURATION PARAMETERS : PAGE-12
Table 4.1
User Manual
OmniX
Section 4
Refer Table 4.1 for the parameter descriptions and settings.
CONTROL OUTPUT TYPE
Select the output type in accordance with the control output used.
(Default : )Relay
Relay
SSR
Refer Table 4.2 for various
available 'Input Types' along
with their respective Ranges
and Resolutions.
INPUT TYPE
Select Input type in accordance with the type of sensor
(Ther m o c o u p le or RT D) connecte d f o r temperatur e
measurement.
CONTROL LOGIC
Reverse
Heating Control (Output Power decreases with increase in
Temperature).
Direct
Cooling Control (Output Power increases with increase in
Temperature).
8
User Manual
OmniX
(Min to Max)
Range
3-wire, RTD Pt100
3-wire, RTD Pt100
-199 to +600°C
-199.9 to +600.0°C
Resolution
Option What it means
1°C
Type J Thermocouple
Type K Thermocouple
0 to +960°C
-200 to +1375°C 1°C
1°C
0.1°C
Table 4.2
9
User Manual
OmniX
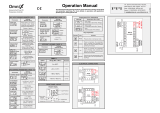
Refer Table 5.1 for the parameter descriptions and settings.
CONTROL PARAMETERS : PAGE-10
Section 5
Table 5.1
Parameter Description
Settings
(Default Value)
(Default : PID)
On-Off
PID
HYSTERESIS (For On-Off Control only)
Sets differential (dead) band between On-Off switching of the
control output (Relay/SSR).
CONTROL MODE
Select appropriate Control Algorithm suited for process
requirement.
On-Off
The control algorithm tends to maintain the Temperature at SP by
either switching the output fully OFF or fully ON. The On and Off
switching is differentiated by the user settable ‘Hysteresis’.
PID
nd
The control algorithm uses a 2 order equation to compute the ‘%
Output Power required to maintain the Temperature at SP. The
constants P, I, D are automatically set by the controller by issuing
Self-Tune command.
1 to 999
or
0.1 to 99.9
(Default : 2 or 0.2)
CYCLE TIME (For PID Control only)
For time-proportionating PID control, the output power is
implemented by adjusting the ratio of ON : OFF time of a fixed time
interval, called ‘Cycle Time’.
Larger Cycle Time ensures longer Relay/SSR life but may result in
poor control accuracy and vice-a-versa. The recommended Cycle
Time values are; 20 sec. for Relay and 1 sec. for SSR .
0.5 to 120.0 Seconds
(in steps of 0.5 Seconds)
(Default : 20.0 Sec)
(Default : 0)
0 to 600 Sec.
(in steps of 0.5 Sec.)
COMPRESSOR TIME DELAY
(For On-Off Control only)
This parameter is mainly used for Compressor Load. For
compressor switching it is desired that once the compressor is
switched OFF, there must be some time delay before it is
switched ON again. The switching ON of the compressor should
therefore take place only if both the conditions, that is; the time
delay is elapsed and PV is above the Setpoint, are satisfied.
Set this parameter value to zero if no time delay is required.
10
User Manual
OmniX
Parameter Description
Settings
(Default Value)
INTEGRAL TIME (For PID Control only)
The application of proportional band alone results in process
value stability within the band but away from the setpoint. This is
called steady state Offset Error. The integral action is incorporated
for automatic removal of offset error with minimum oscillations.
The Integral Time value is automatically calculated by controller’s
Self-Tune feature and seldom requires any manual adjustments.
Setting the value 0 cuts-off Integral action.
0 to 1000 Seconds
(Default : 100 Sec)
DERIVATIVE TIME (For PID Control only)
It is desired that the controller should respond to any dynamic
changes in the process conditions (like variations in load, power
supply fluctuations, etc.) fast enough so as to retain the process
value near the setpoint. The Derivative Time determines how
strong the output power will change in response to the rate of
change of measured PV.
The Derivative Time value is automatically calculated by
controller’s Self-Tune feature and seldom requires any manual
adjustments.
Setting the value 0 cuts-off Derivative action.
0 to 250 Seconds
(Default : 25 Sec)
PROPORTIONAL BAND (For PID Control only)
The Proportional Band is defined in terms of process value
deviation from the setpoint (also known as process error). Within
the band the output power is varied from maximum (100%) at
maximum deviation to minimum (0%) at minimum deviation. The
process value thus tends to stabilize at a point within the band
where the power input equals losses. Larger Band results in better
stability but larger deviation.
The Proportional Band value is automatically calculated by
controller’s Self-Tune feature and seldom requires any manual
adjustments.
0.1 to 999.9
(Default : 10.0)
11
Refer Table 6.1 for the parameter descriptions and settings.
SUPERVISORY PARAMETERS : PAGE-13
Table 6.1
User Manual
OmniX
Parameter Description
Settings
(Default Value)
1.0 to 2.0
(Default : 1.2)
Disable
Enable
(Default : Disable)
Set this parameter to YES to activate ‘Tuning’ operation.
Select as NO if, for any reason, the ‘Tuning’ operation in progress
is to be aborted.
SELF-TUNE COMMAND
(Default : No)
Yes
No
Set this parameter to ‘Enable’ if the process exhibits unacceptable
overshoot upon start-up or a step change in SP. If Enabled, the
controller monitors and controls the rate of change of Temperature
in order to minimize or eliminate overshoot.
OVERSHOOT INHIBIT ENABLE / DISABLE
This parameter is available only if ‘Overshoot Inhibit’ is enabled.
Adjust this parameter value to improve the effectiveness of the
controller’s Overshoot Inhibit feature. Increase the value if the
overshoot is curbed but the Temperature takes too long to reach
the SP. Decrease the value if the overshoot persists.
OVERSHOOT INHIBIT FACTOR
Section 6
12
This parameter allows locking the adjustment of the SP on Lower
Readout in Main Display Mode. For Locking, set the parameter
value to ‘Yes’. This allows the operator to protect the SP from any
unauthorized changes.
SETPOINT LOCKING
OPERATOR PARAMETER : PAGE-0
Table 7.1
User Manual
OmniX
Parameter Description
Settings
(Default Value)
(Default : No)
Yes
No
Section 7
13
w w w . p p i i n d i a . n e t
Jan 2022
Process Precision Instruments
101, Diamond Industrial Estate, Navghar, Vasai Road (E),
Dist. Palghar - 401 210.Maharashtra, India
Sales : 8208199048 / 8208141446
Support : 07498799226 / 08767395333
  • Page 1 1
  • Page 2 2
  • Page 3 3
  • Page 4 4
  • Page 5 5
  • Page 6 6
  • Page 7 7
  • Page 8 8
  • Page 9 9
  • Page 10 10
  • Page 11 11
  • Page 12 12
  • Page 13 13
  • Page 14 14
  • Page 15 15

PPI Omni 48 User manual

Type
User manual

PPI Omni 48, your newly acquired temperature controller, offers precise temperature control for a wide range of industrial applications. With its self-tuning PID algorithm, it efficiently maintains the desired temperature by analyzing the process dynamics and adjusting its control actions accordingly. Omni 48 accepts inputs from thermocouples (J and K types) and Pt100 RTD sensors, making it compatible with various temperature measurement devices.

Ask a question and I''ll find the answer in the document

Finding information in a document is now easier with AI