Page is loading ...

IMPORTANT SAFEGUARDS
READ AND FOLLOW ALL SAFETY INSTRUCTIONS.
When using electrical equipment, basic safety precautions should always be followed including the following:
• DISCONNECT AC POWER SUPPLY BEFORE SERVICING.
• Installation and servicing of this equipment should be performed by qualified service personnel only.
• Ensure that the electrical wiring conforms to the National Electrical Code NEC® and local regulations
if applicable.
• Do not mount near gas or electrical heaters.
• Equipment should be mounted in locations and at heights where it will not be readily subjected to tampering
by unauthorized personnel.
• The use of accessory equipment not recommended by the manufacturer may cause an unsafe condition.
• Any modification or use of non-original components will void the warranty and product liability.
• Do not use this equipment for other than intended use.
SAVE THESE INSTRUCTIONS!
Technical Support ■ (623) 580-8943 ■ [email protected]
MWQ Series
Installation Instructions
20070180 REV 1 - 01/22 1800-533-3948 www.barronltg.com

Wall Mount Using J-Box
1. Remove the four (4) screws from the
sides of the fixture, then remove the
fixture cover and set all aside.
(Fig. 1)
2. Unscrew and remove the 1/2" plug
from the center of the fixture base.
(Fig. 2)
3. Remove the protective film from the
gasket pad, align the holes, then
press the gasket pad onto the
backside of the fixture base. (Fig. 3)
Fig. 3
4. Attach the fixture base to the J-box
with hardware (provided by others).
(Fig. 4)
Fig. 4
Fig. 1 Fig. 2
5. Make electrical connections; see
Electrical Connections section.
(Fig. 5)
Fig. 5
6. Replace the fixture cover over the
base and secure with the screws
provided. (Fig. 6)
Fig. 6
IMPORTANT: Weatherproof your outdoor installation. Be sure to seal all holes in the enclosure, such as the mounting,
conduit, plugs, sensors, and photocontrols with silicone sealant.
MWQ Series
Installation Instructions
20070180 REV 1 - 01/22 2800-533-3948 www.barronltg.com

Wall Mount Using Conduit
1. Remove the four (4) screws from the
sides of the fixture, then remove the
fixture cover. (Fig. 7)
2. Remove the protective film from the
gasket pad, align the holes, then
press the gasket pad onto the
backside of the fixture base. (Fig. 8)
3. Screw fixture base to the wall using
appropriate hardware (provided by
others). (Fig. 9)
Fig. 9
4. Unscrew one of the 1/2" plugs and
secure the conduit to the fixture
base. (Fig. 10)
Fig. 10
Fig. 7 Fig. 8
5. Make electrical connections; see
Electrical Connections section.
(Fig. 11)
Fig. 11
6. Replace the fixture cover over the
base and secure with the screws
provided. (Fig. 12)
Fig. 12
IMPORTANT: Weatherproof your outdoor installation. Be sure to seal all holes in the enclosure, such as the mounting,
conduit, plugs, sensors, and photocontrols with silicone sealant.
MWQ Series
Installation Instructions
20070180 REV 1 - 01/22 3800-533-3948 www.barronltg.com

Electrical Connections
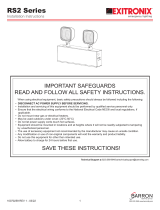
Make electrical connections per Wiring Diagram. (Fig. 13)
a. Connect the line fixture lead to the black supply lead.
b. Connect the common fixture lead to the white supply lead.
c. Connect the ground lead from the service to the ground lead
coming from the driver plate.
Note: Cap unused leads to prevent shorting.
Troubleshooting
If the unit does not turn “ON”:
1. Check incoming voltage to the LED driver. On the Switch/Un-switch line it must be a minimum of 120VAC and no
greater than 277VAC.
2. Are all LEDs on the light engine “OFF”? If so, the LED driver may be defective. Using a voltmeter, check to see if the
voltage is present at the output of the power supply. If low or no voltage is found, replace the power supply.
3. If any individual LEDs are “OFF” the LED light engine may be defective. Please have the serial number off the light
engine available when you contact technical support.
Fig. 13 – Wiring Diagram
Black Line
White Neutral
Green/Yellow Green Ground
MWQ Series
Installation Instructions
20070180 REV 1 - 01/22 4800-533-3948 www.barronltg.com
/