Page is loading ...

INSTALLATION SHEET
SCS-RACK
Description
The SCS-RACK allows you to easily upgrade a standard SCS-1 to the rack-mountable SCS-1R. The SCS-1R provides
a built-in LCD Membrane Keypad for receiver programming, and to view and acknowledge alarm signals. The LCD
Membrane Keypad eliminates the need for a bulky monitor and keyboard. Follow the steps in this Installation Sheet
to complete the SCS-1R upgrade.
Power Considerations
Remove all AC power from the SCS-1: It is recommended to NOT connect AC power to the SCS-1R Receiver
until completing all chip upgrade and card installation steps.
What’s Included
The SCS-RACK includes the following items:
• System Enclosure
• Two ROM rmware chips
• SCS-208 Power Cable
For the upgrade, the SCS-RACK has the following items installed:
• LCD Membrane Keypad
• SCS-202 Convenience Panel
SCS-1 Ribbon Cable Connections
The gure below identies the existing SCS-1 line card locations and their connections to the original port numbers.
Use this information to help eliminate the need to recongure any of the line cards in the SCS-1R programming.
SCS-110 Modem
Power Supply Card
SCS-100 or SCS-101 Line Cards
Multibus
Rack
Modem Rack
with Line Cards
SCS-120 Multibus
Power supply Card
SCS-1062 Processor Card
Figure 1: Standard SCS-1 Ribbon Cable Connection

Digital Monitoring Products SCS-RACK Installation Sheet
2
SCS-RACK Installation Sheet Digital Monitoring Products
3
Completing the Upgrade
To perform the upgrade from an SCS-1 to an SCS-1R, follow the steps below. For the easiest upgrade, place the
SCS-201 System Enclosure and the SCS-RACK next to each other. After removing one component from the SCS-201
System Enclosure, immediately place the component into the SCS-RACK. Be sure to note all wiring connections on
the drawing on page 1 for the easiest upgrade.
Remove all AC power from the SCS-1.
1. On the SCS-201 System Enclosure twist each of the four knobs 90 degrees counter-clockwise to remove the
front plastic cover.
2. Lower the SCS-RACK System Enclosure front cover by turning the two cover knobs counter-clockwise to
loosen the screws and lower the front cover.
3. Check and mark all of the existing wiring connections. Make note where the line cards are installed in the
rack and to which port each cable is connected.
4. Disconnect all ribbon cables, power cables, and incoming communication lines from the components before
relocating to the SCS-RACK.
5. One at a time, slide each line card out of the SCS-201 System Enclosure Modem Rack (top rack). One at a
time, slide each line card into the corresponding location in the SCS-RACK System Enclosure. Reconnect the
cables according to the previously noted wiring connections.
6. Slide the SCS-110 Modem Power Supply Card out of the SCS-201 System Enclosure Modem Rack. Slide the
Modem Power Supply Card into the same position (far left) in the SCS-RACK Modem Rack and reconnect all
cables.
7. Remove the SCS-120 Multibus Power Supply Card from the SCS-1 Multibus Rack (bottom rack). Slide the
SCS-120 into the rack upper position.
8. Remove the SCS-1062 Processor Card from the SCS-201 System Enclosure Multibus Rack lower rack. Before
installing the SCS-1062 into the SCS-RACK, update the rmware chips as described below. Complete the
cable connections as previously noted on the page 1 drawing.
Updating the SCS-1062 Firmware Chips
Your SCS-RACK contains the most recent rmware chips. Before installing the SCS-1062, update the rmware chips
using the chips enclosed with the SCS-RACK. Place each chip in their proper location on the board and rmly press
them into place. Refer to Figure 2.
After installing the rmware chips, slide the SCS-1062 Processor Card into the SCS-RACK Multibus Rack lower
position.
54 53
ROM 2
ROM 3 ROM 0
Remove ROM 2 and
replace with new
ROM 2.
Remove ROM 3 and
replace with new
ROM 3
Remove ROM 0 and
replace with optional
SCS-1062 Time Chip.
LEDs
Figure 2: Chip Placement

Digital Monitoring Products SCS-RACK Installation Sheet
2
SCS-RACK Installation Sheet Digital Monitoring Products
3
Making Wiring Connections
After the line cards and other components are properly installed in the SCS-RACK System Enclosure, complete the
wiring connections as described below.
1. Connect the ribbon cables between the line cards and the SCS-1062 as they were connected on the SCS-1.
Use Figure 1 as a guide.
2. Connect the ribbon cable from the LCD Membrane keypad to the SCS-110 Modem Power Supply Card.
Connect the end marked “7” to the SCS-1062 port 7.
3. Connect the ribbon cable marked “8” (from the Host connector on the SCS-202) to the SCS-1062 port 8.
4. Connect the ribbon cable marked “6” (from Activity Log Printer connector on the SCS-202) to the SCS-1062
port 6.
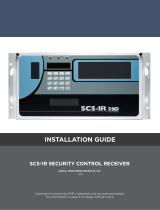
What the Completed SCS-1R Should Look Like
Refer to the diagram below.
Figure 3: SCS-1R Security Control Receiver

LT-0718 (5/04) © 2004 Digital Monitoring Products, Inc.
800-641-4282
www.dmp.com
Made in the USA
INTRUSION • FIRE • ACCESS • NETWORKS
2500 North Partnership Boulevard
Springfield, Missouri 65803-8877
Accessories
SCS-1062 Time Time Chip
SCS-PTR Printer and Cable
iCOM™ Internet Alarm Router
iCOM-E™ High Security Internet Alarm Router
Remote Link Remote Programming Software
System Link End-User Management Software
Alarm Monitoring Alarm Monitoring Software
Command Center Visual Command and Control Software
SCS-130 Transformer Card
Do not connect AC power to the SCS-1R until all upgrade steps are complete.
After properly installing the line cards and other components in the SCS-RACK System Enclosure, remove
the SCS-201 enclosure two-piece back to access the SCS-130 Transformer Card. Refer to Figure 4.
1. Unplug the modem rack power cable from the SCS-130 J2 Connector.
2. Disconnect the power cord from the fan.
3. Disconnect the SCS-208 Power Cable from SCS-130 J3.
4. Remove the four screws attaching the SCS-130 to the modem rack.
5. Open the SCS-RACK enclosure back to install the SCS-130.
6. Align the SCS-130 with the four standoffs and re-attach using the provided screws.
7. Connect the power cord to the fan.
8. Connect the power cable from the modem rack PCB to the SCS-130 J2 connector.
9. Connect the SCS-208 Power Cable to the SCS-130 J3 connector. Then route the power cable under the
SCS-1062 and connect to the SCS-120 Multibus Power Supply Card.
Figure 4: SCS-130 Connections
Applying AC Power
CAUTION: All AC wiring connections MUST be completed by an electrician!
After making all connections, you can apply AC power to the SCS-1R Receiver. Connect the 120 VAC wiring
(hardwired by an electrician) to the SCS-130 Transformer Card mounted on the Modem Rack rear. Use
the provided ring terminal to attach the ground wire to the grounding pin on the inside of the SCS-RACK
enclosure.
Specications
Dimensions 19” wide X 8.75” tall X 12” deep
19” rack mountable
/