Page is loading ...

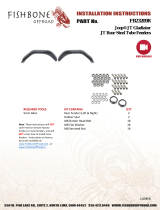
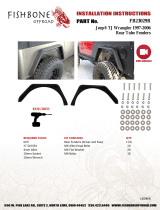
Inner Fender
Install Instrucons
Esmated install me - Approx. 1 hour — Diculty level: Novice
Patent Pending
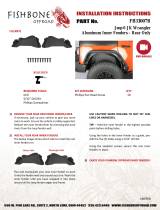
HARDWARE KIT:
A- Front liner arms w/ (long) screws x 2ea.
B– Front liner screws (medium length) x 4
C– Front liner mesh screen screws (shortest) and lock nuts x 10
ea.
D– Rear liner screws and lock nuts ( packaged separately ) x 10
ea.
E– Rubber strip x 1
Tools Needed:
1 - 7/64th Allen Key for screws
2– 3/8” wrench or socket & ratchet
3-drill with 7/32nds drill bit (rears only)
4-Punch or scribe to mark for drilling (rears only)
*Special Note: You will need to save and re-use the 8 factory 10mm bolts that held the factory liners in the front.

2) To assemble the liners, start
by installing the grill behind the
DV8 logo using the shortest
screws with the locking nuts (C)
supplied in the hardware kit.
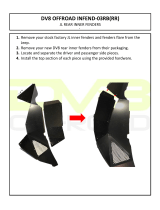
1) Remove the factory fend-
er/liner assembly by un-
screwing all 10mm bolts from
the liner area. Remove the
push-in rivets on the lower
poron of liner to release it
from the frame. Li up on
the fenders to separate from
the snap-in clips on the body
4) Aach the supplied arm (A) on
the back of the hole closest to the
rewall of the Jeep. Let It hang
loosely. This arm will catch and se-
cure on rewall.
3) Next aach the two halves to-
gether with the two allen screws
supplied with the hardware (B). The
“DV8” side should be on top.

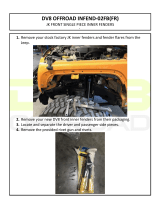
6) Once the inner fenders are aligned in
the proper posion, install with the fac-
tory hardware to secure inner fender.
Tighten the screw near the re wall while
helping the arm to make contact with re
wall.
5) Place the liners in the fender loca-
on. You will use the factory hardware
to aach to the Jeep at the four loca-
ons indicated by arrows. Cut and use
the supplied adhesive rubber strip ( E )
to dampen any noise made from metal
on metal contact if needed.
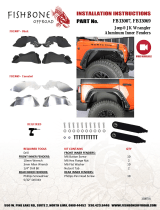
7) REARS : If necessary, jack up the Jeep
from a safe place other than the axle to
give yourself more room. Release the
fender / liner combo by removing the
push-in rivets from inside fender well
and pulling upward on the fender to dis-
connect from snap-in clips.
8) Install the new DV8 inner fender by
exing the liner and manipulang it in
the opening. From there, a lile force
is needed to snap in place. Mark the 5
locaons to drill with punch or marker.
Than remove liner and proceed to next
step.

10) re-insert new liner and feed screws
through. Use the wrench to hold nut in
place.
You’re all done! Tip: Be creative, you can easily customize these to match your color scheme.
9) Proceed drilling locaons
(7/32nds) for the supplied screws
and lock nuts ( D ) *DRIVERS SIDE USE
CAUTION HAVE SOMEONE HELP KEEP FUEL
RELATED HOSES CLEAR FROM PUNTURE.
11) You can access two points under the
body. And the three point inside the cab by
pulling back the carpet.
/