Page is loading ...

EVO-1197/1198/1199
EVO JK Front Vented Inner Fenders
Note: This installation process will vary with aftermarket fenders. What is shown
in these instructions is how to install with factory fenders. If installing with
aftermarket fenders work around these steps to install. When installing inner
fenders with aftermarket fenders. Inner fenders must mount to all body
connections directly and then install all other fender parts or supports to the inner
fender section. Sandwiching inner fenders between. Do not mount inner fenders
to outside of other parts. Removal of factory fenders can damage factory fender
clips. If so these can be purchased through dealerships for replacements if
needed or traditional rivits can be used in replacement. When installing with
aftermarket brakeline configuations, some adjustments may be needed to fit liner
properly. Do so with great care. Fit product prior to painting.

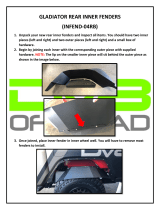
1. Assemble Inner
fender parts on table prior
to install. Use supplied #10
x 1/2” bolts and nylock
nuts. Each inner fender is
comprised of 3 main pieces
(front middle rear) and 2
perforated vents (DTD
Version is one piece with 2
vents, for this use supplied
hardware to directly
mount vents to back side
of each liner). During
assembly of liner, front
and rear piece must be
mounted on outside of
inner piece. At this
connection of parts, the
perforated piece both front and back should be bolted to back side of the inner
piece. See image.
Drive side pieces are etched with an even part number. Passenger side pieces
are etched with an odd part number. Tighten all bolts
2. Safely park and chalk vehicle on level ground with
parking brake on.
3. Start on driver side. To remove your front factory
fenders, begin by drilling out the 3 plastic rivets at
the rear of the fender and removing them. Use a
3/16” drill bit for these.
4. Remove the panel clips using a panel clip tool or
similar tool. There are a total of 4 clips.
5. Using a 10mm wrench remove the 5 bolts holding
the fender in place. Save these bolts for reuse later.

6. You should now be able to work your inner fender out of the wheel well.
7. With the inner fender removed, the rest of the fender will snap out.
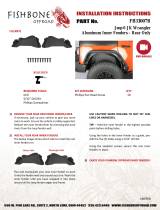
8. The clips that held the fender in place can be removed by squeezing the inside
of the clip together, as shown, from the inside of the body sheet metal.

9. With the factory fender removed.. The factory inner fender shell will need to be
trimmed to reinstall. On the factory inner fender support where it
meets/mounts to the body. Measure from the outside edge of the 3 holes ½”
and mark. Connect the 3 dots across the entire support edge as shown.
10.
11.Using safety glass during all cutting and drilling use a cutting tool and carefully
cut the outside of the plastic at the marked line.
12. Insert EVO inner fender into the wheel opening.
13.Loosely insert supplied 5/16” bolt into inner fender and hole in inner body
substructure. Just behind headlight.
14.Loosely install 2 bolts at upper sub structure that hold inner fender in place
without factory fender. Snug these bolts.
15.At rear there are 2 holes in inner fender that fit top body inner structure. With
inner liner in place and located to your liking. Using a drill with socket and
extension, send 2 supplied self-tapping screws into body sheet metal at these 2
hole locations. Do not over tighten. Just a light snug is sufficient.
16. Now remove the 2 upper bolts at body substructure. Reinstall factory fender in
factory location with the upper 2 bolt lip of EVO liner between fender and body
substructure.
17.Tighten all bolts. Repeat above on passenger side.
/