Page 10
HOW TO USE YOUR GRACE A34
TM
QUILTING FRAME
GET READY: Your quilt fabric may be tacked directly to the poles. However, using cloth leaders is a
much better way to attach your quilt (see the cloth leader instruction sheet). Leaders are easy to
make and allow the quilter to move the last few inches of the quilt forward from the rear pole to the
front quilting area. If you choose to use leaders refer now to the instructions for making leaders and
make them before proceeding to put a quilt on your frame.
*Tip--If you will be using the 4
th
pole kit (optional) for rolling the batting onto, make sure the 4
th
pole
kit is assembled and in place before using your frame.
GET SET: You will put the BACKING for the quilt on the frame first. We recommend the backing always
be 2" to 4" longer than the top from front to back, especially if your top is pieced rather than whole
cloth. A pieced top may stretch out and be larger than the backing if you do not make this
allowance.
If you use unseamed cloth for the backing, you may skip the following discussion.
Pieced Backs: Cut off the selvedges before you piece the back. The selvedge is woven tightly and
won’t have the same “give” in the seam. If you have problems with lengthwise seaming being too
tight, try the optional crosswise piecing of the back or simply put the quilt on the frame crosswise.
GO: You will need large head, short shank tacks, tack hammer, tack lifter. If you are using Leader
Cloth, then it should be installed at this time and you will need tacks only to install the Leaders.
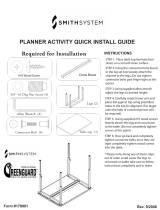
Step 1. Backing Installation
BACKING: Fold the backing fabric in half and mark both
top and bottom with a pin or pencil mark. Tack
the center mark (inside of backing face up) to the
center of the front pole. Do not stretch the fabric.
Tack the corners of the fabric to pole. Measure
again to see if backing is centered at an equal
distance from the outside edges of pole. We will
finish tacking the front down after the back is
attached to the middle pole. You need only a
few tacks in it to hold it in place, and if you need
to make adjustments you will have to remove only
those few tacks. Tack the other end of the
backing fabric to the middle quilting pole,
centering with the mark as on the front pole.
Tack the center and tack the corners, compare
with front pole--the amount of pole wood showing
beyond the edges of quilt should be equal on
both sides. After you have it positioned, tack
securely along the entire edge of the middle pole, using plenty of tacks.
Step 2. Backing Roll Up
Roll the material onto the middle pole, making a smooth roll. Be sure that no large wrinkles are
present. Smooth the quilt from the center to the outside edges of the pole as you roll. At this
point you do not have to roll the fabric tightly, just nice and even and smooth. Roll until the