Page is loading ...

- 1 -
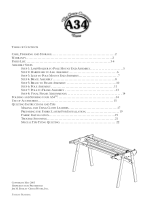
1-Table King Extension
GMQ King Extension
Parts List
1-Middle
Leg
1-Opposing
Middle Leg
2-Middle Leg
Brace King Size
2-Brace Extension Part A
2-Brace Extension Part B
6-1/4 X 45mm
Connector Bolt
16-5/16 X 1 1/2
Hex Bolt
12-5/16
Washer
6-Threaded
Rectangle Nut
4-24" Plastic Tubing - Pr-einstalled in Rail
1-138" .25 Track
1-130" .25 Track
4-24" Rail & Coupler

King Extension Assembly Kit
**You will use some hardware from your current assembly in addition to what is provided in this kit.
Step 1: Brace Extension A
Parts Neede
ssembly
d:
e Extension Part A
hole with T-Nut in the second part, as pictured. . R
Step 2: King Leg Assembly
2 –Brac
2 –Brace Extension Part B
4 –5/16 x 1 ½ hex bolt
4 –5/16 flatwasher
Brace extension
Part A
Brace extension
Part B
5/16 X 1 1/2
hex bolt
5/16 washer
¾ Pair part “A” and “B” Brace Extension together as pictured. As you connect them, be
sure the sides with the “A” and “B” are facing away from each other.
¾ Place the hex bolts through a washer and through the hole of the first part and into the
epeat this process for both sets.
Middle Leg
Part B
Middle Leg
Part A
King Extension
Middle Leg Brace
rectangle nut
45mm
connector
bolt
arts Needed:
on Middle Leg Brace
Bolts
¾ actly as pictured
for proper assembly (lettered sides facing
n).
¾
h the holes in the legs and into the
lot ough
P
1 –Middle Leg
1 –Opp osing Middle Leg
1 –King Extensi
2 –1/4 x 45mm Connector
2 –Rectangle Nuts
Position the parts ex
i
Put the 45mm connector bolts
throug
s of the leg brace, threading it thr
the rectangle nut. Tighten the connector
bolts completely.
- 2 -

- 3 -
tep 3: King Leg to Grace Machine Quilter Assembly
S
arts Needed:
x ½ Hex Bolt
s on the
cent
your
g
¾ th king size mi
assemblies to the braces. These will insta
slots s or
¾ Machine
Quilter assembly instructions for details on re-
attac
¾
1 ½ bolts at this time. Leave loose to
allo
Step 4: Brace Extension to Grace Machine
P
1 –King Size Middle Leg Brace
8 –5/16
8 –5/16 Flatwasher
¾ Disconnect the brace
Grace Machine Quilter in the
er. Remove the Middle Leg
Assembly already installed on
frame, as well as the middle table
top (if your machine was in queen
size). The middle legs must then
be disconnected from each other
and you must insert the longer kin
size middle leg brace. Reconnect
the leg assembly.
Now install bo ddle leg
ll into the
A
5/16" X 1 1/2"
Hex Bolt
1/4" Flat
Washer
A
located almost directly under the edge
seams of the Left and Right table tops
See section one, Step 4 of the Grace
hing the leg assembly to the braces, ignoring
their position on the braces in the pictures.
Substitute the 2” hex bolts used in the old
configuration for 1 ½” hex bolts provided.
NOTE! Do not completely tighten
5/16 X 1 1/2
hex bolt
5/16
washer
w for final frame adjustments after
the rails are installed!
Quilter
sembly
x 1 ½ Hex Bolt
extension brace
assemblies to the ends of the Grace
Mac
¾ ing
outside and away from the frame, and
that bolts go into and through the slots,
s
Parts Needed:
2 –Brace As
8 –5/16
8 –5/16 x Flatwasher
¾ Connect the two King
hine Quilter braces as pictured.
Make sure the T-Nuts are fac
and then into the T-Nuts from behind, a before.
T-nut
5/16 X 1 1/2
hex bolt
5/16 washer

- 4 -
NO me. Leave loose to allow for final frame
tep 5: Table Top and Track Assembly
TE! Do not completely tighten 1 ½ bolts at this ti
adjustments after the rails are installed!
S
0” .25 Track
sion
Bolt
aces connected, you are ready to put your king size table top into place. Do so with
the “
¾ nuts. Secure
the m
¾ e to allow for final
fram
¾ pictured.
tep 6: King Rail Assembly
Parts Needed
1 – 13
1 – 138” .25 Track
1 –Table King Exten
6 –1/4 x 45mm Connector
6 –Rectangle Nut
¾ With your br
K” right side up facing the same direction as the “M” on the adjacent table top.
Secure the king size table top using four ¼ x 45mm connector bolts and rectangle
iddle table top using two ¼ x 45 mm connector bolts and rectangle nuts.
NOTE! Do not completely tighten 1 ½ bolts at this time. Leave loos
e adjustments after the rails are installed!
Place the 130” and 138” tracking into place as
130
”
Track
138
”
Track
S
xtensions
With each rail, place the 24” rail
with
¾ e on the
fram e
You will now push in on the frame from both sides, being sure to eliminate any space
betw
Having done this adjustment, you are now ready to tighten all bolts and the braces and
tabl
OU HAVE NOW COMPLETED YOUR KING SIZE EXTENSION ASSEMBLY!
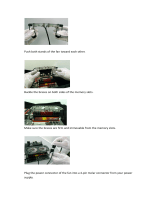
Parts Needed: 4 – 24” Rail E
4 – 24” Dowels
¾
24" Rail
34" Rail
70" Rail
King Extension Rail Assembly
coupler in between the 70” rail
and 34” rail as pictured.
Put your rails in plac
e, noting any gaps between th
rail ends and Pole Mount Ends.
¾
een all three the rail ends and Pole Mound Ends.
¾
e tops.
Y
/