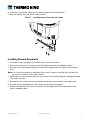
Thermo King Remote Power Receptacle Installation guide
- Type
- Installation guide

TK 55597-2-IM Rev. B ©2021 Trane Technologies 1
For Precedent™™ Units with SmartPower™™
DDAANNGGEERR
HHaazzaarrddoouuss VVoollttaaggee!!
RRiisskk ooff ffaattaall iinnjjuurryy ffrroomm eelleeccttrriicc sshhoocckkss!! PPrreecceeddeenntt SSmmaarrttPPoowweerr uunniittss wwiitthh tthhee rreemmoottee ppoowweerr rreecceeppttaaccllee
ooppttiioonn rreeqquuiirree tthhee eelleeccttrriiccaall wwiirriinngg ((iinnssttaalllleerr ssuupppplliieedd)) ttoo bbee ccoorrrreeccttllyy ssiizzeedd aanndd pprrooppeerrllyy iinnssttaalllleedd ttoo pprreevveenntt
sseerriioouuss iinnjjuurryy oorr ddeeaatthh!! TThhee uunniitt ggrroouunndd wwiirree ((ssuupppplliieedd)) mmuusstt aallssoo bbee pprrooppeerrllyy aattttaacchheedd ttoo tthhee ttrraaiilleerr
cchhaassssiiss.. RReeffeerr ttoo TTKK 5555559977 ffoorr iinnssttaallllaattiioonn gguuiiddeelliinneess.. TThheessee gguuiiddeelliinneess mmuusstt bbee ffoolllloowweedd..
DDAANNGGEERR
HHaazzaarrddoouuss VVoollttaaggee!!
RRiisskk ooff ffaattaall iinnjjuurryy ffrroomm eelleeccttrriicc sshhoocckkss!! AAnn iimmpprrooppeerrllyy iinnssttaalllleedd rreemmoottee ppoowweerr rreecceeppttaaccllee ccoouulldd lleeaadd ttoo
sseerriioouuss iinnjjuurryy oorr ddeeaatthh!! OOnnllyy aa qquuaalliiffiieedd eelleeccttrriicciiaann sshhoouulldd ppeerrffoorrmm tthhiiss iinnssttaallllaattiioonn..
DDAANNGGEERR
HHaazzaarrdd ooff EExxpplloossiioonn aanndd//oorr FFiirree!!
TThhee rreemmoottee ppoowweerr ccaabbllee mmuusstt bbee pphhyyssiiccaallllyy sseeppaarraatteedd ffrroomm tthhee ttrraaiilleerr’’ss ffuueell lliinneess.. FFuueell lliinneess iinn tthhee pprreesseennttss
ooff aann eelleeccttrriiccaall sshhoorrtt ccaann rreessuulltt iinn aa ffiirree!!
WWAARRNNIINNGG
RRiisskk ooff IInnjjuurryy!!
TThhee uunniitt ccaann ssttaarrtt aatt aannyy ttiimmee wwiitthhoouutt wwaarrnniinngg.. PPrreessss tthhee OOFFFF kkeeyy oonn tthhee HHMMII ccoonnttrrooll ppaanneell,, ppllaaccee tthhee uunniitt
OOnn//OOffff sswwiittcchh iinn tthhee OOffff ppoossiittiioonn,, aanndd ddiissccoonnnneecctt tthhee bbaatttteerryy bbeeffoorree iinnssppeeccttiinngg oorr sseerrvviicciinngg aannyy ppaarrtt ooff tthhee
uunniitt..
WWAARRNNIINNGG
EEqquuiippmmeenntt DDaammaaggee aanndd RRiisskk ooff IInnjjuurryy!!!!
TThhee rreemmoottee ppoowweerr rreecceeppttaaccllee aanndd eelleeccttrriiccaall wwiirriinngg mmuusstt bbee iinnssttaalllleedd iinn ssuucchh aa mmaannnneerr aass ttoo nnoott iinntteerrffeerree
wwiitthh tthhee nnoorrmmaall ooppeerraattiioonn ooff tthhee ttrraaiilleerr..
NNoottee:: The power receptacle factory installed onto the unit is the preferred mounting method.
Alternative mounting methods are the responsibility of the installer.
• Installer is responsible for mounting the remote junction box and remote receptacle securely
and safely onto the trailer.
• Installer is responsible that all electrical wiring is safely installed and all connections and
grounds are made per the supplied instructions and wiring diagram.
Installation Instructions
Remote Power Receptacle Installation
Guidelines

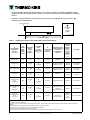
2©2021 Trane Technologies TK 55597-2-IM Rev. B
• To prevent damage to the refrigeration unit’s electric motor, the combined power cable
length from the unit to the power supply, must not exceed the recommendations shown in
Table 1.
• Installer is responsible for installing the remote power receptacle wiring in water tight
conduit and junction boxes.
A
B
Thermo King Unit
Warehouse
Power
Supply
Voltage
75 ft. (22.8 m) Max.
RCS1780
Table 1. Standby Power Cable and Circuit Breaker Size Recommendations.
A
TK Trailer Unit
Nameplate
Voltage
(Motor Type)
TK
Trailer
Unit
Name-
plate
Current
Separable
Power
Supply
Cable,
Gauge(2)
Separable
Power
Supply
Cable, Type
(Recommend-
ed)
B
Power Supply
Circuit
Breaker(4)
Separable Power
Supply Cable Plug
Standard
Configuration,
Outlet(5)
TK
Supplied
Trailer
Flanged
Surface
Inlet –
Service
Part
Number
(On the
Trailer)
Plug Type
230/3/60
(12 hp motor) 50A 8 AWG
(3) W50 amps CS8364 (6) 418275 Twist Lock
460/3/60
(12 hp motor)
(1)
30A 10 AWG
(3)
W
or SOOW 30 amps IEC 60309 430C7W
NEMA L16-30 (7)
420833
418275
Pin and Sleeve
Twist Lock
460/3/60
(15/16 hp motor)
(1)
30A 10 AWG
(3)
W
or SOOW 30 amps IEC 60309 430C7W
NEMA L16-30 (7)
420833
418275
Pin and Sleeve
Twist Lock
460/3/60
(19 hp motor)
(1)
50A 8 AWG
(3) W50 amps CS8164 (6) 418275 Twist Lock
460/3/60
(S-750i Hermetic
Scroll
Compressor)
(1)
30A 10 AWG
(3)
W
or SOOW 30 amps IEC60309 430C7W 420833 Pin and Sleeve
460/3/60
(S-750i Hermetic
Scroll
Compressor)
(1)
30A 10 AWG
(3)
W
or SOOW 30 amps
ESL eTRUconnect
PS Series
IEC60309 430C7W
420833 Pin and Sleeve
460/3/60
(S-750i Hermetic
Scroll
Compressor)
(1)
30A 10 AWG
(3)
W
or SOOW 30 amps SafeConnect
Docking Station
425417
(SafeCon-
nect
DSN30)
6 pin, Proprietary
(1) System voltage 480 VAC, ANSI C84.1 utilization voltage 460 VAC
(2) Minimum Recommendation
(3) 25 ft (7.5m) permitted without cable management, 75 ft. (22.8 m) Max recommended permitted with approved cable management
system
(4) HACR/Motor Circuit Breaker Recommended, Consult a Licensed Electrician
(5) TRU Shore Power Equipment provider or Cord End from Building
(6) CS = California Standard, legacy Twist Lock Style
(7) Pin and Sleeve connectors are recommended for new installation in place of legacy twist lock types

TK 55597-2-IM Rev. B ©2021 Trane Technologies 3
SmartPower Remote Junction Box Installation
Instructions (for S-750i units only)
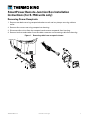
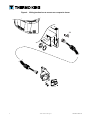
Removing Power Receptacle
1. Remove two bolts securing receptacle bracket to unit and any clamps securing cable to
trailer
2. Remove four screws securing receptacle to housing.
3. Disconnect four wires from the receptacle and remove receptacle from housing.
4. Remove lock nut and washer from the cable connector and removing cable from housing.
Figure 1. Removing cable from receptacle shown.
RCS1937

4©2021 Trane Technologies TK 55597-2-IM Rev. B
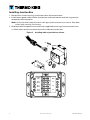
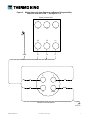
Installing Junction Box
1. Remove four screws securing junction box cover and remove cover.
2. Install factory power cable into the junction box and install washer and lock ring securely
onto power cable connector.
NNoottee:: Verify individual cable wires will reach appropriate terminal connections. Strip back
power cable sleeving if necessary.
3. Strip the ends of the power wires and install supplied terminal lugs firmly onto each wire.
a. Attach wires securely to correct terminals inside the junction box.
Figure 2. Installing cable to junction box shown.
PP-GND
(G/Y)
PP-X
(BLK)
PP-Y
(WHT)
PP-Z
(RED)
GND
P1
P2
P3
RCS1936
X4

TK 55597-2-IM Rev. B ©2021 Trane Technologies 5
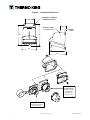
4. Install the junction box under the unit with the two bolts removed earlier.
5. Reinstall clamps securing power cable to trailer.
Figure 3. Installing junction box onto unit shown.
RCS1971
Installing Remote Receptacle
1. Install the remote receptacle (removed earlier) onto rear of trailer.
2. Drill correct size hole in junction box for liquid tight connector provided by installer.
3. Strip the ends of the power cable wires and install supplied terminal lugs firmly onto each
wire.
NNoottee:: It is recommended that an additional ground wire (installer supplied) be provided from
the remote receptacle to the trailer chassis.
4. Make electrical connections at both the junction box and remote receptacle and tighten cable
connectors securely.
5. Reinstall the four screws securing receptacle to housing and reinstall junction box cover.
6. Plug the correct voltage power cord into the remote power receptacle.
7. Reconnect the battery, turn the unit controls ON and operate the unit in both diesel and
electric standby modes.

6©2021 Trane Technologies TK 55597-2-IM Rev. B
Figure 4. Wiring junction box to remote rear receptacle shown.
RCS1972
X4

TK 55597-2-IM Rev. B ©2021 Trane Technologies 7
Figure 5. Wiring Schematic from Contactor to Remote Receptacle Plug
Not to be used for S-750i — See Figures 1–4.
Phase Contactor PC1
GND
X Y
Z
T3 T2 T1
L1L2L3
L1
L1
L2
L2
L3
L3
GND
GND
Remote Power Receptacle
RCS1781

8©2021 Trane Technologies TK 55597-2-IM Rev. B
Figure 6. Receptacle Dimensions.
Mates to:
IEC 60309 430C7W 480V,
30A, 30 AC, 3 Pole, 4 Wire
Grounding and is also
compatible with ESL
eTruConnect PS Series.
Compatible with
SafeConnect 30A, 480V
Docking Station
ABA590-2
4.44
15°
1.50
CENTERLINE OF CONDUIT
Ø 1.38 CONDUIT HOLE MOUNTING
SURFACE
ACCOMMODATES 1/4” MOUNTING
HARDWARE (NOT SUPPLIED)
2.35
3.91
4.92 5.67

TK 55597-2-IM Rev. B ©2021 Trane Technologies 9
Customer Satisfaction Survey
Let your voice be heard!
Your feedback will help improve our manuals. The survey is accessible through any internet-
connected device with a web browser.
Scan the Quick Response (QR) code or click Technical Publications TK Americas Feedback to
complete the survey.
-
 1
1
-
 2
2
-
 3
3
-
 4
4
-
 5
5
-
 6
6
-
 7
7
-
 8
8
-
 9
9


Thermo King Remote Power Receptacle Installation guide
- Type
- Installation guide
Ask a question and I''ll find the answer in the document
Finding information in a document is now easier with AI
Related papers
-
Thermo King Heat King Zero-Cube Option Installation guide
-
-
-
-
-
-
-
-
-
Other documents
-
Klein Tools 55599 Operating instructions
-
Klein Tools 54445 Operating instructions
-
LG LYH123ATA52 Owner's manual
-
Generac MLT4060MV [5/21] Operating instructions
-
GREE PTAC-GAA12AB-D Installation guide
-
Trane PTEE150 User manual
-
Trane Cold Generator Installation, Operation and Maintenance Manual
-
 Heat Controller EKTC07-1G Owner's manual
-
Carrier 52P User manual
-
 Islandaire EZ42151231S46AA User manual

