Page is loading ...


Important User Information
Because of the variety of uses for the products described in this
publication, those responsible for the application and use of this
control equipment must satisfy themselves that all necessary steps
have been taken to assure that each application and use meets all
performance and safety requirements, including any applicable laws,
regulations, codes and standards.
The illustrations, charts, sample programs and layout examples
shown in this guide are intended solely for purposes of example.
Since there are many variables and requirements associated with any
particular installation, Allen-Bradley
does not assume responsibility
or liability (to include intellectual property liability) for actual use
based upon the examples shown in this publication.
Allen-Bradley publication SGI-1.1, Safety Guidelines for the
Application, Installation and Maintenance of Solid-State Control
(available from your local Allen-Bradley office), describes some
important differences between solid-state equipment and
electromechanical devices that should be taken into consideration
when applying products such as those described in this publication.
Reproduction of the contents of this copyrighted publication, in
whole or part, without written permission of Rockwell Automation,
is prohibited.
Throughout this manual we use notes to make you aware of safety
considerations:
Attention statements help you to:
•
identify a hazard
•
avoid a hazard
•
recognize the consequences
Allen-Bradley is a registered trademark of Rockwell Automation.
ControlLogix, RSLogix 5000, and SCANport are trademarks of Rockwell Automation.
SERCOS interface is a trademark of the Interests Group SERCOS interface e.V. (IGS).
UL is a registered trademark of Underwriters Laboratories.
ATTENTION
!
Identifies information about practices or
circumstances that can lead to personal injury or
death, property damage or economic loss.
IMPORTANT
Identifies information that is critical for successful
application and understanding of the product.

i Publication 1394-5.20 — July 2001
Preface
Who Should Use this Manual . . . . . . . . . . . . . . . . . . . . . . . P-1
Purpose of this Manual . . . . . . . . . . . . . . . . . . . . . . . . . . . P-1
Contents of this Manual . . . . . . . . . . . . . . . . . . . . . . . . . . . P-2
Related Documentation . . . . . . . . . . . . . . . . . . . . . . . . . . . P-2
Conventions Used in this Manual . . . . . . . . . . . . . . . . . . . . P-3
1394 Product Receiving and Storage Responsibility . . . . . . . P-3
Allen-Bradley Support . . . . . . . . . . . . . . . . . . . . . . . . . . . . P-3
Local Product Support . . . . . . . . . . . . . . . . . . . . . . . . . P-4
Technical Product Assistance . . . . . . . . . . . . . . . . . . . . P-4
Chapter 1
Installing Your 1394 SERCOS
Interface System
Chapter Objectives. . . . . . . . . . . . . . . . . . . . . . . . . . . . . . . 1-1
Complying With European Union Directives. . . . . . . . . . . . 1-2
EMC Directive . . . . . . . . . . . . . . . . . . . . . . . . . . . . . . . 1-2
Low Voltage Directive. . . . . . . . . . . . . . . . . . . . . . . . . . 1-2
Before Mounting Your System . . . . . . . . . . . . . . . . . . . . . . 1-3
Storing Your 1394 Before Installation . . . . . . . . . . . . . . 1-3
Unpacking Modules. . . . . . . . . . . . . . . . . . . . . . . . . . . . . . 1-3
System Mounting Requirements . . . . . . . . . . . . . . . . . . . . . 1-4
Determining Your System Mounting Hole Layout. . . . . . 1-5
Mounting Your 1394 Through the Back of the Cabinet. . 1-7
Bonding Your System . . . . . . . . . . . . . . . . . . . . . . . . . . . . 1-7
Bonding Modules . . . . . . . . . . . . . . . . . . . . . . . . . . . . . 1-7
Bonding Multiple Subpanels . . . . . . . . . . . . . . . . . . . . . 1-9
Mounting Your 1394 SERCOS interface System . . . . . . . . . . 1-9
Mounting the External Shunt Resistor for
5 and 10 kW System Modules . . . . . . . . . . . . . . . . 1-12
Mounting External Shunt Modules for
22 kW System Modules . . . . . . . . . . . . . . . . . . . . . 1-12
Shunt Module Mounting Orientation . . . . . . . . . . . . . . 1-13
Shunt Module Mounted Outside the Cabinet . . . . . . . . 1-14
Shunt Module Mounted Inside the Cabinet . . . . . . . . . 1-15
Mounting the Shunt Module . . . . . . . . . . . . . . . . . . . . 1-16
Chapter 2
Connecting Your 1394 SERCOS
Interface System
Chapter Objectives. . . . . . . . . . . . . . . . . . . . . . . . . . . . . . . 2-1
Understanding Basic Wiring Requirements . . . . . . . . . . . . . 2-1
Routing High and Low Voltage Cables. . . . . . . . . . . . . . 2-2
System Module Wire Sizes . . . . . . . . . . . . . . . . . . . . . . 2-3
Shielding . . . . . . . . . . . . . . . . . . . . . . . . . . . . . . . . . . . 2-3
EMI/RFI Shielding. . . . . . . . . . . . . . . . . . . . . . . . . . . . . 2-3
EMI/RFI Bonding . . . . . . . . . . . . . . . . . . . . . . . . . . . . . 2-3
Input Power Conditioning. . . . . . . . . . . . . . . . . . . . . . . 2-4
Determining Your Type of Input Power . . . . . . . . . . . . . . . 2-5
Grounded Power Configuration . . . . . . . . . . . . . . . . . . 2-5
Ungrounded Power Configuration. . . . . . . . . . . . . . . . . 2-6
Table of Contents
Allen-Bradley PLCs

Publication 1394-5.20 — July 2001
ii Table of Contents
Setting the Ground Jumper in a 5 or 10 kW System Module
for Ungrounded Power Configurations . . . . . . . . . . . 2-7
Setting the Ground Jumper in a 22 kW System Module
for Ungrounded Power Configurations . . . . . . . . . . . 2-8
Grounding Your 1394 SERCOS interface System . . . . . . . . 2-10
Grounding your System to the Subpanel . . . . . . . . . . . 2-10
Grounding Multiple Subpanels . . . . . . . . . . . . . . . . . . 2-11
Connecting System Module Power . . . . . . . . . . . . . . . . . . 2-11
Connecting Ground Wires. . . . . . . . . . . . . . . . . . . . . . 2-11
Connector Locations for 5 and 10 kW System Modules. 2-12
Terminal Block Locations for 22 kW System Modules. . 2-13
Required Tools and Equipment . . . . . . . . . . . . . . . . . . 2-14
Connecting Power Wiring for 5 and 10 kW
System Modules. . . . . . . . . . . . . . . . . . . . . . . . . . . 2-14
Connecting Power Wiring for 22 kW System Modules . 2-15
Connecting Motor Power to Axis Modules. . . . . . . . . . . . . 2-16
Connecting Thermal and Brake Leads to Axis Modules. 2-17
Required Tools and Equipment . . . . . . . . . . . . . . . . . . 2-18
Wiring Motor Power, Thermals and Brakes . . . . . . . . . 2-18
Connecting Feedback to System Modules . . . . . . . . . . . . . 2-21
Required Tools and Equipment . . . . . . . . . . . . . . . . . . 2-22
Connecting Feedback Cables. . . . . . . . . . . . . . . . . . . . 2-23
Connecting Your Motor Cables to Motors . . . . . . . . . . . . . 2-26
SCANport Adapter. . . . . . . . . . . . . . . . . . . . . . . . . . . . 2-26
Understanding I/O Connections . . . . . . . . . . . . . . . . . . . . 2-27
I/O Signal Pin-outs . . . . . . . . . . . . . . . . . . . . . . . . . . . 2-27
I/O Signal Descriptions . . . . . . . . . . . . . . . . . . . . . . . . 2-29
Wiring I/O Connections . . . . . . . . . . . . . . . . . . . . . . . 2-30
Connecting Your SERCOS Fiber Optic Cables . . . . . . . . . . 2-31
Connecting Your Internal Shunt Resistor
(5 and 10 kW Systems) . . . . . . . . . . . . . . . . . . . . . 2-32
Connecting Your External Shunt Resistor
(5 and 10 kW Systems) . . . . . . . . . . . . . . . . . . . . . 2-33
Connecting Your Shunt Module
(required for 22 kW system). . . . . . . . . . . . . . . . . . 2-34
Required Tools and Equipment . . . . . . . . . . . . . . . . . . 2-34
Wiring the Shunt Module Power . . . . . . . . . . . . . . . . . 2-34
Wiring Shunt Module Fan Power. . . . . . . . . . . . . . . . . 2-39
Appendix A
Specifications
Chapter Objectives. . . . . . . . . . . . . . . . . . . . . . . . . . . . . . . A-1
System Specifications . . . . . . . . . . . . . . . . . . . . . . . . . . . . . A-1
Certification . . . . . . . . . . . . . . . . . . . . . . . . . . . . . . . . . A-1
System Modules . . . . . . . . . . . . . . . . . . . . . . . . . . . . . . A-2
AC Line Filters . . . . . . . . . . . . . . . . . . . . . . . . . . . . . . . A-2
Contact Ratings. . . . . . . . . . . . . . . . . . . . . . . . . . . . . . . A-3
Axis Modules . . . . . . . . . . . . . . . . . . . . . . . . . . . . . . . . A-3

Publication 1394-5.20 — July 2001
Table of Contents iii
User-Supplied Contactor (M1) . . . . . . . . . . . . . . . . . . . . A-4
User-Supplied Line Input Fusing . . . . . . . . . . . . . . . . . . A-4
User-Supplied 24V Logic Input Power . . . . . . . . . . . . . . A-5
Input Transformer for 24V Control Power . . . . . . . . . . . A-5
Circuit Breakers . . . . . . . . . . . . . . . . . . . . . . . . . . . . . . A-6
External Shunt Resistor Kit for 5 and 10 kW Systems . . . A-8
1394 Shunt Module for the 22 kW System . . . . . . . . . . . A-8
Environmental Specifications . . . . . . . . . . . . . . . . . . . . . . . A-9
Power Dissipation . . . . . . . . . . . . . . . . . . . . . . . . . . . . . . . A-9
System Modules . . . . . . . . . . . . . . . . . . . . . . . . . . . . . A-10
Axis Modules . . . . . . . . . . . . . . . . . . . . . . . . . . . . . . . A-10
Internal Shunt Resistor for the 5 and 10 kW System . . . A-10
Communication Specifications . . . . . . . . . . . . . . . . . . . . . A-11
Dedicated I/O Specifications. . . . . . . . . . . . . . . . . . . . A-11
Dimensions . . . . . . . . . . . . . . . . . . . . . . . . . . . . . . . . . . . A-11
1394 System Module Dimensions . . . . . . . . . . . . . . . . A-12
Axis Module Dimensions . . . . . . . . . . . . . . . . . . . . . . A-13
AC Line Filter Dimensions. . . . . . . . . . . . . . . . . . . . . . A-15
External Shunt Dimensions . . . . . . . . . . . . . . . . . . . . . A-17
Motor Dimensions . . . . . . . . . . . . . . . . . . . . . . . . . . . A-20
Servo Motor Performance Data. . . . . . . . . . . . . . . . . . . . . A-30
MP-Series Performance Data . . . . . . . . . . . . . . . . . . . . A-30
1326AB Performance Data . . . . . . . . . . . . . . . . . . . . . A-31
1326AS Performance Data. . . . . . . . . . . . . . . . . . . . . . A-32
Appendix B
Interconnect Diagrams
Chapter Objectives. . . . . . . . . . . . . . . . . . . . . . . . . . . . . . . B-1
1394 SERCOS Interface Interconnect Diagrams . . . . . . . . . . B-1
1394 SERCOS Interconnections . . . . . . . . . . . . . . . . . . . B-2
Thermal and Brake Interconnect Diagrams . . . . . . . . . . . . . B-7
Understanding Motor Thermal Switches. . . . . . . . . . . . . B-7
How Your Feedback Cable Affects Thermal Switch
Wiring . . . . . . . . . . . . . . . . . . . . . . . . . . . . . . . . . . B-7
Thermal Switch Interconnect Diagrams . . . . . . . . . . . . . B-7
Brake Interconnect Diagrams . . . . . . . . . . . . . . . . . . . B-12
Motor Cable Pin-Outs . . . . . . . . . . . . . . . . . . . . . . . . . . . B-16
MP-Series Motor Feedback Cables. . . . . . . . . . . . . . . . B-16
1326 Motor Feedback Cables. . . . . . . . . . . . . . . . . . . . B-17
MP-Series Motor Power Cables . . . . . . . . . . . . . . . . . . B-18
1326 Motor Power Cables . . . . . . . . . . . . . . . . . . . . . . B-19
Grounding for 1394 CE Requirements. . . . . . . . . . . . . . . . B-21
Allen-Bradley PLCs

Publication 1394-5.20 — July 2001
iv Table of Contents
Appendix C
Catalog Numbers and Accessories
Chapter Objectives. . . . . . . . . . . . . . . . . . . . . . . . . . . . . . . C-1
1394 System Modules. . . . . . . . . . . . . . . . . . . . . . . . . . . . . C-1
1394 Axis Modules . . . . . . . . . . . . . . . . . . . . . . . . . . . . . . C-2
External Shunt Modules . . . . . . . . . . . . . . . . . . . . . . . . . . . C-2
AC Line Filters . . . . . . . . . . . . . . . . . . . . . . . . . . . . . . . . . . C-2
SERCOS Interface Fiber Optic Cables . . . . . . . . . . . . . . . . . C-3
Motor Cables and Connector Kits . . . . . . . . . . . . . . . . . . . . C-4
Miscellaneous Accessories . . . . . . . . . . . . . . . . . . . . . . . . . C-6

Publication 1394-5.20 — July 2001
Preface
Read this preface to familiarize yourself with the rest of the manual.
The preface covers the following topics:
•
Who should use this manual
•
The purpose of this manual
•
Contents of this manual
•
Related documentation
•
Conventions used in this manual
•
1394 product receiving and storage responsibility
•
Allen-Bradley support
Who Should Use this
Manual
Use this manual for designing, installing, or wiring your Allen-
Bradley 1394 SERCOS interface
system. The manual is intended
for engineers or technicians directly involved in the installation and
wiring of the 1394.
If you do not have a basic understanding of the 1394, contact your
local Allen-Bradley representative for information on available
training courses before using this product.
Purpose of this Manual
This manual provides the mounting, wiring, and connecting
procedures for the 1394 SERCOS interface system and standard
Rockwell Automation/Allen-Bradley motors recommended for use
with the 1394.
For system integration with the ControlLogix
SERCOS interface
module (1756-M08SE), refer to the 1394 SERCOS Interface
Integration Manual (publication 1394-IN024x-EN-P). This manual is
available at TheAutomationBookstore.com electronically (as a .pdf)
or in hardcopy.
Allen-Bradley PLCs

Publication 1394-5.20 — July 2001
P-2 Preface
Contents of this Manual
Related Documentation
The following documents contain additional information
concerning related Allen-Bradley products. To obtain a copy,
contact your local Allen-Bradley office or distributor.
Chapter Title Contents
Preface
Describes the purpose, background, and scope of this
manual. Also specifies the audience for whom this
manual is intended.
1
Installing Your 1394 SERCOS
Interface System
Provides mounting information for your 1394 SERCOS
interface system.
2
Connecting Your 1394 SERCOS
Interface System
Provides information on how to connect your 1394
SERCOS interface system components together.
Appendix A Specifications
Provides physical, electrical, environmental, and
functional specifications for the 1394 SERCOS
interface system.
Appendix B Interconnect Diagrams
Provides diagrams showing the interconnections for
the 1394 SERCOS interface system, cable pin-outs,
and installation requirements to meet CE directives.
Appendix C
Catalog Numbers and
Accessories
Provides catalog numbers and descriptions of the
1394 SERCOS interface system and related products.
For: Read This Document: Document Number:
System integration information needed to startup and
troubleshoot the 1394 with the ControlLogix motion module
1394 SERCOS Interface Integration Manual 1394-IN024x-EN-P
A description and specifications for the 1394 family including
1326 motors and motor accessories
Motion Control Selection Guide GMC-SG001x-EN-P
More detailed discussion on use of ControlLogix motion features
and application examples
ControlLogix Motion Module Programming
Manual
1756-RM086x-EN-P
Installation Instructions for the ICP 8 Axis SERCOS interface
Module
ICP 8 Axis SERCOS interface Module
Installation Instructions
1756-IN572x-EN-P
Information on the instructions needed to program a motion
application
Logix5000 Controller Motion Instruction Set
Reference Manual
1756-RM007x-EN-P
Information for configuring and troubleshooting your ControlLogix
motion module
ControlLogix Motion Module Setup and
Configuration Manual
1756-UM006x-EN-P
An article on wire sizes and types for grounding electrical
equipment
National Electrical Code
Published by the National Fire
Protection Association of Boston,
MA.
A glossary of industrial automation terms and abbreviations Allen-Bradley Industrial Automation Glossary AG-7.1

Publication 1394-5.20 — July 2001
Preface P-3
Conventions Used in this
Manual
The following conventions are used throughout this manual:
•
Bulleted lists such as this one provide information, not
procedural steps.
•
Numbered lists provide sequential steps or hierarchical
information.
•
Words that you type or select appear in bold.
•
When we refer you to another location, the section or
chapter name appears in italics.
1394 Product Receiving and
Storage Responsibility
You, the customer, are responsible for thoroughly inspecting the
equipment before accepting the shipment from the freight
company. Check the item(s) you receive against your purchase
order. If any items are obviously damaged, it is your
responsibility to refuse delivery until the freight agent has noted
the damage on the freight bill. Should you discover any
concealed damage during unpacking, you are responsible for
notifying the freight agent. Leave the shipping container intact
and request that the freight agent make a visual inspection of
the equipment.
Leave the product in its shipping container prior to installation.
If you are not going to use the equipment for a period of time,
store it:
•
in a clean, dry location
•
within an ambient temperature range of 0 to 65° C (32 to
149° F)
•
within a relative humidity range of 5% to 95%, non-
condensing
•
in an area where it cannot be exposed to a corrosive
atmosphere
•
in a non-construction area
Allen-Bradley PLCs

Publication 1394-5.20 — July 2001
P-4 Preface
Allen-Bradley Support
Allen-Bradley offers support services worldwide, with over 75
Sales/Support Offices, 512 authorized Distributors and 260
authorized Systems Integrators located throughout the United
States alone, plus Allen-Bradley representatives in every major
country in the world.
Local Product Support
Contact your local Allen-Bradley representative for:
•
sales and order support
•
product technical training
•
warranty support
•
support service agreements
Technical Product Assistance
If you need technical assistance, call your local Allen-Bradley
representative or Rockwell Automation Technical Support at
(440)-646-5800. Please have the catalog numbers of your
products available when you call.

Publication 1394-5.20 — July 2001
Chapter
1
Installing Your 1394 SERCOS Interface
System
Chapter Objectives
This chapter covers the following topics:
•
Complying with European Union directives
•
Before mounting your system
•
Unpacking your modules
•
System mounting requirements
•
Bonding your system
•
Mounting your 1394 SERCOS interface system
•
Mounting the external shunt resistor for 5 and 10 kW system
modules
•
Mounting external shunt modules for 22 kW system modules
ATTENTION
!
The following information is a guideline for
proper installation. The National Electrical Code
and any other governing regional or local
codes overrule this information. The Allen-
Bradley Company cannot assume responsibility
for the compliance or the noncompliance with
any code, national, local or otherwise, for the
proper installation of this system or associated
equipment. If you ignore codes during
installation, hazard of personal injury and/or
equipment damage exists.
Allen-Bradley PLCs

Publication 1394-5.20 — July 2001
1-2 Installing Your 1394 SERCOS Interface System
Complying With European
Union Directives
If this product is installed within the European Union or EEC regions
and has the CE mark, the following regulations apply.
EMC Directive
This unit is tested to meet Council Directive 89/336 Electromagnetic
Compatibility (EMC) using a technical construction file and the
following standards, in whole or in part:
•
EN 50081-2 EMC - Emission Standard, Part 2 - Industrial
Environment
•
EN 50082-2 EMC - Immunity Standard, Part 2 - Industrial
Environment
•
EN 61800-3 EMC - Adjustable Speed Electrical Power Drive
Systems - Second Environment, Restricted Distribution Class
The product described in this manual is intended for use in an
industrial environment.
To meet CE requirements, the following additions are required:
•
You must run three-phase input wiring in a conduit that is
grounded to the enclosure.
•
You must install a power line filter (Allen-Bradley catalog number
SP-74102-006-01, SP-74102-006-02, SP-74102-006-03 or equivalent
based on system current) between the three-phase input line and
the system module input.
Low Voltage Directive
These units are tested to meet Council Directive 73/23/EEC Low
Voltage Directive. The EN 50178-1 Electronic Equipment for Use in
Power Installations and EN 60204-1 Safety of Machinery-Electrical
Equipment of Machines, Part 1-Specification for General Requirements
standards apply in whole or in part.
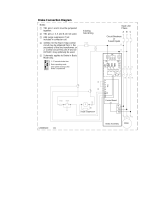
Refer to Appendix B of this document for interconnect information.

Publication 1394-5.20 — July 2001
Installing Your 1394 SERCOS Interface System 1-3
Before Mounting Your
System
Before you mount your 1394 SERCOS interface system make sure you
understand the following:
•
how to store your 1394 before installation
•
how to unpack the system and axis modules
•
the minimum mounting requirements
•
how to determine your mounting hole layout
Storing Your 1394 Before Installation
The 1394 system module and axis modules should remain in their
shipping containers prior to installation. If the equipment is not to be
used for a period of time, store it as follows:
•
Store the equipment in a clean, dry location that is not exposed to
a corrosive atmosphere.
•
Do not store equipment in a construction area.
•
Store within an ambient temperature range of 0 to 65
°
C
(32
to
149°
F).
•
Store within a relative humidity range of 5 to 95%, noncondensing.
Unpacking Modules
Each 1394 system module ships with the following:
•
One system module
•
One system terminator
•
One installation manual (publication 1394-5.20)
•
Mating power connectors (5 and 10 kW Series C only)
•
Mating I/O and feedback connectors
•
Cable shield grounding clamps
Each 1394 axis module ships with the following:
•
One 1394 axis module
•
TB1 and TB2 connectors
•
Cable shield grounding clamp
•
One 1394 axis module information sheet (publication 1394-5.5)
Allen-Bradley PLCs

Publication 1394-5.20 — July 2001
1-4 Installing Your 1394 SERCOS Interface System
Remove all packing material, wedges, and braces from within and
around the components. After unpacking, check the item(s)
nameplate catalog number against the purchase order. Refer to
Appendix C for more information on catalog numbers.
System Mounting
Requirements
There are several things that you need to take into account when
preparing to mount the 1394:
•
The ambient temperature of the location in which you will install
the 1394 must not exceed Environmental Specifications as shown
in Appendix A.
•
You must install the panel on a flat, rigid, vertical surface that
won’t be subjected to shock, vibration, moisture, oil mist, dust, or
corrosive vapors.
•
You have to mount the system vertically.
•
You need to maintain minimum clearances (see Figure 1.1) for
proper airflow, easy module access, and proper cable bend radius.
Refer to Appendix A for mounting dimensions, power dissipation, and
environmental specifications for the 1394.
ATTENTION
!
This drive contains ESD (Electrostatic Discharge)
sensitive parts and assemblies. You are required to
follow static control precautions when you install,
test, service, or repair this assembly. If you do not
follow ESD control procedures, components can be
damaged. If you are not familiar with static control
procedures, refer to Allen-Bradley publication 8000-
4.5.2, Guarding Against Electrostatic Damage or
any other applicable ESD Protection Handbook.

Publication 1394-5.20 — July 2001
Installing Your 1394 SERCOS Interface System 1-5
Figure 1.1
Minimum System and Axis Module Mounting Requirements
Determining Your System Mounting Hole Layout
To prepare your subpanel for mounting:
1. Before you mount your 1394 System, use the following illustration
(refer to Figure 1.2) and table to identify your axis module
combination.
Status
Status
DANGER
RISK OF ELECTRICAL SHOCK. HIGH VOLTAGE MAY
EXIST UP TO FIVE MINUTES AFTER REMOVING POWER.
DANGER
RISK OF ELECTRICAL SHOCK. HIGH VOLTAGE MAY
EXIST UP TO FIVE MINUTES AFTER REMOVING POWER.
50.8 mm (2.0 in.) clearance
for airflow and installation
Allow additional clearance below the system module to provide the recommended cable bend radius. Refer
to the Motion Control Selection Guide (publication GMC-SG001x-EN-P) for more information.
Allow 10.0 mm (0.4 in.) side clearance
Allow 76.2 mm (3.0 in.) clearance
for depth of terminator.
Wire entry area for cable ground clamps
and signal, power, and motor connections.
Allow 10.0 mm (0.4 in.) side clearance
Allow 25.4 mm (1.0 in.) clearance
at cover tab for opening and closing.
Allen-Bradley PLCs

Publication 1394-5.20 — July 2001
1-6 Installing Your 1394 SERCOS Interface System
Figure 1.2
1394 Mounting Hole Layout
2. Once you have identified your axis module combination, modify
your subpanel using the dimensions that correspond with the
combination you chose in step one.
3. Go to Bonding Your System.
Axis Module
Combination
Type of Axis Module Number of
Axes
Cutout Needed?
A
1394x-AM50, or -AM75, and
1394C-AM50-IH, or -AM75-IH
0no
1394x-AM03, AM04, or AM07 up to 4 no
B
1394x-AM50, or -AM75, and
1394C-AM50-IH, or -AM75-IH
1
yes (1394x-AM50 or -AM75)
no (1394C-AM50-IH or -AM75-IH)
1394x-AM03, AM04, or AM07 up to 3 no
C
1394x-AM50, or -AM75, and
1394C-AM50-IH, or -AM75-IH
2
yes (1394x-AM50 or -AM75)
no (1394C-AM50-IH or -AM75-IH)
1394x-AM03, AM04, or AM07 up to 2 no
D
1394x-AM50, or -AM75, and
1394C-AM50-IH, or -AM75-IH
3
yes (1394x-AM50 or -AM75)
no (1394C-AM50-IH or -AM75-IH)
1394x-AM03, AM04, or AM07 up to 1 no
E
1394x-AM50, or -AM75, and
1394C-AM50-IH, or -AM75-IH
4
yes (1394x-AM50 or -AM75)
no (1394C-AM50-IH or -AM75-IH)
Note: When mounting axis module combinations, you must mount the 1394x-AM50, -AM75, -AM50-IH, and -AM75-IH closest to the system module and ahead of the
1394x-AM03, -AM04, and -AM07 axis modules.
50
(1.97)
0
(0.00)
62.5
(2.46)
50
(1.97)
125
(4.92)
100
(3.94)
137.5
(5.41)
175
(6.89)
200
(7.87)
212.5
(8.37)
225
(8.86)
250
(9.84)
275
(10.83)
287.5
(11.32)
B
C
D
E
B
B
B
C
D
E
A
C
C
D
E
DE
19.5
(0.768)
33.5 TYP
(1.32)
67 TYP
(2.64)
8 TYP
(0.32)
M6 tapped hole or
1/4-20 UNC - 2B
385
(15.16)
348
(13.70)
AAA
150
(5.91)
System module
mounting holes
Heatsink
cutout for the
AM50/75
module
only
Heatsink
cutout for the
AM50/75
module
only
Heatsink
cutout for the
AM50/75
module
only
Heatsink
cutout for the
AM50/75
module
only
System
outline
Dimensions are in millimeters and (inches)

Publication 1394-5.20 — July 2001
Installing Your 1394 SERCOS Interface System 1-7
Mounting Your 1394 Through the Back of the Cabinet
The figure below shows an example of the typical mounting of a 1394
system with 1394x-AM50 or -AM75 axis modules. The 1394x-AM50
and -AM75 have heatsinks that mount through the back of the
electrical cabinet.
Figure 1.3
Mounting the 1394 with heatsinks through the back of the cabinet
Bonding Your System
After you have established your panel layout, you need to understand
how to bond your system and subpanels. Bonding is the practice of
connecting metal chassis, assemblies, frames, shields and enclosures
to reduce the effects of electromagnetic interference (EMI).
Bonding Modules
Unless specified, most paints are not conductive and act as insulators.
To achieve a good bond between modules and the subpanel, the
surfaces need to be paint-free or plated. Bonding metal surfaces
creates a low impedance exit path for high frequency energy.
Improper bonding blocks that direct exit path and allows high
frequency energy to travel elsewhere in the cabinet. Excessive high
frequency energy can effect the operation of other microprocessor
controlled equipment. The illustrations that follow (refer to Figure 1.4)
show details of recommended bonding practices for painted panels,
enclosures and mounting brackets.
This configuration requires a gasket between
the 1394x-AM50 or -AM75 and the inside of
the enclosure. use the gasket provided.
Customer-supplied
enclosure
Note:
Allen-Bradley PLCs

Publication 1394-5.20 — July 2001
1-8 Installing Your 1394 SERCOS Interface System
Figure 1.4
Bonding Examples
Stud-mounting the subpanel
to the enclosure back wall
Stud-mounting a ground bus
or chassis to the subpanel
Subpanel Welded stud
Scrape paint
Flat washer
If the mounting bracket is coated with
a non-conductive material (anodized,
painted, etc.), scrape the material
around the mounting hole.
Star washer
Nut
Nut
Flat washer
Mounting bracket or
ground bus
Use a wire brush to remove paint from
threads to maximize ground
connection.
Back wall of
enclosure
Welded
stud
Subpanel
Star washer
Use plated panels or scrape paint on
front of panel.
Subpanel
Nut
Nut
Star washer
Flat washer
Star washer
Star washer
Scrape paint on both sides of
panel and use star washers.
Tapped hole
Bolt
Flat washer
Ground bus or
mounting bracket
If the mounting bracket is coated with
a non-conductive material (anodixed,
painted, etc.), scrape the material
around the mounting hole.
Bolt-mounting a ground bus or chassis to the back-panel

Publication 1394-5.20 — July 2001
Installing Your 1394 SERCOS Interface System 1-9
Bonding Multiple Subpanels
Bonding multiple subpanels creates a common low impedance exit
path for the high frequency energy inside the cabinet. Subpanels that
are not bonded together may not share a common low impedance
path. This difference in impedance may affect networks and other
devices that span multiple panels. Refer to Figure 1.5 for
recommended bonding practices.
Figure 1.5
Bonding Multiple Subpanels
Mounting Your 1394
SERCOS interface System
The procedures in this section assume you have prepared your panel
and understand how to bond your system. To mount your 1394
SERCOS interface system:
1. Install the top mounting fasteners on the subpanel for the system
module and all axis modules. The heads of the fasteners should be
at least 0.25 in. from the panel. Make sure all fasteners are
properly bonded to the subpanel. Refer to the section Bonding
Your System for more information.
2. Hang the 1394 system module on the two fasteners on the left side
of the subpanel.
R
ecommen
d
e
d
:
Bond the top and bottom of each subpanel to the cabinet
using 25.4 mm (1.0 in.) by 6.35 mm (0.25 in.) wire braid
Bonded cabinet
ground bus to
subpanel
Scrape the paint around each fastener to
maximize metal to-metal-contact.
Allen-Bradley PLCs

Publication 1394-5.20 — July 2001
1-10 Installing Your 1394 SERCOS Interface System
3.
4. Hang the AM50/75 axis module on the next mounting fastener.
5. Engage the alignment tab (refer to Figure 1.7).
Figure 1.7
Alignment Tab
If you are mounting a: Do this:
1394x-AM03, -AM04 or
-AM07; 1394C-AM50-
IH, or -AM75-IH axis
module
1. Hang the axis module on the
next mounting fastener.
2. Go to main step 5.
1394x-AM50 or -AM75
axis module with the
heat sink through the
back of the enclosure
(refer to Figure 1.3)
1. Remove the paper backing
from the gasket that came with
the AM50/75 axis module.
2. Position the gasket so that the
sticky side faces the axis
module and the small hole side
is on top.
3. Slide the gasket over the heat
sink and attach it to the back of
the axis module.
Figure 1.6
Gasket Position
4. Go to main step 4.
gasket
Engaged alignment tab
/